Repair Chevrolet Repair Toyota Repair Honda Repair AvtoVAZ Repair Mercedes-Benz Repair BMW Repair Opel
Home  |  Contacts  |  Sitemap  |    
English Русский
Български
Беларускі
Український
Српски
Hrvatski
Română
Polski
Slovenský
Magyar
AudiManual.ru


  • AUDI 80
  • AUDI 100
  • AUDI A3
  • AUDI A4
  • AUDI A6
  • AUDI A8
  • AUDI Q
  • OTHER
  • ARTICLES
A2 (1999-2005)

Valve mechanism — design description (Audi A2)

  • Home
  • Audi
  • A2 (1999-2005)
  • Engine 1.4 l (diesel)
  • Engine repair
  • Valve mechanism — design description
            0
Instructions. After installing the camshaft, the engine must not be started for approximately 30 minutes. The hydraulic tappets must be settled (otherwise the valves will touch the pistons). After working on the valve mechanism, turn the engine by hand at least 2 revolutions to make sure that none of the valves are in contact with the piston. Lubricate the bearing and working surfaces with oil see.
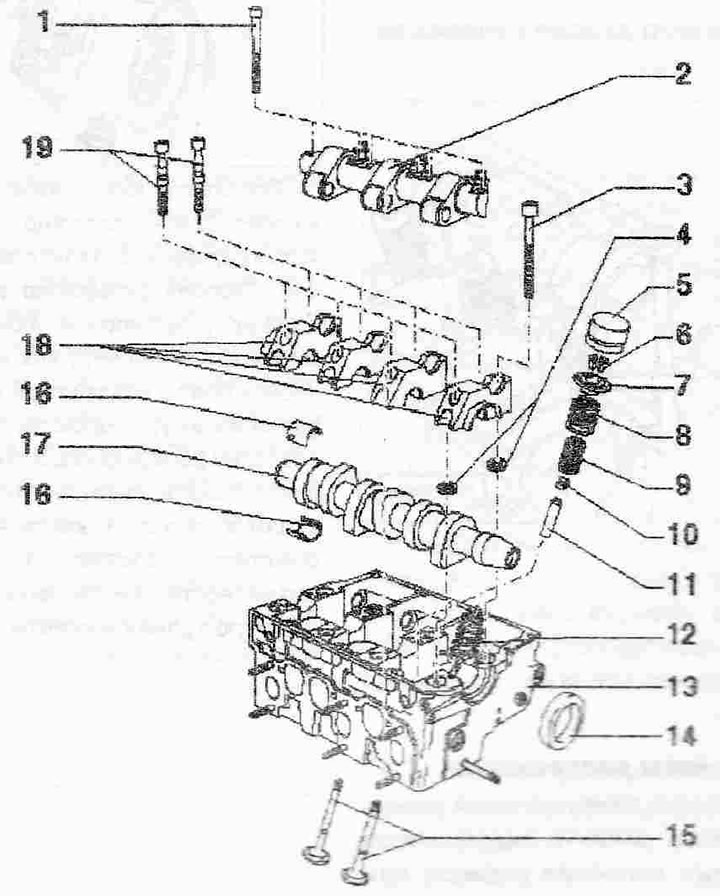

Valve mechanism:

Valve mechanism:
1. Bolt, Replace. Follow the sequence when loosening and tightening the bolts, tighten further 20 Nm + 90°
2. Rocker arm axle. Observe the sequence when loosening and tightening the bolts
3. Bolt. Replace, observe the sequence when loosening and tightening the bolts, before installation insert washers "pos. 4" into the cylinder head
4. Washers for cylinder head bolts. Install in the cylinder head before installing the bearing caps
5. Hydraulic tappet. Check, do not mix up places (mark), fold with the working surface down, check the axial clearance of the camshaft before installation, lubricate the working surface with oil
6. Valve crackers
7. Valve spring plate
8. Outer valve spring. Remove and install with cylinder head installed or remove and install with cylinder head removed using valve spring puller
9. Inner valve spring. Remove and install with cylinder head installed, or remove and install with cylinder head removed using valve spring puller "203710"
10. Oil seal. Replace
I. Valve guide. Check
12. Pump-injector module
13. Cylinder head
14. Sealing cuff. Replace
15. Valves. Check. Valve dimensions cannot be modified, only lapping is allowed
16. Bearing shell. Take into account the installation position. Do not interchange previously used bearing shells (when removing, mark), check the correct position of the locking tabs in the bearing caps and cylinder head
17. Camshaft. Check the radial clearance using Plastigage strips. Radial clearance wear limit: 0.11 mm, runout: max. 0.20 mm
18. Bearing cover. Bearing cover 4 is marked as bearing cover "5". Seal bearing covers 1 and 4 with sealant
19. Bolt. Replace, tighten 8 Nm + 90°
The article was checked by auto expert Daniil Ushakov
This article is available at russian, bulgarian, belarusian, ukrainian, serbian, croatian, romanian, polish, slovak, hungarian

Share information:
Previous articles
Audi A2: Engine repair
Next articles

Removal and installation a toothed belt with a friction-damped…
Toothed belt drive with friction damped tension roller
Removal and installation a toothed belt with a hydraulically…
Toothed belt drive with hydraulically damped tension roller
Checking the axial clearance of the camshaft
Replacing the camshaft seal
Removal and installation the camshaft
Checking hydraulic tappets


Similar articles on other Audi car models:
Technical characteristics of the valve timing mechanism Audi 80 B2 (1979-1986)
Valve timing marks — general description and use Audi 100 C3 (1982-1990, diesel)
Ignition system — general description Audi A3 Type 8L (1996-2003)
Fuel injection system — design description Audi A4 B6 (2000-2006, petrol)
Valve mechanism and valve — design description Audi A6 C5 Allroad (1999-2005)
Valve mechanism Audi A8 D2 (1994-2002)
Valve mechanism Audi Q5 Type 8R (2008-2017)
Link to this page in different formats


Visitor comments

No comments yet


How much will 25 + 28 =


Audi A2(1999-2005) 
  • General information
  • Introduction to the guide
  • Maintenance
  • Engine 1.4 l (gasoline)
  • Engine repair
  • Lubrication system
  • Cooling system
  • Exhaust system
  • Engine 1.6 l (gasoline)
  • Engine repair
  • Lubrication system
  • Cooling system
  • Exhaust system
  • Engine 1.2 l (diesel)
  • Engine repair
  • Lubrication system
  • Cooling system
  • Injection and turbocharging
  • Engine 1.4 l (diesel)
  • Engine repair
  • Lubrication system
  • Cooling system
  • Turbocharging system
  • Supply system
  • Fuel injection system
  • Exhaust system
  • Transmission
  • Mechanical gearbox 02J
  • Mechanical gearbox 02T
  • Mechanical gearbox 085 DS
  • Chassis
  • Car suspension
  • Steering
  • Brake system
  • Body
  • Exterior
  • Interior
  • Seats
  • Doors, locks and windows
  • Safety system
  • Heating and air conditioning
  • Electrical equipment
  • Power devices
  • Equipment and devices
  • Wipers and washers
  • Lighting and lamps
  • Breakers and switches
  • Electrical circuits
 
AudiManual.ru © 2017-2026 · Mobile version · Feedback · Sitemap: EN BG BY UA RS HR RO PL SK HU · Site search · News and articles
80 B2 · 80 B3 petrol · 80 B3 · 80 B4 · 100 C3 diesel · 100 C3 petrol · 100 C3 · 100 C4 petrol · 100 C4 · A3 Type 8L · A4 B5 petrol · A4 B5 · A4 B6 petrol · A4 B6 · A4 B7 · A4 B8 · A6 C4 · A6 C5 · A6 C5 Allroad · A8 D2 · Q5 Type 8R · Q7 Typ 4L · Audi A2 ·
This site uses cookies 🍪. Click the button to accept this fact.