
Repair Chevrolet Repair Toyota Repair Honda Repair AvtoVAZ Repair Mercedes-Benz Repair BMW Repair Opel
Home  |  Contacts  |  Sitemap  |    
English Русский
Български
Беларускі
Український
Српски
Hrvatski
Română
Polski
Slovenský
Magyar
AudiManual.ru


  • AUDI 80
  • AUDI 100
  • AUDI A3
  • AUDI A4
  • AUDI A6
  • AUDI A8
  • AUDI Q
  • OTHER
  • ARTICLES
Q7 Typ 4L (2005-2015, diesel) Q5 Type 8R (2008-2017)

Removal the fuel tank with attachments (Audi Q5-8R)

  • Home
  • Audi Q
  • Q5 Type 8R (2008-2017)
  • Power unit
  • Fuel system (diesel)
  • Removal the fuel tank with attachments
            0
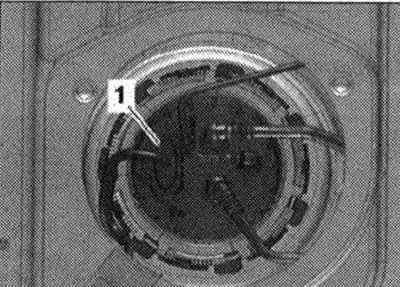
Remove 1/3 of the rear seat on the right. Unscrew the bolts "arrows" and remove the cover "1" of the locking flange. Disconnect the plug "1" from the flange

Remove 1/3 of the rear seat on the right. Unscrew the bolts «arrows» and remove the cover «1» of…


To do this, lift the lock "1" "arrow A", press it "arrow B" and disconnect the plug connector "2".
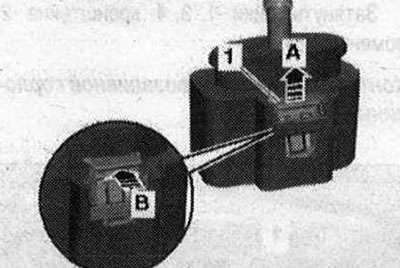
To do this, lift the lock «1» «arrow A», press it «arrow B» and disconnect the plug connector «2».


Open the fuel tank hatch. Clean the area around the fuel tank filler neck. Remove the "arrow" cap from the fuel tank filler neck.
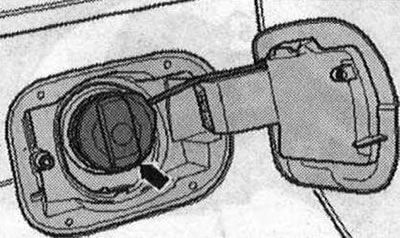
Open the fuel tank hatch. Clean the area around the fuel tank filler neck. Remove the «arrow» cap…


Remove the right rear wheel. Remove the rear right mudguard. Unscrew bolts "1" and "2" of the fuel tank filler neck. Ignore "Pos. 3...7".
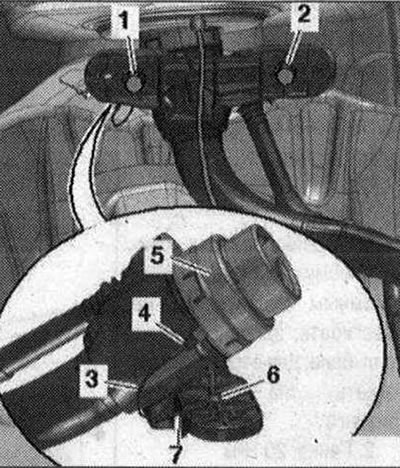


Remove the right rear wheel. Remove the rear right mudguard. Unscrew bolts «1» and «2» of the fuel…


Remove the rear section of the exhaust system. Remove the rear axle. Remove the right underbody trim. Unscrew nuts "1, 3, 4" and remove bracket "2".
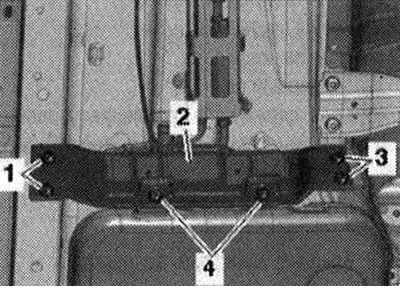
Remove the rear section of the exhaust system. Remove the rear axle. Remove the right underbody…


Disconnect the return fuel line "1" and the supply fuel line "2".
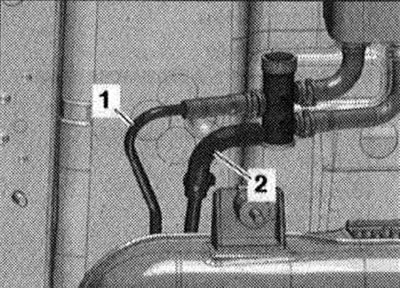
Disconnect the return fuel line «1» and the supply fuel line «2».


On a car with an independent heater, disconnect the fuel line "1" from the metering pump by pressing the release button. Pry up the retainer "2" with a screwdriver and remove the bracket "3" with the metering pump of the independent heater from the fuel tank "in the direction of the arrow".
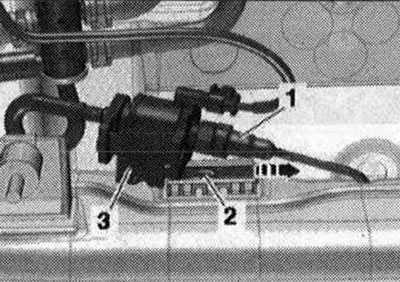


On a car with an independent heater, disconnect the fuel line «1» from the metering pump by…


To maintain balance, place the engine and gearbox bracket under the fuel tank. Support the fuel tank with an engine and gearbox lift.
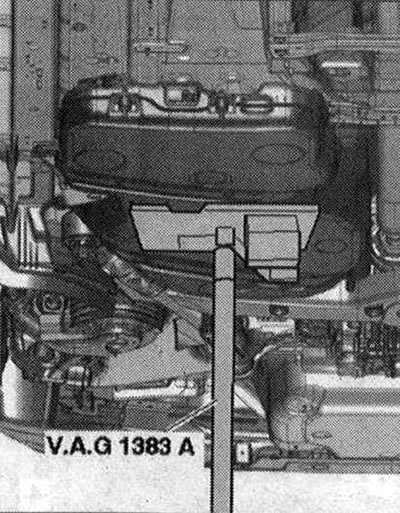
To maintain balance, place the engine and gearbox bracket under the fuel tank. Support the fuel…


Unscrew bolts "1" and remove bracket "2" of the exhaust system. Unscrew bolts "3...6". Lower the fuel tank using an engine and gearbox lift, holding the fuel tank with your hand.
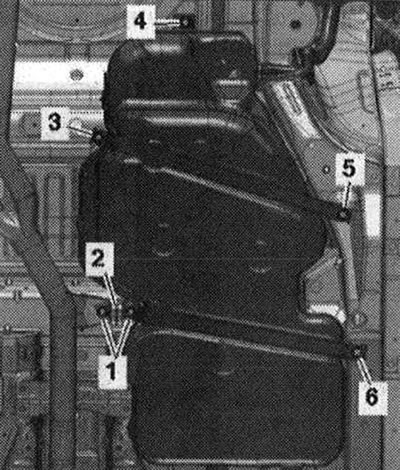
Unscrew bolts «1» and remove bracket «2» of the exhaust system. Unscrew bolts «3...6». Lower the…


Installation


Installation is in the reverse order, taking into account the following. Make sure that the fuel and ventilation lines are secured to the fuel tank. Make sure there are no traces of oxidation on both ends of the ground wire. If found, remove such traces. Make sure that there is no corrosion on the threaded connections "1" and "2" of the fuel tank filler neck, as this may affect the quality of the contact with the body ground. Route the ground connection "3" as shown in the figure. Install the contact tongue "7" of the ground connection in the mounting hole of the fuel tank and press the spacer sleeve inside "6". Check the tightness of the fit of the plug "4" of the ground connection in the mounting hole "5" of the filler neck.
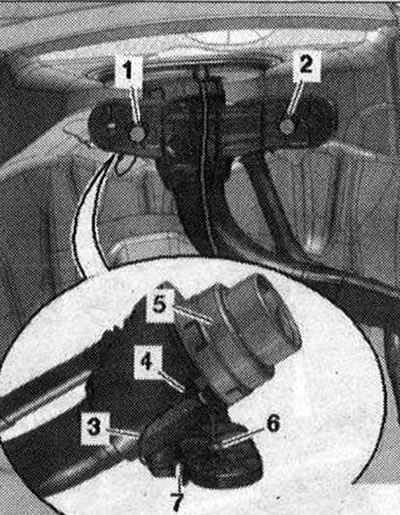


Installation is in the reverse order, taking into account the following. Make sure that the fuel…


Place the fuel tank on the underbody of the vehicle using tie straps and an engine and gearbox jack. When installing the fuel tank, ensure that the filler neck fits correctly into the body opening. Install bracket "2" of the exhaust system and tighten bolts "1...6". Tighten bolts "1" and "2" of the fuel tank filler neck. Install the bracket. Install the right underbody trim. Install the rear axle. Install the rear part of the exhaust system. Install the rear right mudguard. Install the rear right wheel. Install the flange cover. Install 1/3 of the rear seat on the right. On vehicles with an independent heater, bleed the fuel supply line going to the metering pump.
The article was checked by auto expert Timur Bazhenov
This article is available at russian, bulgarian, belarusian, ukrainian, serbian, croatian, romanian, polish, slovak, hungarian

Share information:
Previous articles
Audi Q Q5 Type 8R: Fuel system (diesel)
Next articles

Fuel tank with attachments
Fuel filler flap
Disable protection against incorrect filling
Fuel Delivery Module and Fuel Level Sensor
Removal the fuel supply unit


Similar articles on other Audi car models:
Fuel tank — removal and installation Audi 80 B3 (1986-1991, petrol)
Fuel tank — removal and installation Audi 100 C3 (1982-1990, diesel)
Fuel tank, fuel pump and fuel filter Audi A3 Type 8L (1996-2003)
Fuel tank with attachments, front-wheel drive Audi A4 B8 (2007-2015)
Remote control fuel tank flap Audi A6 C5 (1997-2004)
Fuel expansion tank Audi A8 D2 (1994-2002)
20 liter fuel tank with attachments Audi A2 (1999-2005)
Link to this page in different formats


Visitor comments

No comments yet


How much will 49 + 17 =


Q7 4L(2005-2015, diesel) 
  • General information
  • Operating instructions
  • Maintenance
  • Power unit
  • Diesels 3.0 l (BUG, BUN, CAS)
  • Diesels 3.0 l (CATA, CCMA)
  • Diesels 3.0 l (CJGA/CJGC)
  • Diesels 4.2 l (BTR, CCFA/CCFC)
  • Cooling system
  • Fuel and exhaust system
  • Engine management system
  • Starting and charging
  • Transmission
  • Automatic gearbox
  • Drive shafts
  • Chassis
  • Brake system
  • Front suspension
  • Rear suspension
  • Steering system
  • Body
  • Air conditioner
  • Exterior
  • Interior
  • Electrical equipment
  • Equipment and devices
  • Electrical circuits
 
Q5 8R(2008-2017) 
  • General information
  • User manual
  • Power unit
  • Petrol engine 2.0 l
  • Petrol engine 3.2 l
  • Fuel system (petrol)
  • Diesel 2.0 liter (CA)
  • Diesel 2.0 liter (CG/CJ/CM)
  • Diesel engine 3.0 l
  • Fuel system (diesel)
  • Transmission
  • Manual gearbox 0B1
  • Manual gearbox 0B2
  • Automatic gearbox 0B5
  • Automatic gearbox 0B6
  • Chassis
  • Front suspension
  • Rear suspension
  • Brake system
  • Steering
  • Body
  • Exterior
  • Interior
  • Doors, locks and windows
  • Safety system
  • Ventilation and heating
  • Electrical equipment
  • Power devices
  • Equipment and devices
  • Lighting and alarm
  • Audio system
  • Electrical circuits
 
AudiManual.ru © 2017-2026 · Mobile version · Feedback · Sitemap: EN BG BY UA RS HR RO PL SK HU · Site search · News and articles
80 B2 · 80 B3 petrol · 80 B3 · 80 B4 · 100 C3 diesel · 100 C3 petrol · 100 C3 · 100 C4 petrol · 100 C4 · A3 Type 8L · A4 B5 petrol · A4 B5 · A4 B6 petrol · A4 B6 · A4 B7 · A4 B8 · A6 C4 · A6 C5 · A6 C5 Allroad · A8 D2 · Q5 Type 8R · Q7 Typ 4L · Audi A2 ·
This site uses cookies 🍪. Click the button to accept this fact.