
Repair Chevrolet Repair Toyota Repair Honda Repair AvtoVAZ Repair Mercedes-Benz Repair BMW Repair Opel
Home  |  Contacts  |  Sitemap  |    
English Русский
Български
Беларускі
Український
Српски
Hrvatski
Română
Polski
Slovenský
Magyar
AudiManual.ru


  • AUDI 80
  • AUDI 100
  • AUDI A3
  • AUDI A4
  • AUDI A6
  • AUDI A8
  • AUDI Q
  • OTHER
  • ARTICLES
Q7 Typ 4L (2005-2015, diesel) Q5 Type 8R (2008-2017)

Radiator frame, service position (Audi Q5-8R)

  • Home
  • Audi Q
  • Q5 Type 8R (2008-2017)
  • Body
  • Exterior
  • Radiator frame, service position
            0
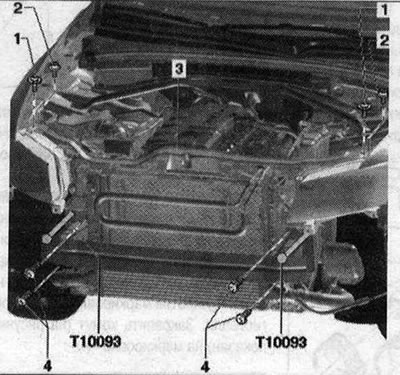
Note: For the service position, do not disconnect or open lines or circuits, such as engine cooling, air conditioning, etc. When installing the radiator frame, make sure that the lines and cables are not compressed or pinched at the attachment points.

Note: For the service position, do not disconnect or open lines or circuits, such as engine…


1/2. Bolt. 10 Nm

3. Radiator frame. Service position: On vehicles with adaptive cruise control (ACC), additionally note the following: if the bumper has been removed and is being reinstalled, or if changes have been made to the ACC holder, the adaptive cruise control must be adjusted. Disconnect the battery terminals. Remove the front bumper. Remove the upper radiator frame trim. Unscrew the bolts under the bumper sound insulation. Unscrew the bolts of the closing panel pillar. Disconnect the cable in the bonnet casing at the attachment point. Unscrew the bolts of the coolant expansion tank. Remove the expansion tank from the holder by moving it upwards. Disconnect the headlight plug connectors. On vehicles with an intercooler, additionally disconnect the pressure hoses. Unscrew the lower bolts on the right and left of the side member. Screw the guide rods "T10093" on the left and right from the outside into the free threaded holes. Unscrew the remaining bolts.


Move the radiator frame forward together with the expansion tank, without stretching the lines, onto the guide rods. When installing the radiator frame, the wires should not be squeezed or pinched. Install in reverse order. After installation, check the headlight adjustment and adjust the headlights if necessary

4. Bolt. 55 Nm. Screw the guide rods "T10093" into the free threaded holes on the left and right from the outside

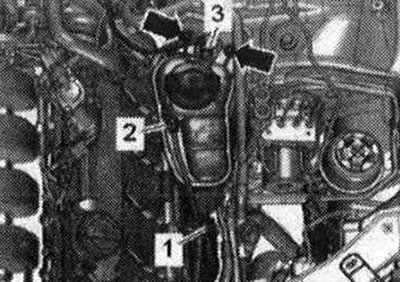
Loosen the coolant expansion tank


Before moving the radiator frame forward, unscrew the nuts "arrows" of the expansion tank and move it from the bottom up from the bushing. When installing, tighten the bolts with a torque of 5 N·m.
Before moving the radiator frame forward, unscrew the nuts «arrows» of the expansion tank and move…
The article was checked by auto expert Timur Bazhenov
This article is available at russian, bulgarian, belarusian, ukrainian, serbian, croatian, romanian, polish, slovak, hungarian

Share information:
Previous articles
Audi Q Q5 Type 8R: Exterior
Next articles

Radiator frame mounting diagram with attachments
Additional amplifiers
Wing assembly diagram
Removal the hood


Similar articles on other Audi car models:
Radiator — removal, inspection, cleaning and installation Audi 80 B3 (1986-1991, petrol)
Radiator — removal, inspection, cleaning and installation Audi 100 C3 (1982-1990, diesel)
Service technology, tools and workplace equipment Audi A3 Type 8L (1996-2003)
Bringing the radiator frame into service position Audi A4 B7 (2004-2008)
Installing the front cross panel in the service position Audi A6 C5 (1997-2004)
Radiator check Audi A8 D2 (1994-2002)
Removal and installation the radiator frame with attachments Audi A2 (1999-2005)
Link to this page in different formats


Visitor comments

No comments yet


How much will 26 + 19 =


Q7 4L(2005-2015, diesel) 
  • General information
  • Operating instructions
  • Maintenance
  • Power unit
  • Diesels 3.0 l (BUG, BUN, CAS)
  • Diesels 3.0 l (CATA, CCMA)
  • Diesels 3.0 l (CJGA/CJGC)
  • Diesels 4.2 l (BTR, CCFA/CCFC)
  • Cooling system
  • Fuel and exhaust system
  • Engine management system
  • Starting and charging
  • Transmission
  • Automatic gearbox
  • Drive shafts
  • Chassis
  • Brake system
  • Front suspension
  • Rear suspension
  • Steering system
  • Body
  • Air conditioner
  • Exterior
  • Interior
  • Electrical equipment
  • Equipment and devices
  • Electrical circuits
 
Q5 8R(2008-2017) 
  • General information
  • User manual
  • Power unit
  • Petrol engine 2.0 l
  • Petrol engine 3.2 l
  • Fuel system (petrol)
  • Diesel 2.0 liter (CA)
  • Diesel 2.0 liter (CG/CJ/CM)
  • Diesel engine 3.0 l
  • Fuel system (diesel)
  • Transmission
  • Manual gearbox 0B1
  • Manual gearbox 0B2
  • Automatic gearbox 0B5
  • Automatic gearbox 0B6
  • Chassis
  • Front suspension
  • Rear suspension
  • Brake system
  • Steering
  • Body
  • Exterior
  • Interior
  • Doors, locks and windows
  • Safety system
  • Ventilation and heating
  • Electrical equipment
  • Power devices
  • Equipment and devices
  • Lighting and alarm
  • Audio system
  • Electrical circuits
 
AudiManual.ru © 2017-2026 · Mobile version · Feedback · Sitemap: EN BG BY UA RS HR RO PL SK HU · Site search · News and articles
80 B2 · 80 B3 petrol · 80 B3 · 80 B4 · 100 C3 diesel · 100 C3 petrol · 100 C3 · 100 C4 petrol · 100 C4 · A3 Type 8L · A4 B5 petrol · A4 B5 · A4 B6 petrol · A4 B6 · A4 B7 · A4 B8 · A6 C4 · A6 C5 · A6 C5 Allroad · A8 D2 · Q5 Type 8R · Q7 Typ 4L · Audi A2 ·
This site uses cookies 🍪. Click the button to accept this fact.