
Warnings: The fuel tank is removed from underneath the vehicle. Use a jack to support the fuel tank.
Even an empty fuel tank contains fuel vapors that are explosive, so use caution.
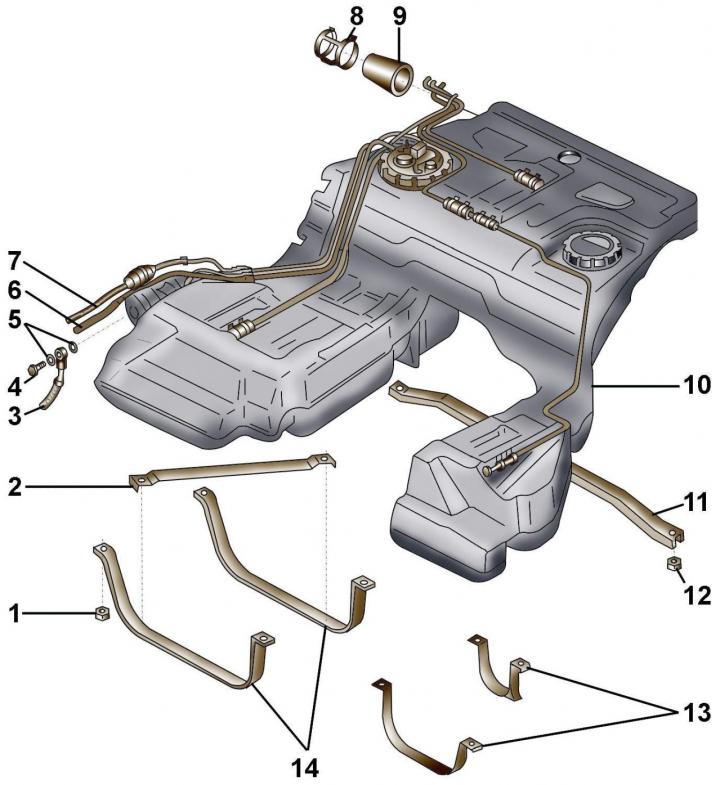
Fig. 4.1–3. Fuel tank: 1 – bolt, 23 Nm; 2 – diagonal cross tape; 3 – fuel supply pipe; 4 – hollow bolt, 23 Nm; 5 – gaskets; 6 – fuel return pipe; 7 – fuel supply pipe; 8 – double hose clamp, 9 – lower hose connection; 10 – fuel tank; 11 – cross beam; 12 – bolt, 23 Nm; 13, 14 – straps for fastening the fuel tank
When installing the fuel tank, pay attention to the different lengths of the straps (Fig. 4.1–3).
Before disconnecting the battery, find out if you have a radio activation code.
Turn off the ignition and disconnect the ground wire from the battery.
Drain the fuel from the fuel tank.
Remove the fuel level sensor/fuel pump covers located on the left and right sides under the trunk carpet.
Disconnect the electrical connectors from the fuel level sensor/fuel pump and move them to the side.
Remove the rear wheels.
Unscrew the four bolts securing the crossbar located under the mufflers.
Unscrew the nuts securing the couplings of the exhaust pipes and disconnect the rear section of the exhaust system.
Remove the two heat shield panels from both sides of the rear axle.
From underneath the vehicle, unscrew the fuel tank covers on both sides of the vehicle.
Disconnect the parking brake cable clamps and move the cable to the side.
Front wheel drive cars
Using a spring compressor, compress the rear suspension springs one at a time and remove them.
Place a jack with a support plate under the rear frame and support the frame with the jack.
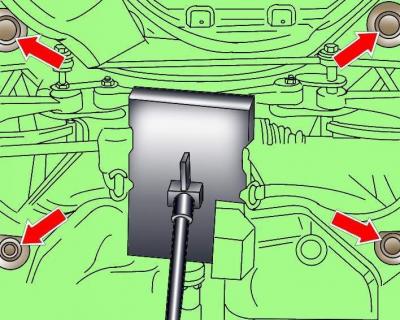
Fig. 4.1–4. Installing the jack and locating the lower rear frame mounting bolts
Unscrew the four bolts securing the lower rear frame (Fig. 4.1–4).
If the fuel tank is removed for a long time, secure the lower frame with bolts after removing it.
All-wheel drive vehicles
Remove the rear axle.
All models
Loosen the double clamp securing the lower hose between the fuel tank and the fuel feed pipe, leaving the lower hose on the fuel tank.
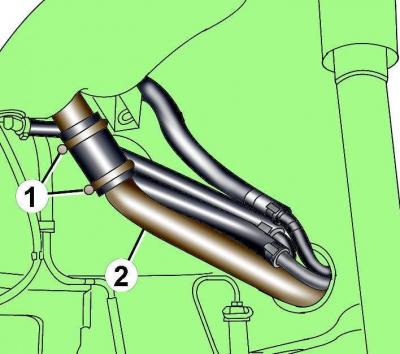
Fig. 4.1–5. Location of fuel tank tubes: 1 – clamps for fastening the tube connecting the expansion chamber to the fuel supply tube; 2 – fuel supply pipe
Loosen clamps 1 (Fig. 4.1–5) and disconnect the tube connecting the expansion chamber to the fuel supply tube, while the connecting tube should remain on the supply tube.
Label the remaining fuel tank pipes and disconnect them.
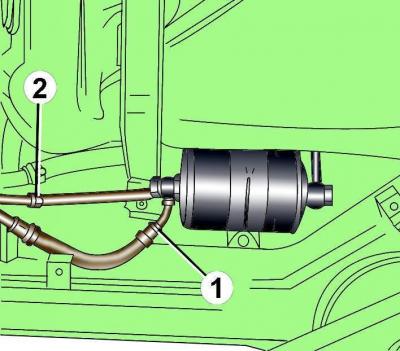
Fig. 4.1–6. Location of fuel supply (1) and return (2) pipes near the fuel filter
Disconnect pipe 1 (Fig. 4.1–6) from the fuel filter.
Disconnect fuel return pipe 2.
Disconnect the electrical connectors on the left and right sides of the crossmember bracket to mount the fuel tank.
Unscrew the nuts and remove the cross beam.
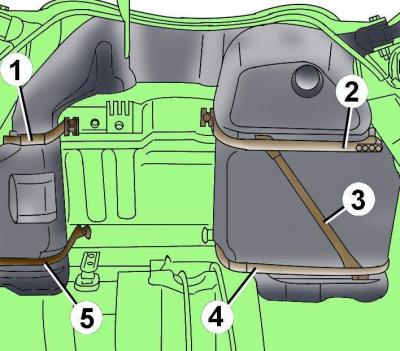
Fig. 4.1–7. Location of fuel tank fastening straps: 1, 2 – front straps; 3 – diagonal tape; 4, 5 – rear straps for fastening the fuel tank
Unscrew the front straps 1 and 2 of the fuel tank fastening (Fig. 4.1–7).
Place a jack with a support plate under the right section of the fuel tank and raise the jack enough so that the weight of the fuel tank is supported by the jack.
Unscrew the rear straps 4 and 5 of the fuel tank (Fig. 4.1–7).
With an assistant, lower the fuel tank, being careful not to bend the fuel lines.
Unscrew the diagonal tape.
Installation
Installation is carried out in the reverse order of removal.
Make sure that parking brake cables are positioned correctly and secured with clamps.

Fig. 4.1–8. Location of fuel pipes before installing the fuel tank: 1 – fuel pipes leading to the fuel tank; 2 – flexible mounting element; 3 – filler neck
Check that the fuel pipes leading to the fuel tank through the opening in the body are positioned as shown in Figure 4.1–8.
Connect the ground wire to the battery.
Start the engine and check the fuel system for leaks.
Turn on radio and enter the code into it.
This article was copied from the website: AudiManual.ru