
Table of contents: Checking the voltage supply ↓ Checking pump performance ↓
The fuel pump is located in the fuel tank.
Warning: Do not use open fire, do not smoke or hold any very hot objects near the work area. There is a risk of accident! Keep a fire extinguisher at hand.
Warning: Ensure adequate ventilation of the work area. Fuel vapors are toxic.
Warning: The fuel system is under pressure. When opening the system, fuel may escape under pressure. Collect fuel with a rag. Wear safety glasses.
Verification conditions: The battery must be fully charged, the voltage should not be less than 11.5 V.
Checking the voltage supply
1. Check fuel pump fuse #28. Replace faulty fuse.
2. Briefly turn on the starter. The fuel pump should start, which should be audible for a short time (about 1 sec). If the ambient noise level is high, you can ask an assistant to listen.
3. If the pump does not work, connect the remote control.
4. Press the remote control switch. If the pump now works, check the fuel pump relay.
If the pump does not work, you need to act as follows:
5. Fold the rear seat back and unscrew the reserve sensor and fuel pump cover.
6. Disconnect the reserve sensor and fuel pump connector.
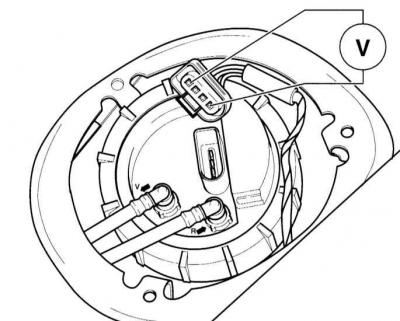
7. Connect a diode test lamp or voltmeter to both outer contacts of the plug.
8. Turn on the remote control. The meter should show battery voltage (about 12 V), otherwise, there is a wire break that should be identified using an electrical diagram and corrected.
9. If the instrument shows battery voltage, remove the fuel reserve sensor.
10. Check if the flange and fuel pump are connected with electrical wires and if there is good contact. Check with an ohmmeter and auxiliary wires if there is a break in the wires between the sensor body and the fuel pump and repair the damage if necessary.
11. If there is no break, replace the fuel pump.
12. Install the fuel pump and reserve sensor, connect the electrical wires.
Checking pump performance
1. Remove the fuel tank cap to relieve fuel pressure.
Warning: The fuel system is under pressure! Before opening the hose connections, place a thick rag on it. Then carefully open the hose and relieve the pressure. Wear protective glasses when doing this.
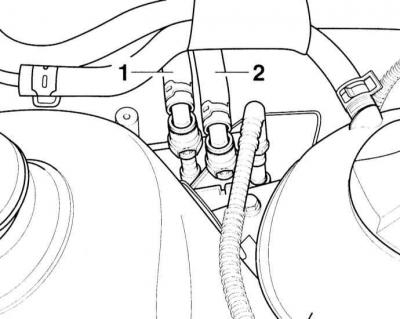
2. Disconnect the fuel return hose at the fuel distribution line by pressing the quick-release button. 1 - Fuel supply line.
3. Connect the auxiliary hose with the intermediate element to the fuel return line from the engine and lower it into the measuring container.
4. Connect the voltmeter to the battery.
5. Press the remote control switch for 15 seconds. Read the indicated battery voltage and record it.
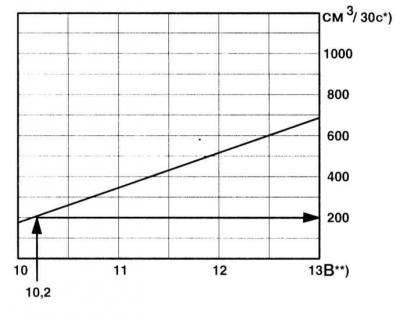
6. Compare the pump performance with the required value on the diagram.
Example: During the test, the battery voltage is 12.5 V. Since the voltage at the fuel pump is 2 V less than the battery voltage, the voltage at the fuel pump is 10.5 V (12.5 – 2 = 10.5). This voltage corresponds to a pump capacity of about 130 cm³/15 s.
*) Minimum productivity, cm³/15 sec.
**) Voltage at the fuel pump with the engine off and the pump running (approximately 2V less than battery voltage).
7. If the supply voltage is OK but the performance is still low, check if the fuel lines are damaged or clogged.
8. Check if the fuel filter is clogged by repeating the performance test with a new fuel filter.
9. If the minimum performance is still not achieved, remove the fuel supply unit and check if the filter screen is clogged. Clean the screen if necessary.
10. If the fault is not found, check the fuel pump check valve (work of the service station).
Warning: If the minimum performance is achieved, but a fuel supply fault is still suspected (for example, periodic stop of supply), check the pump current consumption with an ammeter. Required value: max. 8 A. If the current is higher, replace the fuel pump.
Warning: If the fuel system experiences intermittent problems, a test can be performed while the vehicle is moving. This requires an assistant.
11. Remove the remote control and replace fuse #28.
12. Screw on the fuel tank cap.
13. Put the back seat back in place.