
Repair Chevrolet Repair Toyota Repair Honda Repair AvtoVAZ Repair Mercedes-Benz Repair BMW Repair Opel
Home  |  Contacts  |  Sitemap  |    
English Русский
Български
Беларускі
Український
Српски
Hrvatski
Română
Polski
Slovenský
Magyar
AudiManual.ru


  • AUDI 80
  • AUDI 100
  • AUDI A3
  • AUDI A4
  • AUDI A6
  • AUDI A8
  • AUDI Q
  • OTHER
  • ARTICLES
Q7 Typ 4L (2005-2015, diesel) Q5 Type 8R (2008-2017)

Removal the ATF pan (Audi Q5-8R)

  • Home
  • Audi Q
  • Q5 Type 8R (2008-2017)
  • Transmission
  • Automatic gearbox 0B6
  • Removal the ATF pan
            0
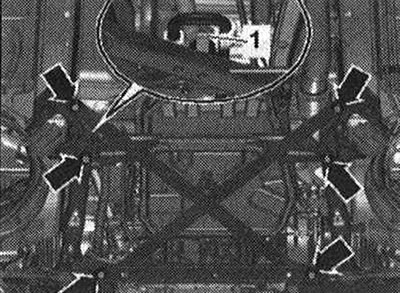
Remove the tunnel cross member. Unscrew the nut "1" of the hydraulic line of the power steering. Risk of damage to chassis parts. If the support of the power unit, steering gear or the spacer cross of the subframe is incorrectly installed, the vehicle must not be placed on the wheels. Using the subframe or the cross of the subframe as a support for the vehicle (for example, when lifting with a jack or similar device) unacceptable! Unscrew the "arrow" bolts and remove the subframe spacer crosspiece.

Remove the tunnel cross member. Unscrew the nut «1» of the hydraulic line of the power steering.…


Drain the ATF oil "arrow". Unscrew the ATF oil pan bolts in the reverse tightening sequence "from 13 to 1". Remove the ATF oil pan.
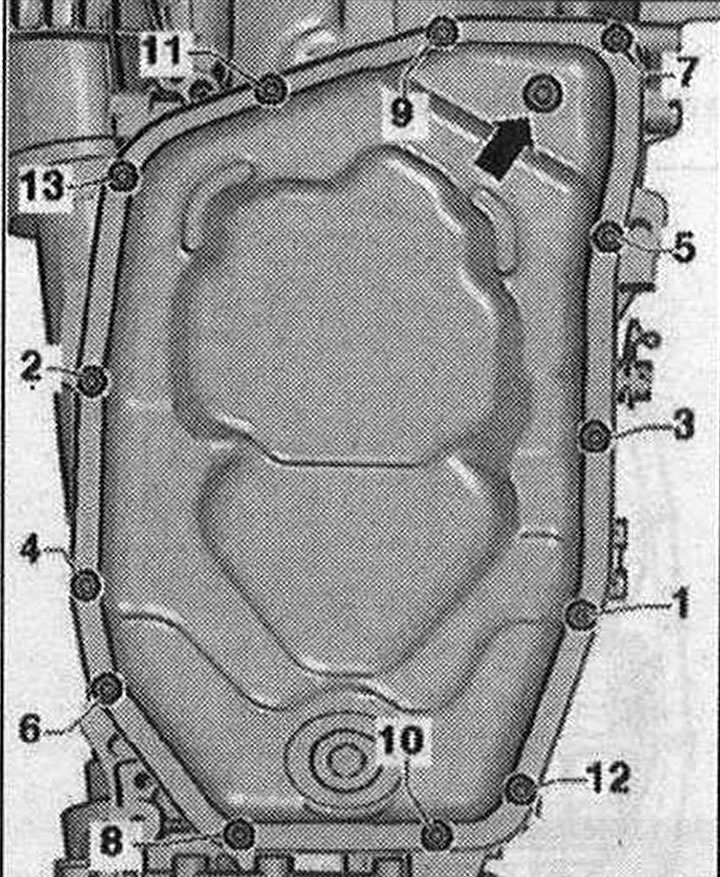
Drain the ATF oil «arrow». Unscrew the ATF oil pan bolts in the reverse tightening sequence «from…


Installation


Install in reverse order. Replace the gaskets. The ATF oil pan bolts must be replaced. In case of high mileage, it is recommended to replace the ATF mesh filter when removing the ATF oil pan. Otherwise, replace the ATF mesh filter only if damaged. Clean all magnets in the grooves of the ATF pan. Make sure that the magnets in the ATF pan are in contact with the entire surface. Thoroughly clean the sealing surface, all traces of the old gasket must be removed. Screw in the 4 guide pins "T40199" with the ATF oil pan removed in positions "10, 11, 12 and 13". The guide pins "T40199" center the seal and the ATF oil pan. This is the only way to ensure optimum sealing of the ATF oil pan. Fit the new seal and the ATF oil pan via the guide pins "T40199". Tighten new ATF oil pan bolts in sequence "1 to 9". Unscrew 4 guide pins "T40199". Screw in the remaining bolts "10,11,12 and 13" in this sequence. Install the subframe spacer crossmember. Install the tunnel crossmember. Fill with ATF.

[The article is a reprint of material from «audimanual»]
The article was checked by auto expert Timur Bazhenov
This article is available at russian, bulgarian, belarusian, ukrainian, serbian, croatian, romanian, polish, slovak, hungarian

Share information:
Previous articles
Audi Q Q5 Type 8R: Automatic gearbox 0B6
Next articles

ATF oil pan, ATF mesh filter and Mechatronics
ATF radiator and ATF lines installation diagram
ATF drain and ATF refill after repair
Checking and adjusting the ATF level
Removal the ATF mesh filter
Filling transmission oil into the front final drive after repair
Checking the level and topping up the transmission oil in the…
Front main gear


Link to this page in different formats


Visitor comments

No comments yet


How much will 14 + 45 =


Q7 4L(2005-2015, diesel) 
  • General information
  • Operating instructions
  • Maintenance
  • Power unit
  • Diesels 3.0 l (BUG, BUN, CAS)
  • Diesels 3.0 l (CATA, CCMA)
  • Diesels 3.0 l (CJGA/CJGC)
  • Diesels 4.2 l (BTR, CCFA/CCFC)
  • Cooling system
  • Fuel and exhaust system
  • Engine management system
  • Starting and charging
  • Transmission
  • Automatic gearbox
  • Drive shafts
  • Chassis
  • Brake system
  • Front suspension
  • Rear suspension
  • Steering system
  • Body
  • Air conditioner
  • Exterior
  • Interior
  • Electrical equipment
  • Equipment and devices
  • Electrical circuits
 
Q5 8R(2008-2017) 
  • General information
  • User manual
  • Power unit
  • Petrol engine 2.0 l
  • Petrol engine 3.2 l
  • Fuel system (petrol)
  • Diesel 2.0 liter (CA)
  • Diesel 2.0 liter (CG/CJ/CM)
  • Diesel engine 3.0 l
  • Fuel system (diesel)
  • Transmission
  • Manual gearbox 0B1
  • Manual gearbox 0B2
  • Automatic gearbox 0B5
  • Automatic gearbox 0B6
  • Chassis
  • Front suspension
  • Rear suspension
  • Brake system
  • Steering
  • Body
  • Exterior
  • Interior
  • Doors, locks and windows
  • Safety system
  • Ventilation and heating
  • Electrical equipment
  • Power devices
  • Equipment and devices
  • Lighting and alarm
  • Audio system
  • Electrical circuits
 
AudiManual.ru © 2017-2026 · Mobile version · Feedback · Sitemap: EN BG BY UA RS HR RO PL SK HU · Site search · News and articles
80 B2 · 80 B3 petrol · 80 B3 · 80 B4 · 100 C3 diesel · 100 C3 petrol · 100 C3 · 100 C4 petrol · 100 C4 · A3 Type 8L · A4 B5 petrol · A4 B5 · A4 B6 petrol · A4 B6 · A4 B7 · A4 B8 · A6 C4 · A6 C5 · A6 C5 Allroad · A8 D2 · Q5 Type 8R · Q7 Typ 4L · Audi A2 ·
This site uses cookies 🍪. Click the button to accept this fact.