
Repair Chevrolet Repair Toyota Repair Honda Repair AvtoVAZ Repair Mercedes-Benz Repair BMW Repair Opel
Home  |  Contacts  |  Sitemap  |    
English Русский
Български
Беларускі
Український
Српски
Hrvatski
Română
Polski
Slovenský
Magyar
AudiManual.ru


  • AUDI 80
  • AUDI 100
  • AUDI A3
  • AUDI A4
  • AUDI A6
  • AUDI A8
  • AUDI Q
  • OTHER
  • ARTICLES
Q7 Typ 4L (2005-2015, diesel) Q5 Type 8R (2008-2017)

Removal the fuel supply unit (Audi Q5-8R)

  • Home
  • Audi Q
  • Q5 Type 8R (2008-2017)
  • Power unit
  • Fuel system (petrol)
  • Removal the fuel supply unit
            0
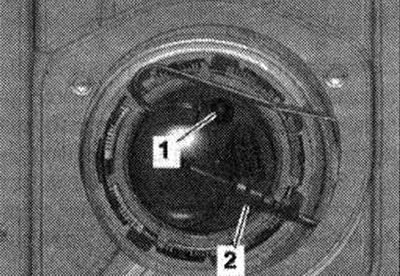
If necessary, drain the fuel tank. If necessary, move the front passenger seat as far forward as possible. Disconnect the battery "arrow". Remove 1/3 of the rear seat on the right. Unscrew the bolts "arrow" and remove the cover "1" of the locking flange. Disconnect the plug "1" from the flange. To do this, move the stopper "1" upwards "arrow A" and press the release button inward "arrow B".

If necessary, drain the fuel tank. If necessary, move the front passenger seat as far forward as…


Disconnect fuel line "2" from the flange by pressing the release button. Disconnect fuel line "1" from the metering pump of the independent heater by pressing the release button.
Disconnect fuel line «2» from the flange by pressing the release button. Disconnect fuel line «1»…


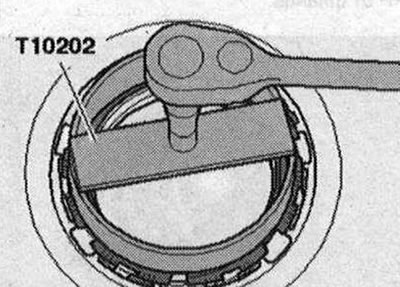
Unscrew the retaining ring using the T10202 puller.
Unscrew the retaining ring using the T10202 puller.


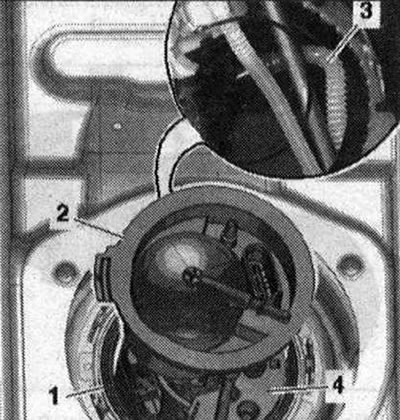
Do not completely remove flange "2" from the fuel tank and remove sealing cuff "1" of the flange. Insert your hand into the fuel tank through the gap between the flange and the mounting hole and carefully remove fuel line "3" from the fuel tank, tilting the flange to the right side of the car. Remove the flange of the fuel supply module "4" from the opening of the fuel tank and put it aside with the lines connected.


Do not completely remove flange «2» from the fuel tank and remove sealing cuff «1» of the flange.…


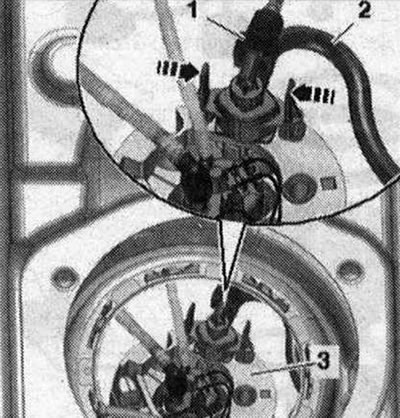
Insert your hand into the fuel tank through the mounting hole and unlock the ejector pump "arrows". Carefully pull the ejector pump "1" with the connected working line of the ejector "2". Disconnect the working fuel line from the ejector pump by pressing the release button. Remove the ejector pump.
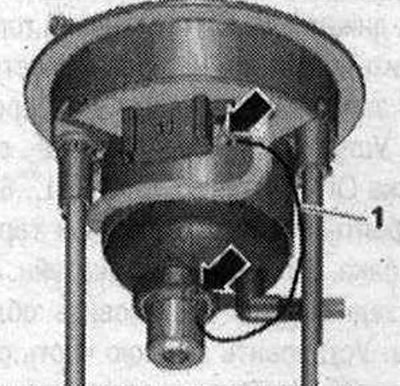
Insert your hand into the fuel tank through the mounting hole and unlock the ejector pump «arrows».…


Carefully insert your hand into the fuel tank through the mounting hole and remove the fuel delivery module "3". When removing the fuel delivery module, make sure that the float of the fuel level sensor "G" does not bend.

Installation


Installation in reverse order, replacing the sealing ring. When installing the fuel supply module, ensure that the float of the fuel level sensor "G" is not bent. Monitor the tightness of the fuel hoses. Make sure that the ground wire "1" of the fuel pressure regulator is securely fastened to the flange of the "arrow".
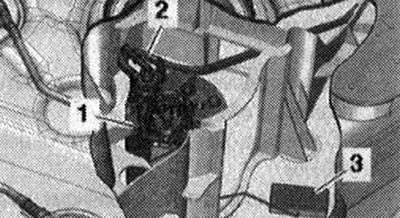


Installation in reverse order, replacing the sealing ring. When installing the fuel supply module,…


Insert fuel supply module "1" into the fuel tank (flange set aside), in doing so, take into account the installation position of the fuel level sensor "G". Float "3" of the fuel level sensor "G" must be directed through the opening in the oil separator to the right side of the car. Insert the ejector pump "2" into the fuel tank and connect the working line of the ejector.
Insert fuel supply module «1» into the fuel tank (flange set aside), in doing so, take into account…


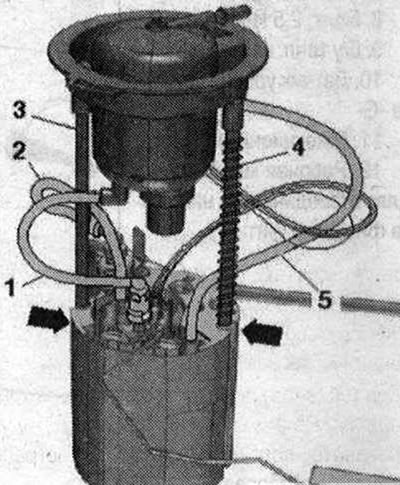
The ejector pump must be routed in the direction of travel between the 2 oil separator jumpers. Secure the ejector pump in the fuel supply module. To do this, insert your hand through the mounting hole in the fuel tank. The moment the ejector pump is secured must be clearly audible. Make sure that the working line of the ejector pump ejector is securely fixed. For greater clarity, the fuel tank is shown partially in section. Insert flange "2" with the fuel line into the fuel tank. To do this, tilt the flange to the right and carefully insert the fuel line "3" into the fuel tank. Stretch the new sealing ring "1" of the flange over the flange and install it dry. Ensure that the fuel hoses and wires are routed correctly, as shown in the figure: the fuel line must pass "1" in front of the guide tube "3". The working line of the ejector must pass "2" behind the guide tube "3". The fuel supply The line "5" of the independent heater must pass behind the guide tube "4". Insert the guide tubes "3" and "4" of the flange into the guide holes "arrows" of the fuel supply module.


The ejector pump must be routed in the direction of travel between the 2 oil separator jumpers.…


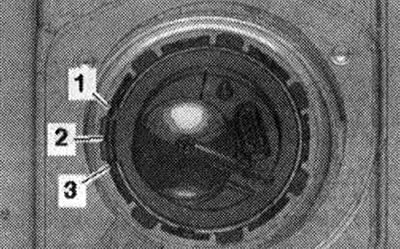
For clarity, the fuel supply module is shown without the fuel tank. Bring the cover to the installation position. Tab "2" on the flange faces the rear of the car and should be between tabs "1" and "3" of the fuel tank.

Tighten the locking ring with the "T10202" key. Connect the fuel lines "1,2".
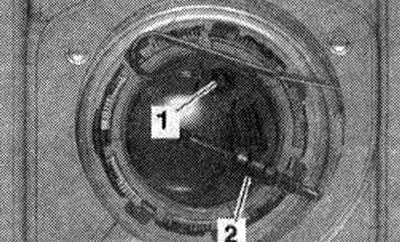
Tighten the locking ring with the «T10202» key. Connect the fuel lines «1,2».


Connect the plug connector. Install the flange cover. Install 1/3 of the rear seat on the right. Connect the battery, following the instructions after connecting the battery. After installing the fuel supply unit, fill the car with at least 5 liters of fuel. On a car with an independent heater, bleed the fuel supply line going to the metering pump.
The article was checked by auto expert Timur Bazhenov
This article is available at russian, bulgarian, belarusian, ukrainian, serbian, croatian, romanian, polish, slovak, hungarian

Share information:
Previous articles
Audi Q Q5 Type 8R: Fuel system (petrol)
Next articles

Electrical test of fuel pre-supply pump «G6»
Fuel Delivery Module and Fuel Level Sensor
Fuel tank
Checking the fuel level sensor «G»
Fuel level sensor «G»
Fuel filter
Removal air from the fuel system


Similar articles on other Audi car models:
Electrical diagram of the fuel pump, fuel injection system,… Audi 80 B4 (1991-1996)
Mono-Motronic injection system control unit, fuel pump relay,… Audi 100 C4 (1990-1994, petrol)
Control unit for Motronic, fuel pump relay, injectors... Audi A3 Type 8L (1996-2003)
The most important parts of the fuel supply system Audi A4 B6 (2000-2006, petrol)
Electrical diagram of the Motronic control unit, fuel pump… Audi A6 C5 (1997-2004)
Draining water from the fuel filter of a V6 TDI diesel engine Audi A8 D2 (1994-2002)
Safety precautions when working with the fuel supply system Audi A2 (1999-2005)
Link to this page in different formats


Visitor comments

No comments yet


How much will 42 + 20 =


Q7 4L(2005-2015, diesel) 
  • General information
  • Operating instructions
  • Maintenance
  • Power unit
  • Diesels 3.0 l (BUG, BUN, CAS)
  • Diesels 3.0 l (CATA, CCMA)
  • Diesels 3.0 l (CJGA/CJGC)
  • Diesels 4.2 l (BTR, CCFA/CCFC)
  • Cooling system
  • Fuel and exhaust system
  • Engine management system
  • Starting and charging
  • Transmission
  • Automatic gearbox
  • Drive shafts
  • Chassis
  • Brake system
  • Front suspension
  • Rear suspension
  • Steering system
  • Body
  • Air conditioner
  • Exterior
  • Interior
  • Electrical equipment
  • Equipment and devices
  • Electrical circuits
 
Q5 8R(2008-2017) 
  • General information
  • User manual
  • Power unit
  • Petrol engine 2.0 l
  • Petrol engine 3.2 l
  • Fuel system (petrol)
  • Diesel 2.0 liter (CA)
  • Diesel 2.0 liter (CG/CJ/CM)
  • Diesel engine 3.0 l
  • Fuel system (diesel)
  • Transmission
  • Manual gearbox 0B1
  • Manual gearbox 0B2
  • Automatic gearbox 0B5
  • Automatic gearbox 0B6
  • Chassis
  • Front suspension
  • Rear suspension
  • Brake system
  • Steering
  • Body
  • Exterior
  • Interior
  • Doors, locks and windows
  • Safety system
  • Ventilation and heating
  • Electrical equipment
  • Power devices
  • Equipment and devices
  • Lighting and alarm
  • Audio system
  • Electrical circuits
 
AudiManual.ru © 2017-2026 · Mobile version · Feedback · Sitemap: EN BG BY UA RS HR RO PL SK HU · Site search · News and articles
80 B2 · 80 B3 petrol · 80 B3 · 80 B4 · 100 C3 diesel · 100 C3 petrol · 100 C3 · 100 C4 petrol · 100 C4 · A3 Type 8L · A4 B5 petrol · A4 B5 · A4 B6 petrol · A4 B6 · A4 B7 · A4 B8 · A6 C4 · A6 C5 · A6 C5 Allroad · A8 D2 · Q5 Type 8R · Q7 Typ 4L · Audi A2 ·
This site uses cookies 🍪. Click the button to accept this fact.