



Table of contents: Removal the headlight housing ↓ Installation ↓ Replacement of low beam headlight… ↓ Installation ↓ Replacement of high beam headlight… ↓ Installation ↓ Replacement of parking light bulb… ↓ Installation ↓ Replacing a daytime running light… ↓ Installation ↓ Replacing the front side marker… ↓ Installation ↓ Replacing the front turn signal lamp… ↓ Installation ↓ Removal the headlight corrector… ↓ Installation ↓ Installing the headlight housing… ↓
Note: After carrying out activities that may affect the headlight adjustment, the headlights should be adjusted again.
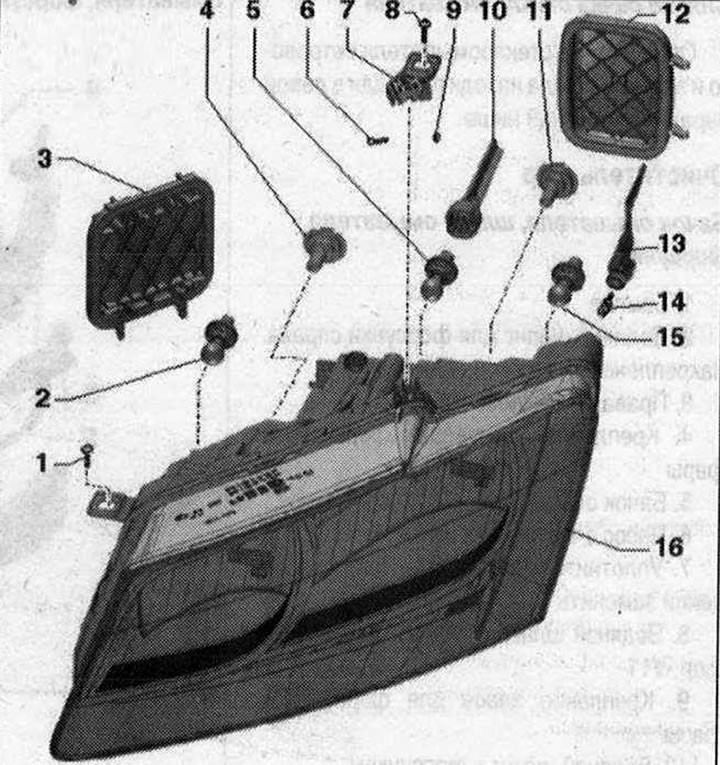
Part 1. Headlights 1. Bolt 4.5 Nm; 2. Front turn signal lamp: Front left turn signal lamp "M5"; front right turn signal lamp "M7". 12 V, 24 W. Yellow; 3. Housing cover for high beam and turn signal; 4. High beam headlight bulb: left high beam headlight bulb "M30"; right high beam headlight bulb "M32". 12 V, 55 W (H7); 5. Daytime running light. Daytime running light left "L174". Daytime running light right "L175". 12 V, 13 W; 6. Bolt. 4.5 Nm; 7. Headlight housing bracket; 8. Bolt. 4.5 Nm; 9. Self-locking nut. Replace; 10. Decoding the lamp symbols for daytime driving lamps; 11. Low beam headlight bulb: left low beam headlight bulb "M29"; right low beam headlight bulb "M31". 12 V, 55 W (H7); 12. Housing cover for low beam/daytime running light/parking light; 13. Decoding the symbols of the front side marker light bulb; 14. Front side marker light bulb (only for cars in the set for the USA). Front left side marker light bulb "M33". Front right side marker light bulb "M34". 12 V, 5 W; 15. Parking light/daylight lamp. Left parking light "M1". Right parking light lamp "MZ". Lamp left of the daytime running light system "L174". Lamp right of the daytime running light system "L175". 12 V, 13 W; 16. Headlight housing
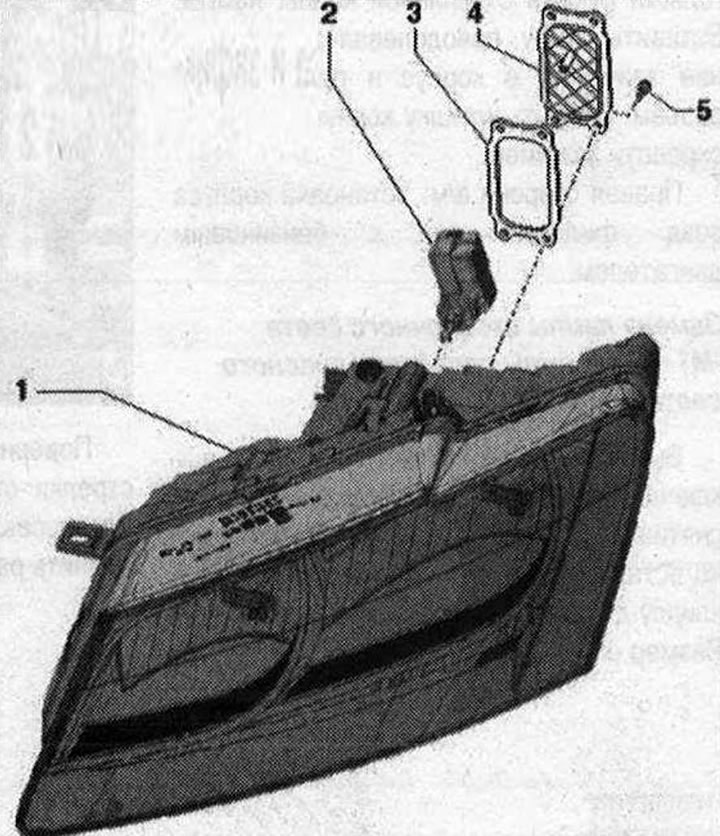
Part 2. Repair kits for other cars 1. Headlight housing; 2. Headlight corrector actuator: left headlight corrector actuator "V48"; executor electric motor of the right headlight corrector "V49"; 3. Sealing ring. Not supplied separately as a spare part; 4. Headlight Aiming Motor Housing Cover. To replace the actuator motor, the headlight housing must be cut. A housing cover is supplied for subsequent covering of the mounting hole; 5. Bolt from the repair kit of the actuator motor for adjusting the angle of the headlights. 2 Nm
Removal the headlight housing
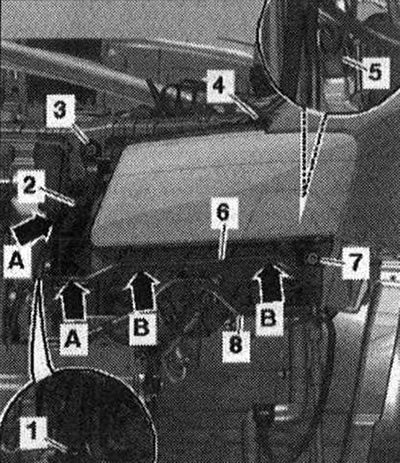
Turn off the ignition. Set the light switch to position "0". Remove the front bumper trim. Disconnect the electrical plug connection "5". Release the wiring harness "6" from the bracket by opening the crimps "arrows B" and cutting the clamps "arrows A". If available, remove the headlight washer hose "8" from the clamps. Disconnect the front Airbag collision sensor connector. Unscrew the bolts "1,3,4,7" and remove the headlight bracket "2" with the headlight housing. When replacing the headlight housing, it is necessary to remove the bracket mount.
Installation
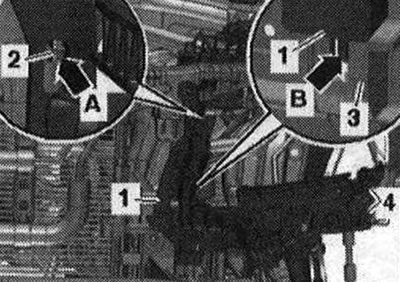
Installation in reverse order: place the headlight housing "3" with the bracket on the radiator frame and wing arch. Tighten the bolts "1,2,4,5" tightly.
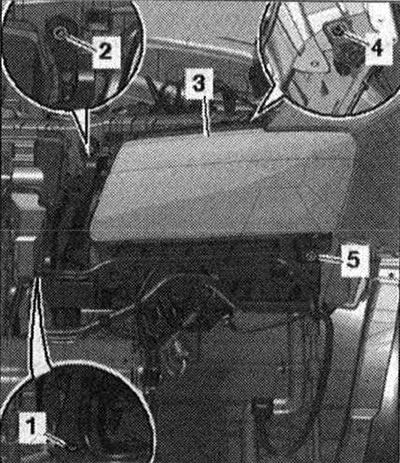
The guide nose "arrow B" on the bracket "1" of the headlight housing must enter the groove of the radiator frame "3". Guides "2" and "4" must enter the fasteners "arrow A". Install the front bumper trim.
Set gaps "3" to the contours of the body. Gap size = gap uniformity. Remove the front bumper trim. Tighten bolts "1, 2,4, 5". Install the front bumper trim. Check the gaps again, if necessary, repeat the gap adjustment as described at the beginning. Adjust the position of the headlights.
Replacement of low beam headlight bulb "M29" / "M31"
Turn off the ignition. Set the light switch to the "O" position. To remove the "arrow" spacer clips, carefully insert pin "1" at a distance "x" into the clip until you hear "arrow A" locking. Size "x" = 5 mm.
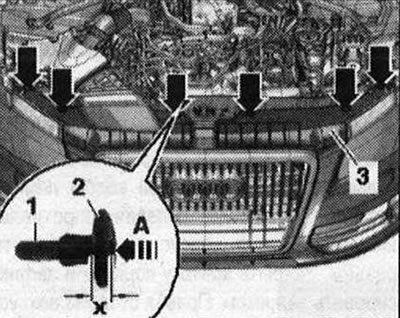
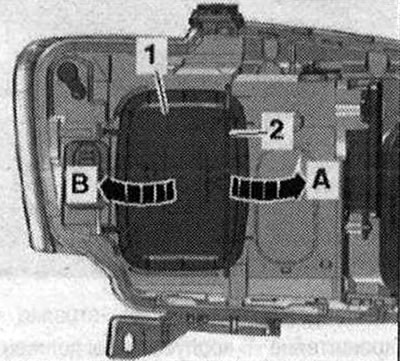
Remove the unlocked clip "2" with the pin. Lift the cover "3" on the radiator frame and hang it on the radiator grille. Right side of the car: remove the air filter housing: cars with a gasoline engine. Open the clamp -2 "arrow A". Turn the housing cover "1" towards "arrow B" and remove it.
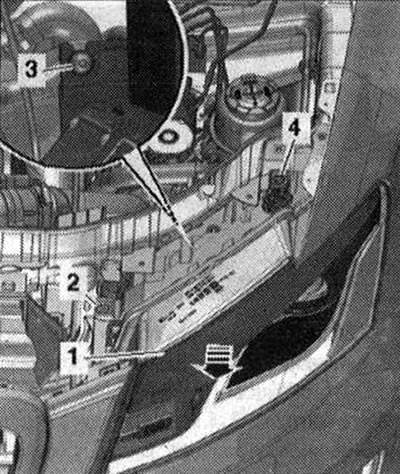
Unscrew bolts "2" and "4". Loosen bolt "3" by 3 turns. Press headlight housing "1" in the direction of the "arrow" until it stops forward.
Remove lamp -1 from the spring clips "arrows". Disconnect plug connection "2" of the lamp.
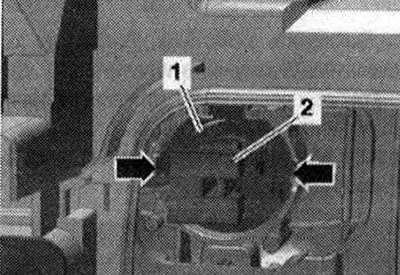
Installation
Installation in reverse order: insert the new bulb into the housing, avoiding touching the glass bulb with bare hands. Insert the bulb, overcoming the resistance of the clamps, into the housing and connect the connector. Close the housing cover and secure with a clamp. Right side of the car: install the air filter housing: cars with a gasoline engine. Install the radiator frame trim on the radiator grille.
Replacement of high beam headlight bulb "M30" / "M32"
Turn off the ignition. Set the light switch to position "0". Right side of the car: remove the air filter housing: cars with a petrol engine. Open the clamp "2" "arrow". Turn the housing cover "1" to the side and remove it.
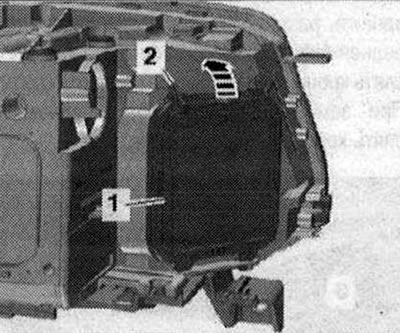
Remove lamp "2" from the spring clips "arrows". Disconnect plug connection "1" of the lamp.
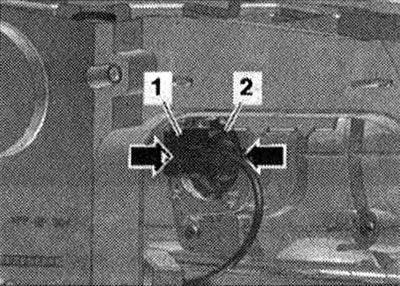
Installation
Installation in reverse order: insert the new lamp into the housing, without touching the glass bulb of the lamp with bare hands. Insert the lamp, overcoming the resistance of the clamps, into the housing and connect the connector. Close the housing cover and fix it with a clamp.
Right side of the vehicle: Installing the air filter housing: vehicles with a gasoline engine.
Replacement of parking light bulb "M1" / "M3", front daytime running light bulb "L174" / "L175"
Turn off the ignition. Set the light switch to the "O" position. To remove the "arrow" spacer clips, carefully insert pin "1" at a distance "x" into the clip until you hear "arrow A" locking. Size "x" = 5 mm.
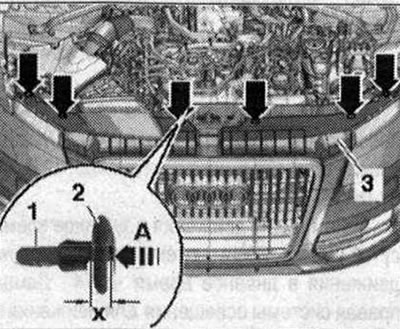
Remove the unlocked clip "2" with the pin. Lift the cover "3" on the radiator frame and hang it on the radiator grille. Right side of the car: remove the air filter housing: cars with a gasoline engine. Open the clip "2" "arrow A". Turn the housing cover "1" towards "arrow B" and remove it.
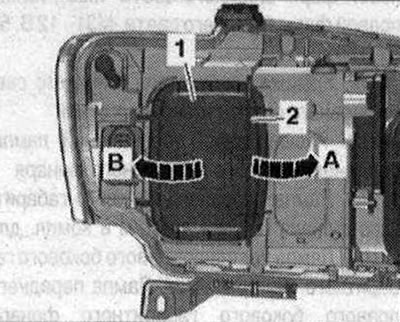
Unscrew bolts "2" and "4". Loosen bolt "3" by 3 turns. Press headlight housing "1" in the direction of the "arrow" until it stops forward.
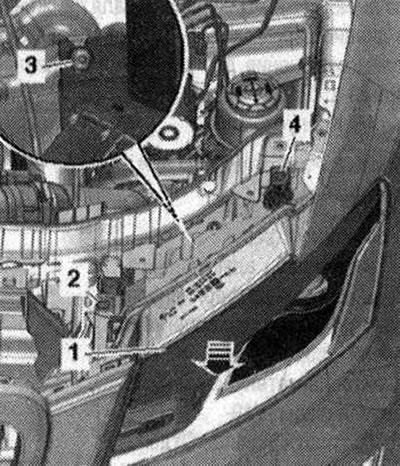
Turn lamp "1" counterclockwise "arrow" and remove from the housing. Unlock spring latch "4" and disconnect connector "3" from lamp "2".
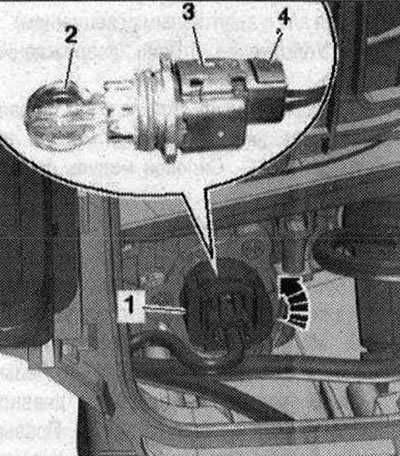
Installation
Installation in reverse order: insert the new bulb into the headlight, avoiding touching the glass bulb with bare hands. Close the housing cover and secure with the clamp. Right side of the car: install the air filter housing: cars with a gasoline engine. Install the radiator frame trim on the radiator grille.
Replacing a daytime running light bulb "L174" / "L175"
Switch off the ignition. Set the light switch to position "0". To remove the spacer clips "arrows", carefully insert pin "1" into the clip by distance "x" until you hear it lock "arrow A". Size "x" = 5 mm. Remove the unlocked clip "2" with the pin. Lift cover "3" on the radiator frame and hang it on the radiator grille. Right side of the vehicle: remove the air filter housing: vehicles with a petrol engine. Open clamp -2 "arrow A". Turn the housing cover "1" towards "arrow B" and remove it. Unscrew bolts "2" and "4". Loosen bolt "3" by 3 turns. Press headlight housing "1" in the direction of the "arrow" forward until it stops. Turn key "1" of the lamp counterclockwise "arrow" and remove it from the housing. Release the spring latch "4" and disconnect the connector from the lamp "2".
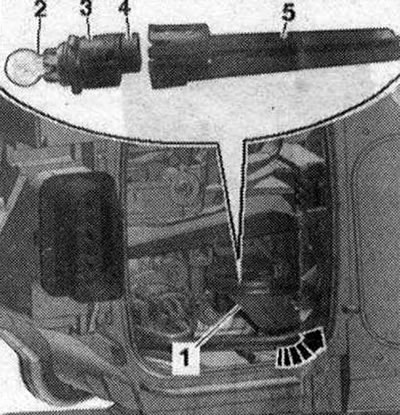
Key "5" cannot be removed from connector "3".
Installation
Installation in reverse order: insert the new bulb into the headlight, avoiding touching the glass bulb with bare hands. Close the housing cover and secure with the clamp. Right side of the car: install the air filter housing: cars with a gasoline engine. Install the radiator frame trim on the radiator grille.
Replacing the front side marker light bulb "M33" / "M34"
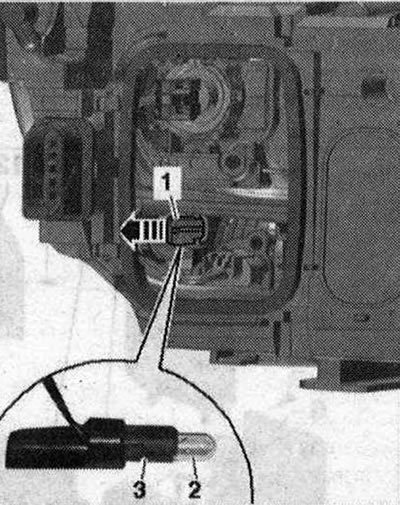
Switch off the ignition. Set the light switch to position "0". To remove the spacer clips "arrows", carefully insert pin "1" a distance "x" into the clip until you hear it lock "arrow A". Dimension "x" = 5 mm. Remove the unlocked clip "2" with the pin. Lift cover "3" on the radiator frame and hang it on the radiator grille. Right side of the car: remove the air filter housing. Open clamp "2" "arrow A". Turn the housing cover "1" towards "arrow B" and remove it. Unscrew bolts "2" and "4". Loosen bolt "3" by 3 turns. Press headlight housing "1" in the direction of the "arrow" until it stops forward. Remove key "1" for the bulb from the housing "arrow". Remove bulb "2" from socket "3".
Installation
Installation in reverse order: insert the new bulb into the headlight, being careful not to touch the glass bulb with bare hands. Close the housing cover and secure with the clamp. Right side of the car: install the air filter housing. Install the radiator frame trim on the radiator grille.
Replacing the front turn signal lamp "M5" / "M7"
Turn off the ignition. Set the light switch to position "0". Right side of the car: remove the air filter housing: cars with a gasoline engine.
Open clamp "2" "arrow". Turn housing cover "1" to the side and remove it.
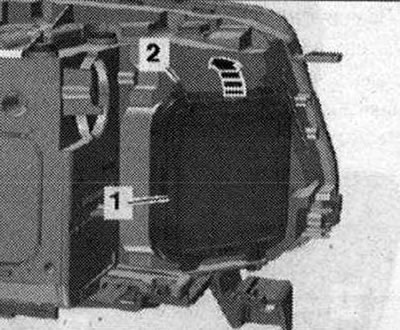
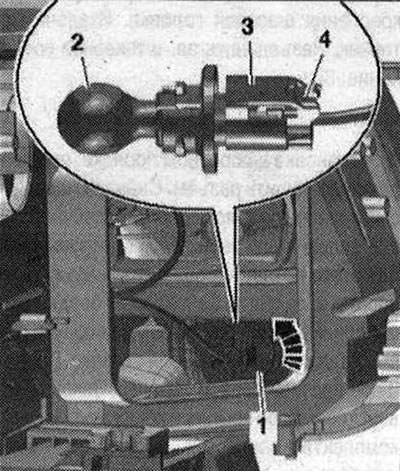
Turn lamp "1" counterclockwise "arrow" and remove from the housing. Unlock spring latch "4" and disconnect connector "3" from lamp "2".
Installation
Installation in reverse order: insert the new bulb into the headlight, without touching the glass bulb with bare hands. Close the housing cover and secure with a clamp.
Right side of the vehicle: Installing the air filter housing: vehicles with a gasoline engine.
Removal the headlight corrector actuator motor "V48" / "V49"
To replace the headlight angle adjustment actuator motor, the headlight housing must be cut with a sharp carpet knife in the designated place. A housing cover is supplied for subsequent closing of the mounting hole. Remove the headlight housing. Cut out the plug "5" from the headlight housing with a sharp carpet knife. Open the clamp "2". Turn the housing cover "1" to the side and remove it. Turn the headlight adjustment motor "4": left headlight counterclockwise; right headlight clockwise.
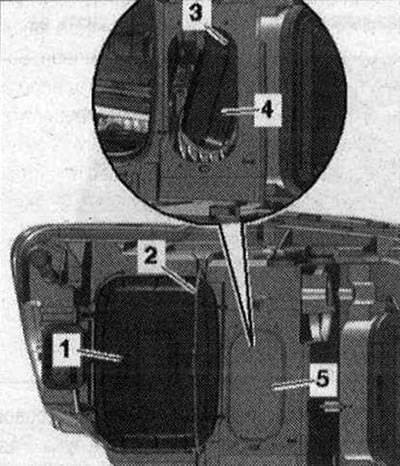
Move the ball head of the adjusting rod, turning the motor upward, from the ball head mount. Remove the motor. Disconnect the electrical plug connection "3".
Installation
Installation in reverse order: when inserting, connect the connector. First, push the ball head of the adjustment axis into the reflector ball head mount from below, to do this, pull the reflector back. Install and close the bayonet connection of the headlight adjustment motor on the headlight housing. Left headlight clockwise. Right headlight counterclockwise. Close the hole in the headlight with the housing cover "1" from the spare parts repair kit. Tighten the bolts "arrows".
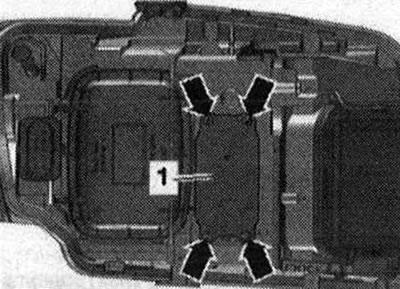
Install the headlight housing.
Installing the headlight housing repair kit
If the headlight mounting plates are damaged, the headlights on the vehicle must be replaced completely before 22.03.2009. Damaged headlight mounting plates can be replaced from 23.03.2009 by installing a repair kit. This eliminates the need to completely replace the headlight. Remove the headlight with the damaged mounting plate. Remove the remainder of the damaged mounting plate from the headlight housing. Install mounting plate "2" from the repair kit onto headlight housing "3" and screw it on with bolts "1".
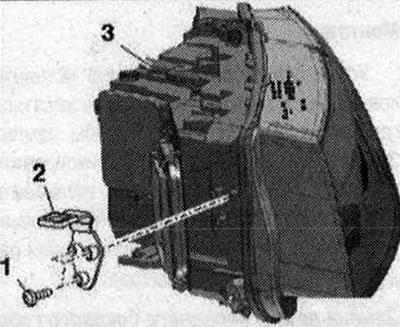
Mounting plate to headlight housing: 6 Nm.
(The original article is available on the website audimanual)