Repair Chevrolet Repair Toyota Repair Honda Repair AvtoVAZ Repair Mercedes-Benz Repair BMW Repair Opel
Home  |  Contacts  |  Sitemap  |    
English Русский
Български
Беларускі
Український
Српски
Hrvatski
Română
Polski
Slovenský
Magyar
AudiManual.ru


  • AUDI 80
  • AUDI 100
  • AUDI A3
  • AUDI A4
  • AUDI A6
  • AUDI A8
  • AUDI Q
  • OTHER
  • ARTICLES
Q7 Typ 4L (2005-2015, diesel) Q5 Type 8R (2008-2017)

Windscreen washer (Audi Q5-8R)

  • Home
  • Audi Q
  • Q5 Type 8R (2008-2017)
  • Electrical equipment
  • Equipment and devices
  • Windscreen washer
            0
Table of contents: Windscreen washer reservoir. Torque… ↓ Removal the filler pipe of the… ↓ Installation ↓ Removal the windshield washer… ↓ All ↓ Installation ↓ Removal the fluid level sensor in… ↓ Installation ↓ Removal the windshield washer pump… ↓ Installation ↓ Removal injectors ↓ Installation ↓
Washer reservoir, hoses, nozzle 1. Bolt; 2. Sealing ring. Replace if damaged; 3. Sealing sleeve.…

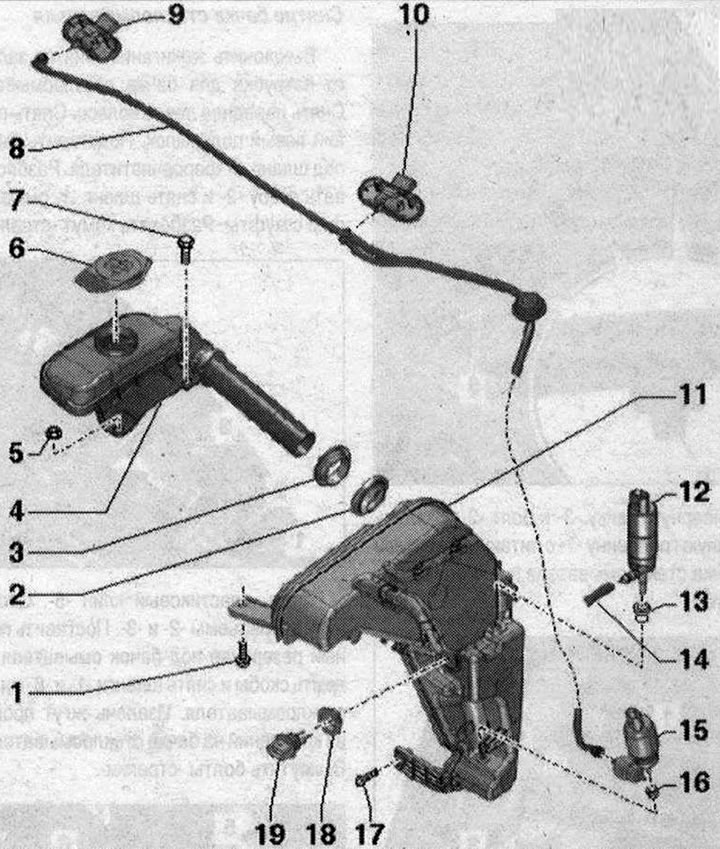
Washer reservoir, hoses, nozzle 1. Bolt; 2. Sealing ring. Replace if damaged; 3. Sealing sleeve. Replace if damaged; 4. Filler neck of the washer reservoir; 5. Nut. 7 Nm; 6. Cap on the filler neck; 7. Bolt. 7 Nm; 8. Windshield washer hose; 9. Right injector (depending on the kit with heating of the right injector "Z21"); 10. Left injector (depending on the kit with heating of the left injector "Z20"); 11. Washer reservoir; 12. Headlight washer pump "V11"; 13/16/18. Sealing sleeve. Replace if damaged; 14. Headlight washer hose; 15. Windscreen washer pump "V5"; 17. Bolt; 19. Windscreen washer fluid level sensor "G33"


Windscreen washer reservoir. Torque and tightening sequence


Windscreen washer reservoir. Torque and tightening sequence


Tighten the windshield washer reservoir bolts in the sequence shown: tighten bolt "3" to 7 Nm; tighten bolt "4" to 7 Nm.


Removal the filler pipe of the washer reservoir


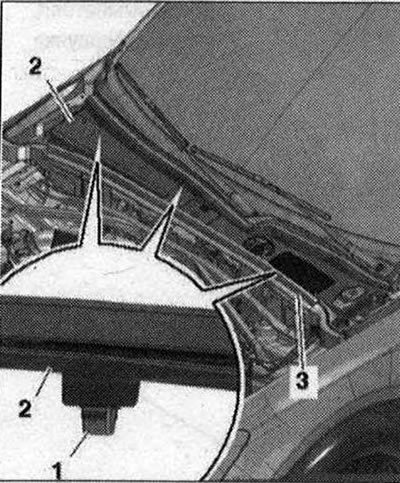
Turn off ignition. Remove seal "3". Disconnect clips "1" from fasteners and remove water drain box casing 2.

Turn off ignition. Remove seal «3». Disconnect clips «1» from fasteners and remove water drain box…


Unscrew nut "3" and bolt "2". Remove filler neck "1" with feed tube from windshield washer reservoir and body opening "arrow".

Unscrew nut «3» and bolt «2». Remove filler neck «1» with feed tube from windshield washer…


Installation


Installation in reverse order: push the sealing nozzle "2" onto the filling tube of the filler pipe "1" until it stops. The projection "3" must fit into the groove "arrow" on the filler pipe. Insert the filler pipe into the windshield washer reservoir.

Installation in reverse order: push the sealing nozzle «2» onto the filling tube of the filler pipe…


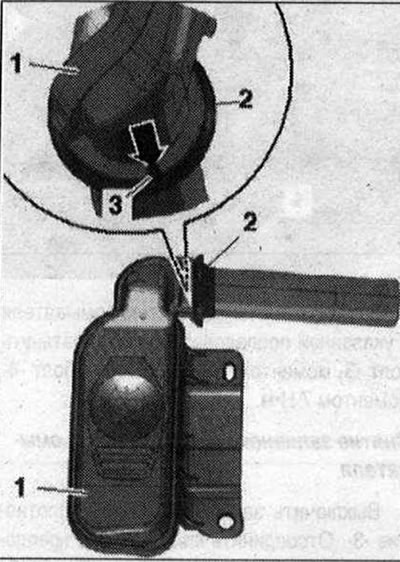
Make sure that the sealing ring is not deformed when pushed in.


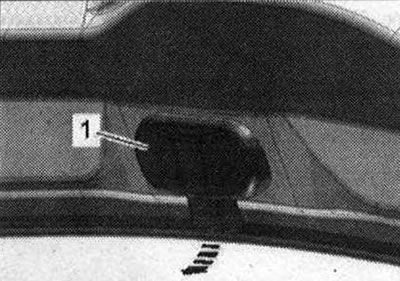
Removal the windshield washer reservoir


Turn off the ignition. Remove the filler pipe for the windshield washer reservoir. Remove the front left wheel. Remove the front left mudguard. Place a container under the headlight washer hose "3". Unlock the clamp "2" and remove the headlight washer hose "1" from the coupling. Cut the clamp "arrow".

Turn off the ignition. Remove the filler pipe for the windshield washer reservoir. Remove the front…


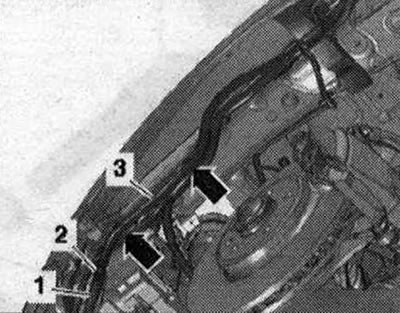
Remove the plastic wedge "5". Disconnect the electrical connectors "2" and "3". Place the receiving tank under the washer reservoir. Open the clamps and remove the hoses "1" and "8" from the windshield washer pump. Remove the wiring harness from the fasteners on the windshield washer reservoir "4". Unscrew the bolts "arrows".

Remove the plastic wedge «5». Disconnect the electrical connectors «2» and «3». Place the receiving…


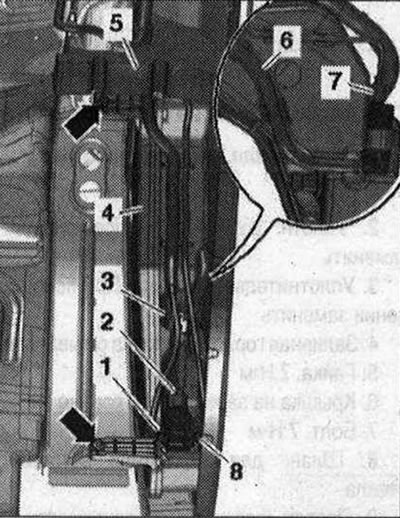
Vehicles with headlamp cleaners: Pull the windscreen washer reservoir forward slightly. Disconnect the electrical plug connection "7". Remove the water hose "6" for the headlamp washer and the wiring harness from the fasteners on the windscreen washer reservoir. Disconnect the windscreen washer pump hose "V11".


All


Remove the windshield washer reservoir.

Installation


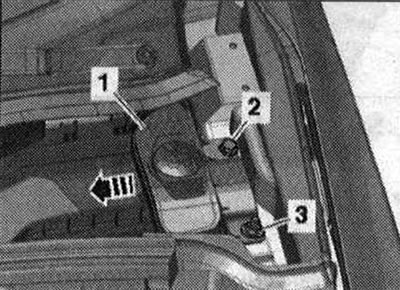
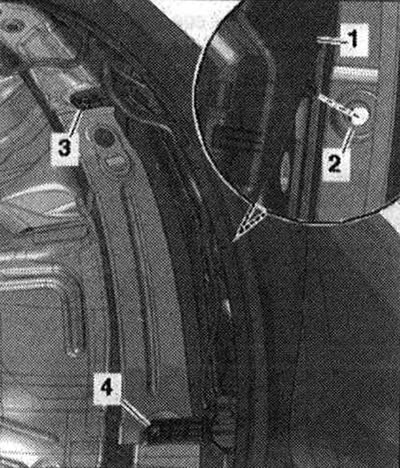
When installing the washer reservoir "1", make sure that the retainer fits into the recess "2" on the wing.

When installing the washer reservoir «1», make sure that the retainer fits into the recess «2» on…


Installation in reverse order: install the front left mudguard. Install the filler pipe for the windshield washer reservoir.

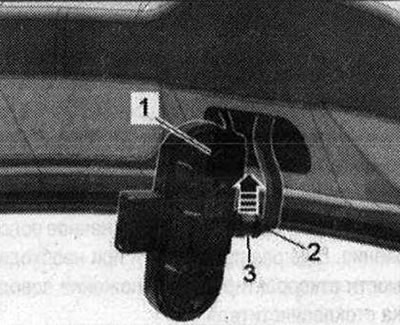
Removal the fluid level sensor in the windshield washer reservoir "G33"


Switch off the ignition. Remove the front left wheel. Remove the front left mudguard. Disconnect the electrical plug connection "1". Place the receiving tank under the washer reservoir. Remove the fluid level sensor in the windshield washer reservoir "G33" "pos. 2" from the windshield washer reservoir.

Switch off the ignition. Remove the front left wheel. Remove the front left mudguard. Disconnect…


Installation


Installation in reverse order: check sealing bushing "3" for damage. Install the front left fender liner.


Removal the windshield washer pump "V5"


Switch off the ignition. Remove the front left wheel. Remove the front left mudguard. Disconnect the electrical plug connection "5". Place the receiving tank under the washer reservoir. Remove hoses "1" and "2" from the windshield washer pump, disconnecting the clamps "3" "arrow". Pull the windshield washer pump "V5" "pos. 4" upwards from the windshield washer reservoir.
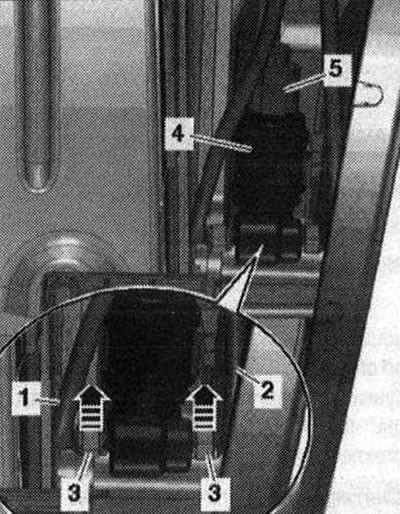
Switch off the ignition. Remove the front left wheel. Remove the front left mudguard. Disconnect…


Installation


Installation in reverse order: check the sealing bushing for damage. Install the front left fender liner.

Removal injectors


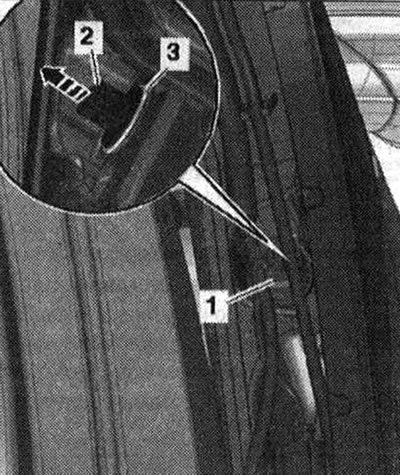
Turn off the ignition. Disconnect the washer nozzles "1" from the bottom of the front flap "arrow".

Turn off the ignition. Disconnect the washer nozzles «1» from the bottom of the front flap «arrow».


Remove hose "2" from the front windshield washer nozzle, disconnecting the clamp -3 "arrow". If available, disconnect the electrical connector "1".


Remove hose «2» from the front windshield washer nozzle, disconnecting the clamp -3 «arrow». If…


Installation


Installation in reverse order: when installing the washer tube, make sure that the safety clip snaps into place with a clearly audible click in the washer tube connection. Install the nozzle in the bonnet.

[The original text of the material can be found on the website AUDIMANUAL.ru]
The article was checked by auto expert Timur Bazhenov
This article is available at russian, bulgarian, belarusian, ukrainian, serbian, croatian, romanian, polish, slovak, hungarian

Share information:
Previous articles
Audi Q Q5 Type 8R: Equipment and devices
Next articles

Front windshield wiper
Windscreen wiper and washer, headlight cleaning system
Antenna system
Voice control system
Rear window wiper and washer
Headlight cleaner
Traction device
Relay board, fuse box


Similar articles on other Audi car models:
Windscreen washer and wiper system, headlight cleaning system... Audi 80 B3 (1986-1991)
Intermittent windscreen wiper switch, windscreen wiper and… Audi 100 C4 (1990-1994, petrol)
Lighting regulator for switches and control devices, adjustment… Audi A3 Type 8L (1996-2003)
Switch for intermittent windscreen wipers, windscreen washer… Audi A4 B5 (1994-2001, petrol)
Windscreen wiper and washer system Audi A6 C4 (1994-1997)
Windscreen wiper blades Audi A8 D2 (1994-2002)
Removal and installation the windshield washer reservoir — 1.2L… Audi A2 (1999-2005)
Link to this page in different formats


Visitor comments

No comments yet


How much will 25 + 45 =


Q7 4L(2005-2015, diesel) 
  • General information
  • Operating instructions
  • Maintenance
  • Power unit
  • Diesels 3.0 l (BUG, BUN, CAS)
  • Diesels 3.0 l (CATA, CCMA)
  • Diesels 3.0 l (CJGA/CJGC)
  • Diesels 4.2 l (BTR, CCFA/CCFC)
  • Cooling system
  • Fuel and exhaust system
  • Engine management system
  • Starting and charging
  • Transmission
  • Automatic gearbox
  • Drive shafts
  • Chassis
  • Brake system
  • Front suspension
  • Rear suspension
  • Steering system
  • Body
  • Air conditioner
  • Exterior
  • Interior
  • Electrical equipment
  • Equipment and devices
  • Electrical circuits
 
Q5 8R(2008-2017) 
  • General information
  • User manual
  • Power unit
  • Petrol engine 2.0 l
  • Petrol engine 3.2 l
  • Fuel system (petrol)
  • Diesel 2.0 liter (CA)
  • Diesel 2.0 liter (CG/CJ/CM)
  • Diesel engine 3.0 l
  • Fuel system (diesel)
  • Transmission
  • Manual gearbox 0B1
  • Manual gearbox 0B2
  • Automatic gearbox 0B5
  • Automatic gearbox 0B6
  • Chassis
  • Front suspension
  • Rear suspension
  • Brake system
  • Steering
  • Body
  • Exterior
  • Interior
  • Doors, locks and windows
  • Safety system
  • Ventilation and heating
  • Electrical equipment
  • Power devices
  • Equipment and devices
  • Lighting and alarm
  • Audio system
  • Electrical circuits
 
AudiManual.ru © 2017-2026 · Mobile version · Feedback · Sitemap: EN BG BY UA RS HR RO PL SK HU · Site search · News and articles
80 B2 · 80 B3 petrol · 80 B3 · 80 B4 · 100 C3 diesel · 100 C3 petrol · 100 C3 · 100 C4 petrol · 100 C4 · A3 Type 8L · A4 B5 petrol · A4 B5 · A4 B6 petrol · A4 B6 · A4 B7 · A4 B8 · A6 C4 · A6 C5 · A6 C5 Allroad · A8 D2 · Q5 Type 8R · Q7 Typ 4L · Audi A2 ·
This site uses cookies 🍪. Click the button to accept this fact.