
Table of contents: Windscreen wiper motor "V" - torque… ↓ Bringing the windshield wiper to the… ↓ Replacing windshield wiper blades ↓ Installation ↓ Removal the windshield wiper arms ↓ Installation ↓ Adjusting the windshield wiper arms ↓ Removal a "V" wiper motor from a… ↓ Installation ↓

II 1. Bolt; 2. Windscreen wiper motor "V" with used windscreen wiper motor "J400"; 3. Bolt; 4/11. Nut. 17 Nm; 5. Plug; 6. Windscreen wiper arm on the front passenger side; 7. Windscreen wiper blade on the front passenger side; 8. Driver's side windshield wiper blade; 9. Driver's side windshield wiper arm; 10. Plug; 12. Bolt; 13. Gutter
Windscreen wiper motor "V" - torque and tightening sequence
Tighten the bolts in the sequence "1, 2, 3" in 2 stages as follows: Tighten by hand until stop; Tighten to 8 Nm.
Bringing the windshield wiper to the service position
If it is necessary to operate the windshield wiper motor during operation, the hood must be closed, otherwise the power supply to the windshield wiper motor will be interrupted.
Check for frost hazard and whether the windshield wiper blades are frozen.
Turn on the ignition. Activate the menu item Windscreen wiper "On" via the "MMI terminal". The windscreen wipers go to the "service position". Turn off the ignition.
Caution! Risk of damage to the bonnet when returning the windscreen wiper to its original position. Do not move the car with the windscreen wiper arms folded down. When the windscreen washer switch is pressed or at a speed of over 6 km/h, the windscreen wipers automatically return to their original position.
Replacing windshield wiper blades
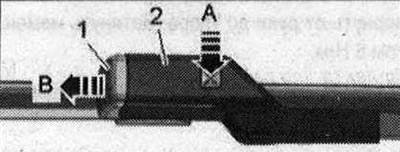
Bring the windshield wiper to the service position. Fold the windshield wiper arm away from the windshield. Press the lock "arrow A". Move the windshield wiper blade "1" away from the windshield wiper arm -2 "arrow B". Remove the windshield wiper blade.
Installation
Installation in reverse order: insert wiper blade "1" parallel to arm "2" "arrow". Note that the wiper blade is pushed into the wiper arm until the clamp is audibly engaged.
When the windscreen wiper switch is pressed or at a speed above 6 km/h, the windscreen wiper leaves the "service position".
Removal the windshield wiper arms
If it is necessary to operate the windshield wiper motor during operation, the hood must be closed, otherwise the power supply to the windshield wiper motor will be interrupted. Move the windshield wiper to the service position. Switch off the ignition. Using a screwdriver, remove the "arrow" caps from the windshield wiper arms "1". Loosen the nuts "2" a few turns.
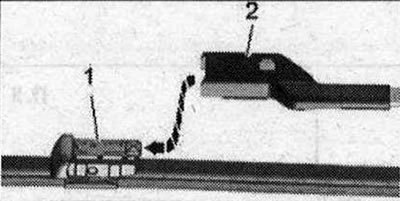
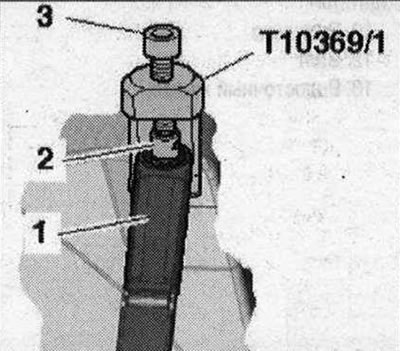
Install the puller "T10369/1", as shown in the figure, on the windshield wiper arm "1". Install the mandrel "2" on the windshield wiper shaft. Rotate the bolt "3" clockwise until the windshield wiper arm moves away from the windshield wiper shaft. Unscrew the nuts completely and remove the windshield wiper arms.
Installation
Installation in reverse order: adjust the wiper arms.
Adjusting the windshield wiper arms
Remove the windscreen wiper arms. Switch on the ignition. Press the "windscreen wiper button" and move the windscreen wiper motor to the end position. Every second time the switch is switched off, the windscreen wiper motor moves to the lower end position, which ensures that the wiper blade takes the other direction. To do this, the windscreen wiper motor moves through the end position downwards and then slightly upwards again. The lower end position must not be used to adjust the windscreen wiper arms. It is necessary to use the end position in which the windscreen wiper motor goes directly to the end position, without lifting from the lower position. If necessary, press the "windscreen wiper button" again. Switch off the ignition.
Install the wiper arm with the blade installed on the axle and align the blade on the windshield as follows: distance "a" = 13+10 mm. Dimension "b" = 15 + 10 mm.
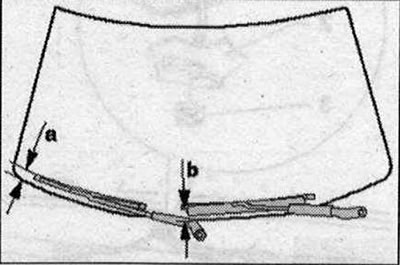
The dimensions indicate the distance from the ends of the brushes to the grille of the fairing on the lower edge of the glass. Tighten nuts "2" of the wiper arms "1". Turn on the ignition. Press the "wiper button" and bring the arms to the end position. Turn off the ignition. Check again and, if necessary, adjust the position of the wiper arms. Put the "arrow" caps on the wiper arms.
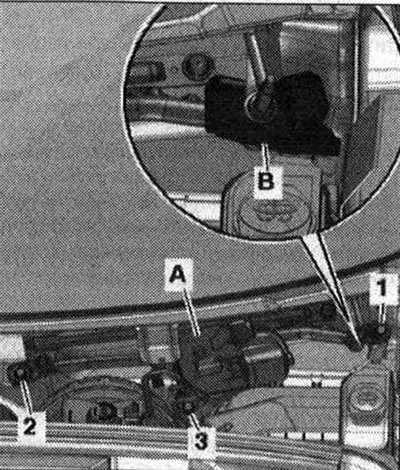
Removal a "V" wiper motor from a used "J400" wiper motor
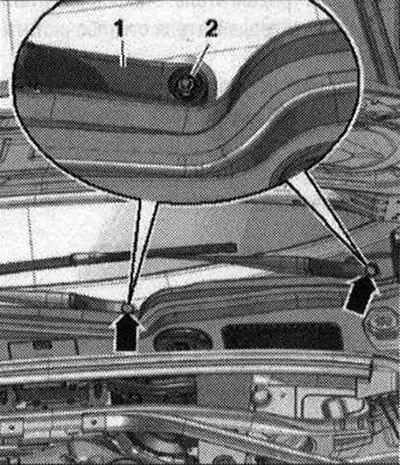
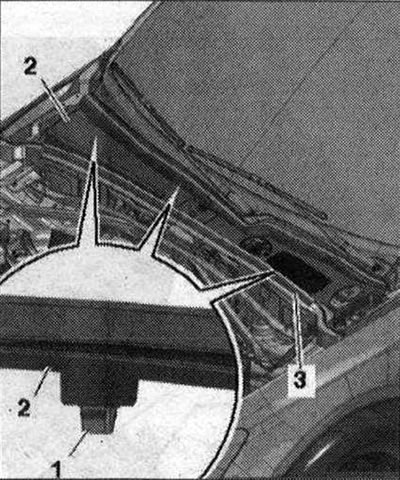
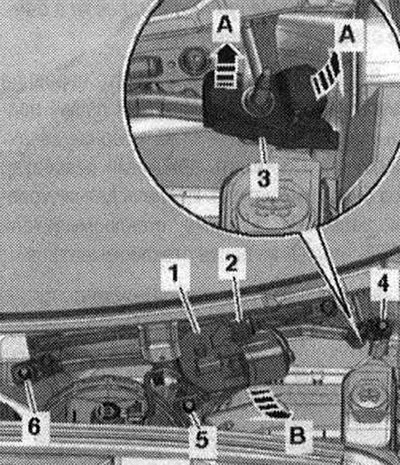
Switch off the ignition. Remove the windscreen wiper arms. Remove the seal "3". Disconnect the clips "1" from the fasteners and remove the water drainage box casing "2". Remove the safety spring clips "2" "arrow A".
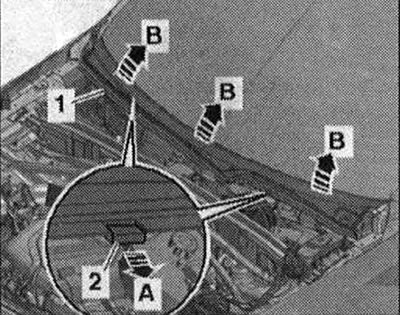
Risk of damage to the fairing. Wet the transition between the windshield and the fairing with a small amount of soapy water and carefully remove the fairing "1" starting from the edge of the glass, vertically upwards from the retainer on the windshield "arrows B". Remove the fairing by carefully releasing it from the retainers on the windshield "arrows B". Remove the fairing "1" by carefully releasing it from the retainers on the windshield "arrows B". Disconnect the electrical plug connection "2". Pull out the gutter "3" on the lever "arrows A". Unscrew the bolts "4,5,6".
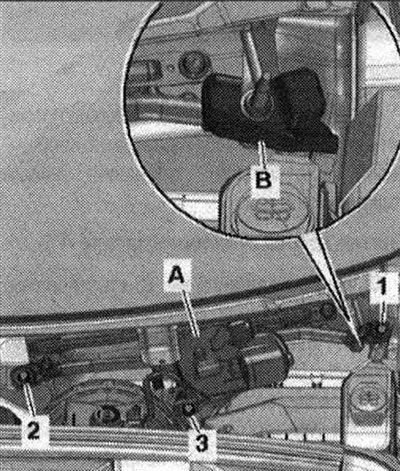
Turn up the windscreen wiper frame "1" with the lever and windscreen wiper motor "arrow B" and remove it forward in the direction of travel from the water drainage box.
Installation
Installation in reverse order: install the windshield wiper motor "A" with the windshield wiper frame into the body. Tighten the bolts. Put the gutter "B" on the windshield wiper motor. Adjust the windshield wiper arms.
(Material republished from the website: «audimanual.ru»)