
Repair Chevrolet Repair Toyota Repair Honda Repair AvtoVAZ Repair Mercedes-Benz Repair BMW Repair Opel
Home  |  Contacts  |  Sitemap  |    
English Русский
Български
Беларускі
Український
Српски
Hrvatski
Română
Polski
Slovenský
Magyar
AudiManual.ru


  • AUDI 80
  • AUDI 100
  • AUDI A3
  • AUDI A4
  • AUDI A6
  • AUDI A8
  • AUDI Q
  • OTHER
  • ARTICLES
Q7 Typ 4L (2005-2015, diesel) Q5 Type 8R (2008-2017)

Head Airbag Installation Diagram from calendar week 22/2010 (Audi Q5-8R)

  • Home
  • Audi Q
  • Q5 Type 8R (2008-2017)
  • Body
  • Safety system
  • Head Airbag Installation Diagram from calendar week 22/2010
            0
Table of contents: Removal the head Airbag with… ↓ Installation ↓
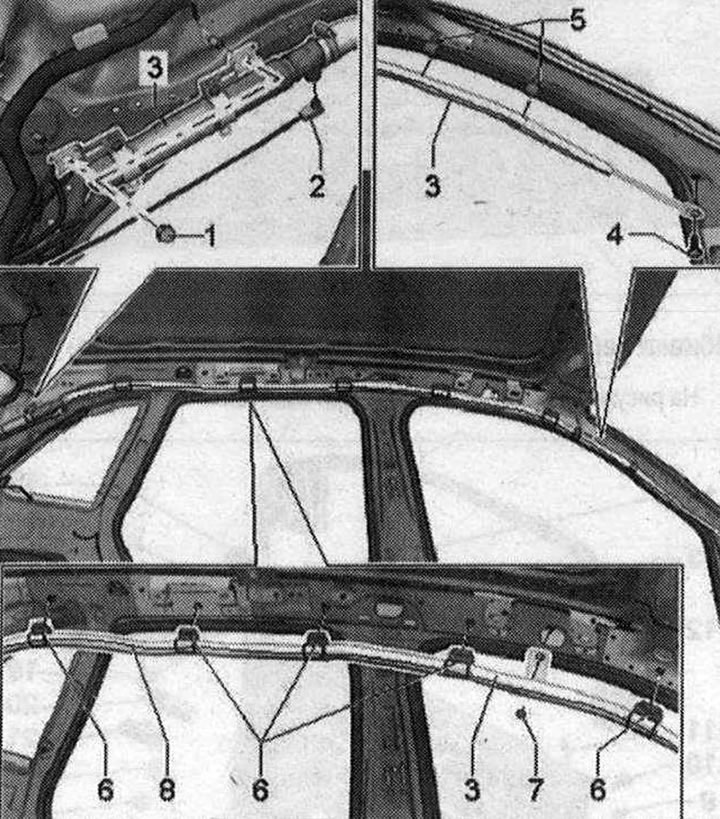
Head Airbag Installation Diagram from calendar week 22/2010 1. Nut. 9 N·m. 2 pcs. To threaded pins;…

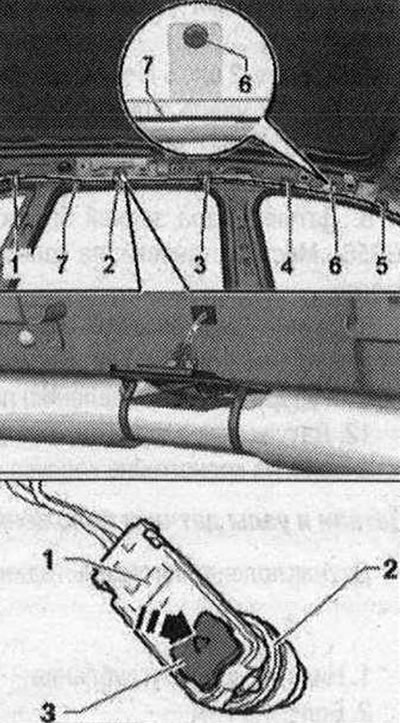
Head Airbag Installation Diagram from calendar week 22/2010 1. Nut. 9 N·m. 2 pcs. To threaded pins; 2. Electrical connector on the driver's side for the driver's head airbag squib "N₂51" on the front passenger's side for the front passenger's head airbag squib "N₂52"; 3. Upper Airbag on the driver's side: with the squib of the head Airbag driver "N₂51". On the front passenger's side: with the squib of the head Airbag front passenger "N₂52"; 4. Bolt. 3.5 Nm. Self-locking. Replace after each removal. The threaded hole for the bolt should be cleaned, for example with a tap; 5. Clamp. 2 pcs. If removal was done as a result of an accident, replace the clamp; 6. Fastening clamp; 7. Clamp; 8. The black line serves as a protection against rotation. After installation it should be visible


Removal the head Airbag with pyropatron "N₂51" or "N₂52" from calendar week 22/2010


Turn on the ignition. Disconnect the battery ground cable with the ignition on. Remove the ceiling panel. Unscrew bolt "3" of the head Airbag on the A-pillar. Remove the head Airbag downwards from the clamps "1" and "2".


Disconnect electrical connector "1".
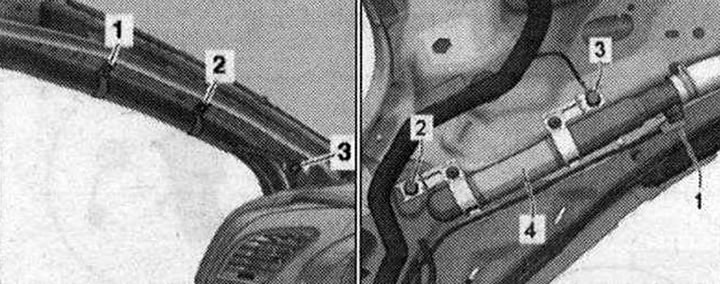
Disconnect electrical connector «1».


To do this, use a small screwdriver "1" to unlock the connector lock "3" and disconnect the plug connector "2" of the main Airbag.
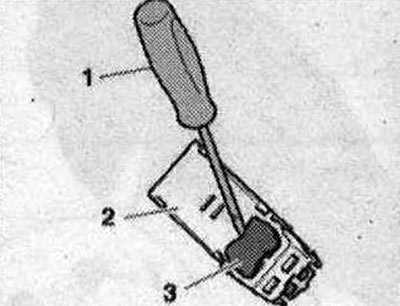
To do this, use a small screwdriver «1» to unlock the connector lock «3» and disconnect the plug…


To do this, use a small screwdriver «1» to unlock the connector lock «3» and disconnect the plug…


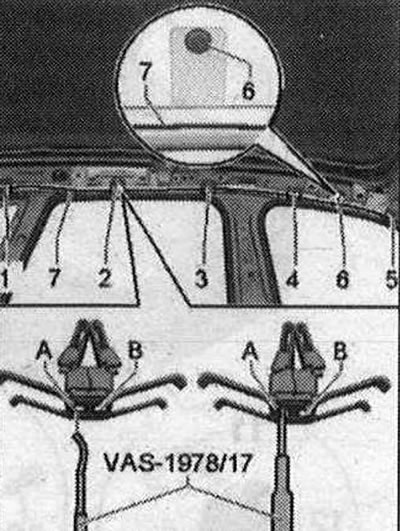
Unscrew cap nuts "2" and "3". Hang up fastener "6" and fasteners "5 to 1" of the head Airbag mounting brackets on the body. For fasteners "5 to 1" puller "VAS 1978/17" insert it with a spoon, as shown in the figure, straight into the hole "A" until it stops. Remove the left side of the fastener from the body. Remove the puller again "VAS1978/17" and "make sure that the fastener does not lock on the weakened side." Turn the puller "VAS 1978/17" 180° and repeat the process at hole "B".


Remove the upper Airbag from the vehicle.

Installation


Installation


Installation in reverse order: Fasten the clamps "1 to 5" of the head Airbag mounting plates in the body. Fix the fastening "6" in the body.

Hang the head Airbag "3" on the pin, screw in blind nuts 2 and "3" by hand. Tighten blind nuts "2" and "3". Connect the plug connector "1". To do this, install the plug connector "1" on the head Airbag squib "2". Press the lock of the plug "3" in the "direction of the arrow", while the plug connector is installed into the head Airbag squib until it stops and is fixed. Note that the electrical connectors must be inserted until they stop with an audible lock. Note that the wires must not be pinched. If removed due to an accident, replace clamps "1" and "2". Secure the head Airbag with clamps "1" and "2". Hang the tension strap and tighten with bolt "3" on the A-pillar.

Make sure the "black line" "8" is visible along its entire length. This ensures that the head airbag is NOT twisted. Install the roof panel. Connect the battery ground cable with the ignition on.
The article was checked by auto expert Timur Bazhenov
This article is available at russian, bulgarian, belarusian, ukrainian, serbian, croatian, romanian, polish, slovak, hungarian

Share information:
Previous articles
Audi Q Q5 Type 8R: Safety system
Next articles

Head Airbag Installation Diagram up to calendar week 21/2010
Parts and units of the front side Airbag
Removal the front passenger airbag warning light
Removal the Airbag with a pyropatron on the front passenger side
Parts and components of impact sensors for Airbag


Similar articles on other Audi car models:
Airbag Wiring Diagram Audi 80 B4 (1991-1996)
Cylinder head — removal, inspection and installation Audi 100 C3 (1982-1990, diesel)
Visual inspection of the seat belt and airbag unit Audi A3 Type 8L (1996-2003)
MMI infotainment systems — general information and instructions… Audi A4 B8 (2007-2015)
Airbag system Audi A6 C5 (1997-2004)
Airbag system Audi A8 D2 (1994-2002)
Cylinder head — design description Audi A2 (1999-2005)
Link to this page in different formats


Visitor comments

No comments yet


How much will 22 + 26 =


Q7 4L(2005-2015, diesel) 
  • General information
  • Operating instructions
  • Maintenance
  • Power unit
  • Diesels 3.0 l (BUG, BUN, CAS)
  • Diesels 3.0 l (CATA, CCMA)
  • Diesels 3.0 l (CJGA/CJGC)
  • Diesels 4.2 l (BTR, CCFA/CCFC)
  • Cooling system
  • Fuel and exhaust system
  • Engine management system
  • Starting and charging
  • Transmission
  • Automatic gearbox
  • Drive shafts
  • Chassis
  • Brake system
  • Front suspension
  • Rear suspension
  • Steering system
  • Body
  • Air conditioner
  • Exterior
  • Interior
  • Electrical equipment
  • Equipment and devices
  • Electrical circuits
 
Q5 8R(2008-2017) 
  • General information
  • User manual
  • Power unit
  • Petrol engine 2.0 l
  • Petrol engine 3.2 l
  • Fuel system (petrol)
  • Diesel 2.0 liter (CA)
  • Diesel 2.0 liter (CG/CJ/CM)
  • Diesel engine 3.0 l
  • Fuel system (diesel)
  • Transmission
  • Manual gearbox 0B1
  • Manual gearbox 0B2
  • Automatic gearbox 0B5
  • Automatic gearbox 0B6
  • Chassis
  • Front suspension
  • Rear suspension
  • Brake system
  • Steering
  • Body
  • Exterior
  • Interior
  • Doors, locks and windows
  • Safety system
  • Ventilation and heating
  • Electrical equipment
  • Power devices
  • Equipment and devices
  • Lighting and alarm
  • Audio system
  • Electrical circuits
 
AudiManual.ru © 2017-2026 · Mobile version · Feedback · Sitemap: EN BG BY UA RS HR RO PL SK HU · Site search · News and articles
80 B2 · 80 B3 petrol · 80 B3 · 80 B4 · 100 C3 diesel · 100 C3 petrol · 100 C3 · 100 C4 petrol · 100 C4 · A3 Type 8L · A4 B5 petrol · A4 B5 · A4 B6 petrol · A4 B6 · A4 B7 · A4 B8 · A6 C4 · A6 C5 · A6 C5 Allroad · A8 D2 · Q5 Type 8R · Q7 Typ 4L · Audi A2 ·
This site uses cookies 🍪. Click the button to accept this fact.