
Table of contents: Seat base upholstery and cushion… ↓ Removal ↓ Installation ↓ Seat back upholstery and cushion… ↓ Removal the seat heating element ↓ Installation ↓
Seat base upholstery and cushion parts and assemblies
The description of parts and units is given for the standard (with manual or electric adjustment), comfortable and reclining front seat.
 1. Seat base; 2. Pillow with foam covered wire; 3. Wire covered with foam material in the cushion to attach the upholstery to the cushion; 4. Clamp for attaching the upholstery to the cushion. Replace after each removal, install in the same place where it was before dismantling; 5. Contour strip/contour wire for attaching the upholstery to the cushion. The wire is inserted into the receiving pocket of the upholstery (only in a comfortable seat). The contour strip is sewn to the upholstery; 6. Clamping strip for fixing the rear upholstery to the upper frame of the seat base, sewn to the upholstery; 7. Rubber band. 2 pcs.; 8. Clamping strip for fixing the upholstery in the front and side area to the upper frame of the seat base, sewn to the upholstery y-zo)
Removal
Remove the front seat. Secure the front seat in the seat repair holder "VAS 6136". Remove the back of the front seat. Remove the clamp of the trim from the side of the threshold.
Option complete with drawer: remove drawer.
Option complete with storage compartment: remove storage compartment.
Option complete with ISOFIX child seat mounting (front passenger seat only): remove the ISOFIX child seat anchorage.
Option complete with seat occupied recognition sensor for deactivating the front passenger airbag: remove with seat occupied recognition sensor.
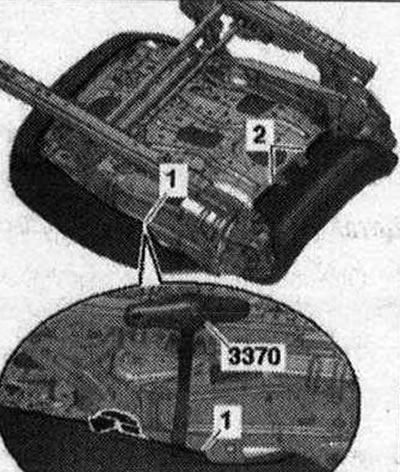
Disconnect the clamping strip "1" of the trim with the pick "3370" in the front and side area "arrow". Disconnect the clamping strip "2" of the trim in the rear area with the pick "3370".
Remove the upholstery with the cushion from the seat base.
Option complete with seat occupancy recognition sensor: remove the upholstery with the seat base cushion together with the seat occupancy recognition mat, the pressure sensor for seat occupancy recognition "G452" and the used seat occupancy recognition "J706".
Installation
Install in reverse order, making sure that the clamping strips are correctly secured and that there are no folds on the upholstery. Note that the electrical connectors must be inserted all the way with an audible lock. Connect the battery ground cable with the ignition on.
Seat back upholstery and cushion parts and assemblies
The description of parts and units is given for standard, sports (with manual or electric adjustment) and a comfortable front seat.
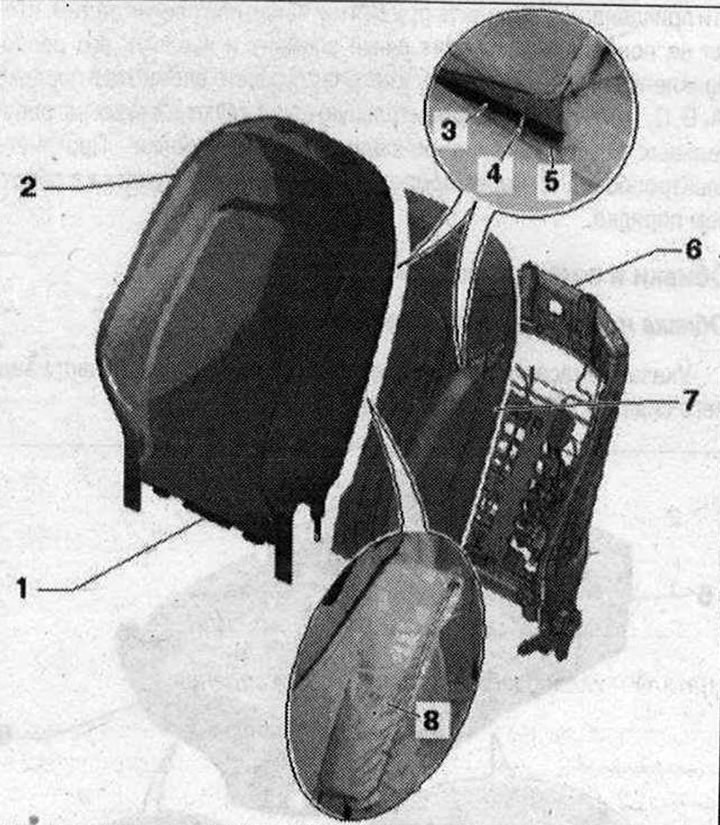 1. The clamping strip for attaching the upholstery to the back frame of the backrest is sewn to the upholstery; 2. Upholstery; 3. Contour strip for attaching the upholstery to the cushion, sewn to the upholstery; 4. Clamp for attaching the upholstery to the cushion. Replace after each removal, install in the same place where it was before dismantling; 5. Wire for attaching the upholstery to the cushion, covered with foam material in the cushion; 6. Backrest frame; 7. Pillow; 8. Side Airbag pocket. Sewn to the upholstery;
Removal the seat heating element
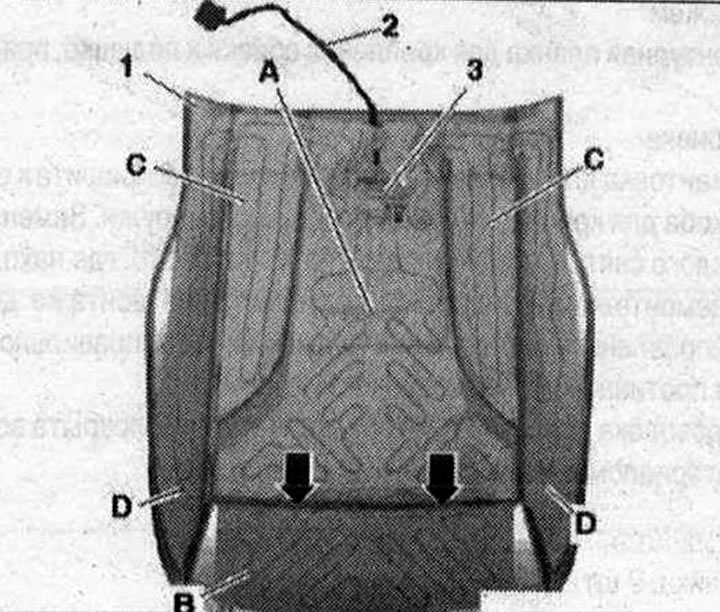
Removing the upholstery from the cushion: cut off the electrical wiring "2" at the base of the old heating element "3". The old heating element remains in the cushion "1" and is sealed with a new heating element. "Pos. A...D" and "arrows" are not taken into account.
Installation
Align the new heating element on the pad. The new heating element must be glued to the old heating element so that it completely covers it. Remove the protective films from the heating element in the gluing sequence. When removing the protective film, be careful not to damage the heating element and lay it flat. Glue the individual parts of the heating element in the order "A, B, C, D". Place the connecting wiring of the individual heating surfaces in the base of the slots "arrows". Pull the electric wire "2" through the slot in the pad "1". Install in the reverse order.
(The original text is available on the website: AUDImanual.ru)