Repair Chevrolet Repair Toyota Repair Honda Repair AvtoVAZ Repair Mercedes-Benz Repair BMW Repair Opel
Home  |  Contacts  |  Sitemap  |    
English Русский
Български
Беларускі
Український
Српски
Hrvatski
Română
Polski
Slovenský
Magyar
AudiManual.ru


  • AUDI 80
  • AUDI 100
  • AUDI A3
  • AUDI A4
  • AUDI A6
  • AUDI A8
  • AUDI Q
  • OTHER
  • ARTICLES
A2 (1999-2005)

Installation of a lift and slide hatch (Audi A2)

  • Home
  • Audi
  • A2 (1999-2005)
  • Body
  • Doors, locks and windows
  • Installation of a lift and slide hatch
            0
Table of contents: Installation of the mounting device… ↓ Operating principle of the… ↓

Installation of the mounting device for the hatch "VAS 60101"


1. Sunroof mounting device «VAS 6010». After the sunroof has been inserted into the opening, it is…

1. Sunroof mounting device "VAS 6010". After the sunroof has been inserted into the opening, it is necessary to install the sunroof mounting device on the vehicle, as shown in the figure. Align the device from the side and secure it with the screws with the handle "arrows c". The front and rear adjusting bolts "arrows a" and arrows "b" may only be tightened to a torque of 1.5 Nm. Screw the front adjusting bolts "arrows a" down until the stop fits against the body side frame. Check the tightness of the fit with a flat feeler gauge (2/10 mm thick). Also turn the rear adjusting bolts "arrows b" downwards until the stop fits against the body side frame
2. Front stop. When adjusted correctly, it should fit against the body side frame
3. Rear stop. When adjusted correctly, it should fit against the body side frame


Operating principle of the adjustment element


The lift and slide sunroof is adjusted and held in a level position using the mounting device «VAS…


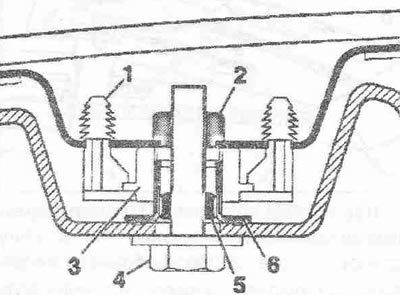
The lift and slide sunroof is adjusted and held in a level position using the mounting device "VAS 6010". When screwing the bolt "4" into the nut "2", the adjusting bolt "6" (with left-hand thread) due to the plastic element "5" (safety clutch) is turned outwards until it stops. By subsequently screwing in the bolt, the hatch is secured with a torque of 8 Nm.

(The original publication in its entirety is posted on the website AUDImanual)
The article was checked by auto expert Daniil Ushakov
This article is available at russian, bulgarian, belarusian, ukrainian, serbian, croatian, romanian, polish, slovak, hungarian

Share information:
Previous articles
Audi A2: Doors, locks and windows
Next articles

Installing the rear cover of the sliding and lifting sunroof
Removal and installation the guides of the lift-and-slide sunroof
Removal the rear cover of the sliding and tilting sunroof
Sealing of a lift and slide hatch
Removal and installation the hatch cover
Removal and installation the hatch locking hooks
Removal and installation the sliding frame
Removal and installation the sunroof fairing


Similar articles on other Audi car models:
Hatch — removal, installation and adjustment Audi 80 B3 (1986-1991, petrol)
Removal and installation an electric window lift Audi 100 C3 (1982-1990)
Lift and slide roof panel Audi A3 Type 8L (1996-2003)
Lift-and-slide sunroof — Avant Audi A4 B8 (2007-2015)
Lift and slide roof panel Audi A6 C5 (1997-2004)
Installation of mirrors Audi A8 D2 (1994-2002)
Lift and slide hatch Audi Q5 Type 8R (2008-2017)
Link to this page in different formats


Visitor comments

No comments yet


How much will 16 + 11 =


Audi A2(1999-2005) 
  • General information
  • Introduction to the guide
  • Maintenance
  • Engine 1.4 l (gasoline)
  • Engine repair
  • Lubrication system
  • Cooling system
  • Exhaust system
  • Engine 1.6 l (gasoline)
  • Engine repair
  • Lubrication system
  • Cooling system
  • Exhaust system
  • Engine 1.2 l (diesel)
  • Engine repair
  • Lubrication system
  • Cooling system
  • Injection and turbocharging
  • Engine 1.4 l (diesel)
  • Engine repair
  • Lubrication system
  • Cooling system
  • Turbocharging system
  • Supply system
  • Fuel injection system
  • Exhaust system
  • Transmission
  • Mechanical gearbox 02J
  • Mechanical gearbox 02T
  • Mechanical gearbox 085 DS
  • Chassis
  • Car suspension
  • Steering
  • Brake system
  • Body
  • Exterior
  • Interior
  • Seats
  • Doors, locks and windows
  • Safety system
  • Heating and air conditioning
  • Electrical equipment
  • Power devices
  • Equipment and devices
  • Wipers and washers
  • Lighting and lamps
  • Breakers and switches
  • Electrical circuits
 
AudiManual.ru © 2017-2026 · Mobile version · Feedback · Sitemap: EN BG BY UA RS HR RO PL SK HU · Site search · News and articles
80 B2 · 80 B3 petrol · 80 B3 · 80 B4 · 100 C3 diesel · 100 C3 petrol · 100 C3 · 100 C4 petrol · 100 C4 · A3 Type 8L · A4 B5 petrol · A4 B5 · A4 B6 petrol · A4 B6 · A4 B7 · A4 B8 · A6 C4 · A6 C5 · A6 C5 Allroad · A8 D2 · Q5 Type 8R · Q7 Typ 4L · Audi A2 ·
This site uses cookies 🍪. Click the button to accept this fact.