
Table of contents: Removal the lane departure warning… ↓ Installation ↓
The lane assist helps the driver to stay in the lane. If the system is switched on and the car approaches a recognized dividing line and there is a possibility of leaving the lane, the system warns the driver by vibrating the steering wheel. If the turn signal is switched on before crossing the dividing line, the warning will not follow, because the system will detect an intentional lane change. To create the vibration, the steering wheel is equipped with a vibration motor. The vibration motor is located inside the lower right spoke of the steering wheel (in a foam shirt). Vibration is produced by rotating the counterweight on the vibration motor shaft. The vibration motor cannot be replaced separately. If the vibration motor is faulty, the steering wheel assembly must be replaced. The duration of the steering wheel vibrations depends on the driver's reaction speed and usually lasts about 1 second. The camera and the lane departure warning system control unit "J759" are installed in the same housing. If the camera or control unit is faulty, the entire unit must be replaced. The used lane departure warning system "J759" is installed in the center of the upper edge of the windshield at the height of the interior mirror. It is fixed to a bracket that is firmly glued to the mirror. Changes that limit the camera's field of view (eg application of stickers/stone impact marks), may cause the system to malfunction. The lane assist button "E517" is installed in the mount together with the turn signal switch. Pressing the button switches the system on/off. If the lane assist button "E517" is faulty, the mount must be completely replaced together with the turn signal switch "E45" and the intermittent wiper switch "E22".
Note: The text message "Audi lane assist not available: no sensor view at present" appears if the camera is no longer able to operate due to the absence of clear lane markings for a long time. Possible causes include: dirty or icy camera field of view (in this case, eliminate the cause); fogging of the camera's field of view (wait until the fogging clears); due to the peculiarities of road conditions (for example, a snowy road) for a long time it is impossible to distinguish the marking lines.
If fogging does not resolve on its own or if there is heavy contamination on the inside of the glass (in the camera's field of view) it is necessary to manually clean the camera's field of view. To do this, remove the control unit and the diffused light curtain and clean the windshield with a cleaning solution. High-quality calibration is required for the lane assist to work. A new calibration is required if: the memory unit actively stores the error "basic setting/adaptation missing or incorrect"; the lane departure warning system control unit "J759" is being replaced; windshield replacement or removal; rear wheel alignment angles are adjustable; changes were made to the vehicle's chassis, such as replacing the standard chassis with a sports chassis. The ground clearance sensors on vehicles with electronic damping control were retrained.
Note. Before calibrating the lane assist, the fault memory must be read and faults rectified if necessary. To calibrate the lane assist, the direction of travel of the vehicle must be determined, which will serve as the starting position of the vehicle "IMS 6430". The lane assist may only be calibrated using a wheel alignment device approved by VW/AUDI. Only the "IMS 6430" tool may be used to calibrate the lane assist!
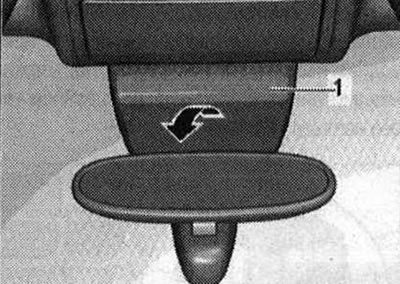
Removal the lane departure warning control unit "J759" and the ambient light curtain
Remove curtain "1" from bracket "in direction of arrow" downwards
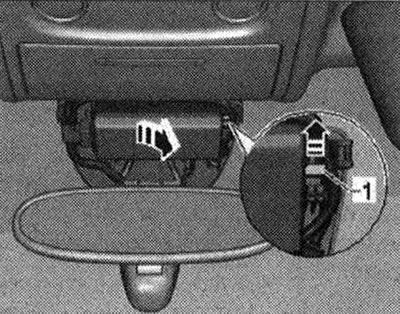
Press the retaining clip "1" "in the direction of the arrow" and pull the lane assist control unit "J759" downwards out of the bracket at the side. Disconnect the electrical connector and remove the lane assist control unit "J759".
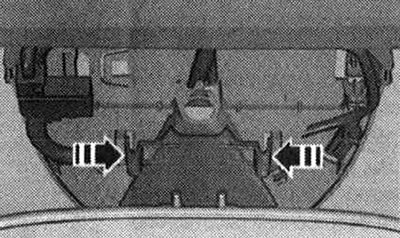
Press the "arrow" brackets, remove the diffused light curtain from the bracket and remove it back.
Installation
Installation is carried out in reverse order. Please note the following: The camera's field of view on the inside of the windscreen must not be fogged up or dirty, otherwise this area must be cleaned manually with a cleaning solution. After installation, check that the lane assist control unit "J759" is correctly seated on the bracket. If the lane assist control unit "J759" is replaced, the camera and lane assist control unit "J759" must be recalibrated.
[The original version is on the portal «audimanual.ru»]