
Repair Chevrolet Repair Toyota Repair Honda Repair AvtoVAZ Repair Mercedes-Benz Repair BMW Repair Opel
Home  |  Contacts  |  Sitemap  |    
English Русский
Български
Беларускі
Український
Српски
Hrvatski
Română
Polski
Slovenský
Magyar
AudiManual.ru


  • AUDI 80
  • AUDI 100
  • AUDI A3
  • AUDI A4
  • AUDI A6
  • AUDI A8
  • AUDI Q
  • OTHER
  • ARTICLES
A2 (1999-2005)

Removal and installation a three-point seat belt with height adjuster (Audi A2)

  • Home
  • Audi
  • A2 (1999-2005)
  • Body
  • Safety system
  • Removal and installation a three-point seat belt with height adjuster
            0
Table of contents: Disconnect the pre-tensioner plug ↓ Anchor point, seat belt buckle ↓ External floor attachment point ↓ Attachment point - rear seat belt… ↓ Anchor point - rear seat belt buckle… ↓
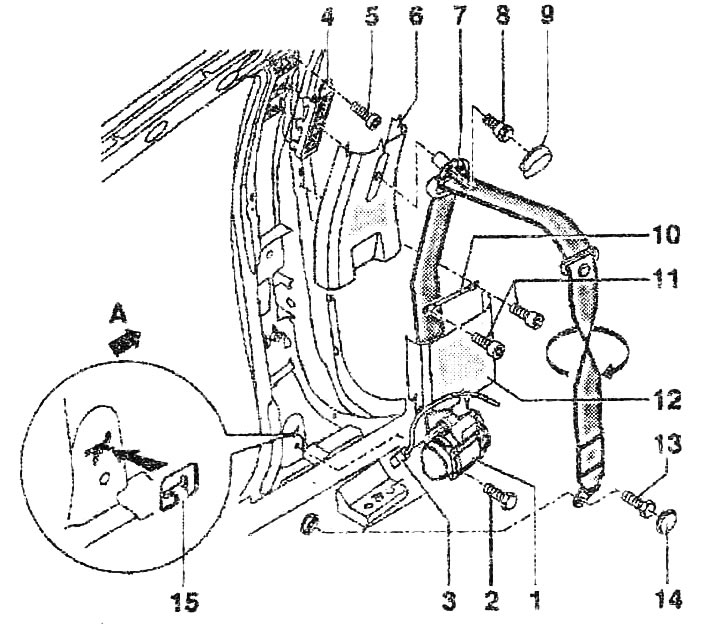
1. Pretensioner. Removing the three-point seat belt: Disconnect the battery. Remove the lower trim…

1. Pretensioner. Removing the three-point seat belt: Disconnect the battery. Remove the lower trim of the support B "12". Unscrew the screws "11" (2 pcs.). Remove the guide bracket "10". Unlock the cover "9" at the bottom and pull it up. Unscrew the screw "8". Remove the cap "14". Unscrew the bolt "13". Carefully disconnect the plug "3". Unscrew the screw "2". Pull out the pretensioner "1" upwards with the twist stop "15". Installing the three-point seat belt: connect the pretensioner as shown in the enlarged view, with the twist stop "15". Install the seat belt webbing - as shown in the figure, twisting it by 180° "arrow". "Arrow A" indicates the direction of travel. Installation is in the reverse order. After installing the three-point seat belt on the front passenger side, check the operation of the child seat belt. The operation of the three-point seat belt must not be obstructed by cables, lines, insulation, etc.
2. Bolt. Tightening torque 55 Nm
3. Pretensioner connector
4. Seat belt height adjustment mechanism Removing the seat belt height adjuster. Unlock cover "9" at the bottom and pull it up. Unscrew screw "8". Remove the upper B-pillar trim "6". Unscrew bolts "5" (1 pc.). Remove the seat belt height adjuster "4" by moving it up. Installing the seat belt height adjuster. Checking the operation after installing the trim: the height adjuster should fix the belt in each of the 5 possible positions with an audible click (also in the extreme upper position). After each press, the button should automatically return to the upper position
5. Bolt. Tightening torque 24 Nm
6. Upper trim of the B-pillar
7. Belt eye. After tightening screw "8", the eye should be installed automatically in the direction of the load
8. Bolt. Tightening torque 55 Nm
9. Cap. Detach cap "9" and lift up
10. bracket
11. Tightening torque 5 Nm
12. Lower trim of B-pillar
13. Bolt. Tightening torque 55 Nm
14. Cap
15. Twist stop


Disconnect the pre-tensioner plug
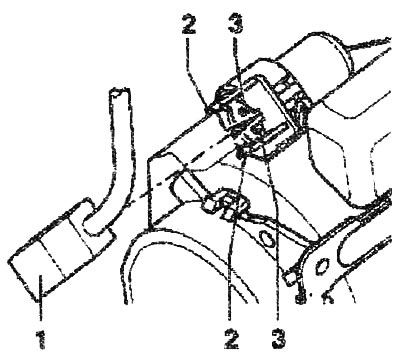


Carefully bend the locking latches «2» (2x) and pull out the plug «1». When installing, the «plug»…


Carefully bend the locking latches "2" (2x) and pull out the plug "1". When installing, the "plug" should lock with a click. Make sure that the pin terminals. "3" of the spark plug are not bent or pushed back. Make sure that the pin terminals "1" of the spark plug are not bent or pushed back.

Anchor point, seat belt buckle
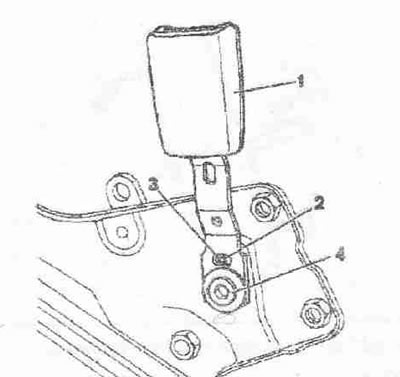


Remove the front seat. Remove the upholstery trim. Unscrew bolt «4», tightening torque 55 Nm. When…


Remove the front seat. Remove the upholstery trim. Unscrew bolt "4", tightening torque 55 Nm. When installing, thickening "2" should click into groove "3". Belt lock "2" is always in the highest position.


External floor attachment point
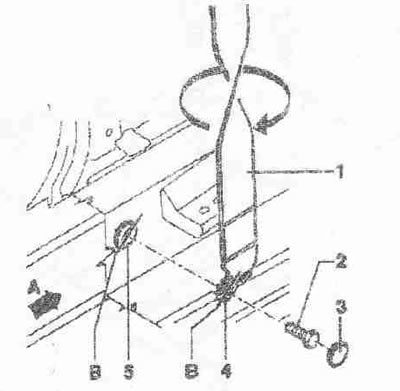


Remove cap «3». Unscrew screw «2» tightening torque 55 Nm. Install seat belt as shown in the…


Remove cap "3". Unscrew screw "2" tightening torque 55 Nm. Install seat belt as shown in the figure. twisting it 180° "arrow". Arrow "c -A" indicates the direction of movement. Pay attention to the position of bracket "5" and tightening pad "4" (axis "B").


Attachment point - rear seat belt buckle
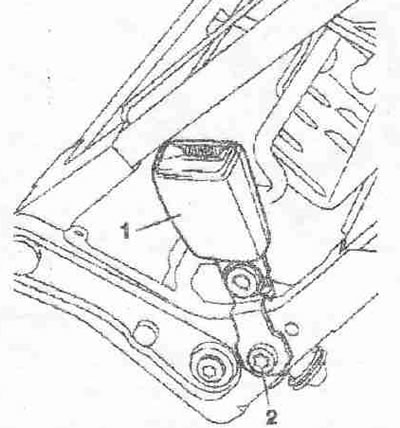


The picture shows the trim without the trim. Remove the rear seat. Unscrew the bolt «2». Tightening…


The picture shows the trim without the trim. Remove the rear seat. Unscrew the bolt "2". Tightening torque 55 Nm. Press the trim up (if necessary, unlock the trim panel) and pull out the belt buckle.

Anchor point - rear seat belt buckle for lightweight seats


Remove the rear seat. Unscrew bolt "3". Tightening torque - 55 Nm. When installing, the cover on the belt buckle shield "4" should snap into the groove of the belt buckle bracket.
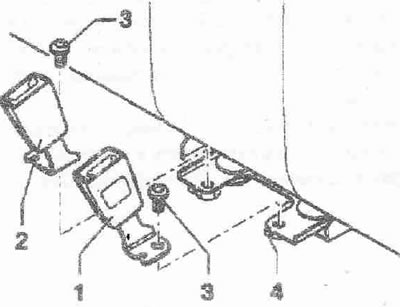
1. Left seat belt buckle

1. Left seat belt buckle
2. Right belt buckle
The article was checked by auto expert Daniil Ushakov
This article is available at russian, bulgarian, belarusian, ukrainian, serbian, croatian, romanian, polish, slovak, hungarian

Share information:
Previous articles
Audi A2: Safety system
Next articles

Seat belt anchor points
Safety precautions when handling pyrotechnic pretensioners
Removal and installation the rear three-point seat belt
Removal and installation the Isofix bracket on the front…
Safety precautions when working with airbags
An accident that causes the Airbag or seat belt tensioner to…


Similar articles on other Audi car models:
Seat belts Audi 80 B3 (1986-1991, petrol)
Electric seat adjustment drive Audi 100 C3 (1982-1990, diesel)
Visual inspection of the seat belt and airbag unit Audi A3 Type 8L (1996-2003)
Front three-point seat belt — removal and installation Audi A4 B8 (2007-2015)
Front seat belt tensioner mechanism Audi A6 C4 (1994-1997)
Checking the condition of the poly V-belt Audi A8 D2 (1994-2002)
Rear center three-point seat belt installation diagram Audi Q5 Type 8R (2008-2017)
Link to this page in different formats


Visitor comments

No comments yet


How much will 25 + 16 =


Audi A2(1999-2005) 
  • General information
  • Introduction to the guide
  • Maintenance
  • Engine 1.4 l (gasoline)
  • Engine repair
  • Lubrication system
  • Cooling system
  • Exhaust system
  • Engine 1.6 l (gasoline)
  • Engine repair
  • Lubrication system
  • Cooling system
  • Exhaust system
  • Engine 1.2 l (diesel)
  • Engine repair
  • Lubrication system
  • Cooling system
  • Injection and turbocharging
  • Engine 1.4 l (diesel)
  • Engine repair
  • Lubrication system
  • Cooling system
  • Turbocharging system
  • Supply system
  • Fuel injection system
  • Exhaust system
  • Transmission
  • Mechanical gearbox 02J
  • Mechanical gearbox 02T
  • Mechanical gearbox 085 DS
  • Chassis
  • Car suspension
  • Steering
  • Brake system
  • Body
  • Exterior
  • Interior
  • Seats
  • Doors, locks and windows
  • Safety system
  • Heating and air conditioning
  • Electrical equipment
  • Power devices
  • Equipment and devices
  • Wipers and washers
  • Lighting and lamps
  • Breakers and switches
  • Electrical circuits
 
AudiManual.ru © 2017-2026 · Mobile version · Feedback · Sitemap: EN BG BY UA RS HR RO PL SK HU · Site search · News and articles
80 B2 · 80 B3 petrol · 80 B3 · 80 B4 · 100 C3 diesel · 100 C3 petrol · 100 C3 · 100 C4 petrol · 100 C4 · A3 Type 8L · A4 B5 petrol · A4 B5 · A4 B6 petrol · A4 B6 · A4 B7 · A4 B8 · A6 C4 · A6 C5 · A6 C5 Allroad · A8 D2 · Q5 Type 8R · Q7 Typ 4L · Audi A2 ·
This site uses cookies 🍪. Click the button to accept this fact.