Repair Chevrolet Repair Toyota Repair Honda Repair AvtoVAZ Repair Mercedes-Benz Repair BMW Repair Opel
Home  |  Contacts  |  Sitemap  |    
English Русский
Български
Беларускі
Український
Српски
Hrvatski
Română
Polski
Slovenský
Magyar
AudiManual.ru


  • AUDI 80
  • AUDI 100
  • AUDI A3
  • AUDI A4
  • AUDI A6
  • AUDI A8
  • AUDI Q
  • OTHER
  • ARTICLES
A2 (1999-2005)

Removal and installation the head protection pillow (Audi A2)

  • Home
  • Audi
  • A2 (1999-2005)
  • Body
  • Safety system
  • Removal and installation the head protection pillow
            0
Table of contents: Gas generator on the C-pillar ↓ Disconnecting the upper airbag… ↓ C-pillar support shield ↓
1. Upper airbag. In vehicles with coded radio/radio navigation system (RNS), observe the coding and…

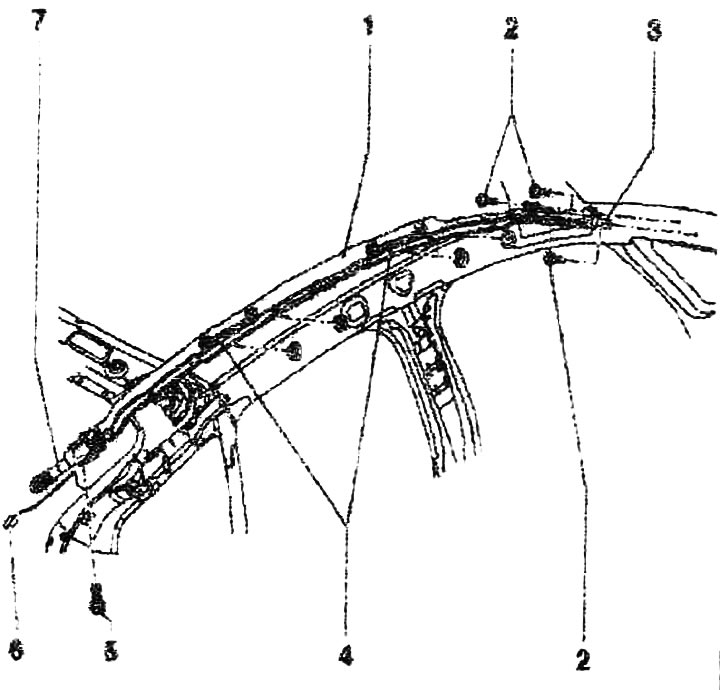
1. Upper airbag. In vehicles with coded radio/radio navigation system (RNS), observe the coding and request it if necessary. Disconnect the battery ground cable and remove the negative terminal. Remove the rear screen trim. Remove the rear bench seat. Remove the wheel arch trim. Remove the trunk floor trim. Remove the trunk trim. Remove the D-pillar trim. Remove the C-pillar trim. Remove the B-pillar upper trim. Remove the A-pillar upper trim. Remove the roof trim. Unscrew screws "5" (2 pcs.). Unscrew bolts "2" (3 pcs.). Remove the front part of the Ziirbag module on the seats. Disconnect connector "6" from the upper Airbag. Move gas generator "7" away from the D-pillar. Remove Airbag "1" from the vehicle. Strictly observe the sequence of installing the upper Airbag. Installation: Remove the upper Airbag "1" from the transport container and secure the upper Airbag sequence. Insert the gas generator "7" into the D-pillar. Screw in the bolts "2" (3x) to the trim "3", without tightening too much. Screw in the screws "5" (2 pcs.). Tighten the bolts "2" (3x) to the trim "3". Installation in the reverse order. Turn on the ignition. Connect the battery
2. Bolts (3 pcs.). Tightening torque 4.5 Nm. On weak threaded bushings, tighten the threaded bushings with rivet pliers
3. Overlay
3. The spacers are part of the upper Airbag kit
4. Screws (2 pcs.). Tightening torque 4.5 Nm. On weak threaded bushings, tighten the threaded bushings with rivet pliers
5. Connector, upper airbag
7. Gas generator


Gas generator on the C-pillar


Bolt "5" (2 pcs.), tightening torque 4.5 Nm. Insert gas generator "7" into pillar D.
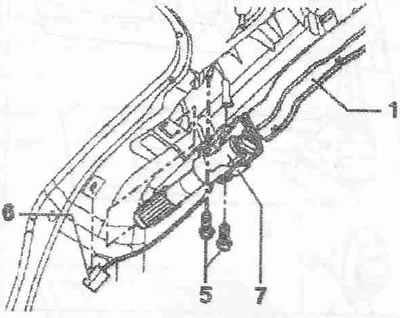
1. Upper airbag

1. Upper airbag
6. Airbag plug connector
7. Gas generator


Disconnecting the upper airbag connector


1. Support for fastening the connector

1. Support for fastening the connector


Press the lock "A" and pull out the connector in the direction of the arrow.

C-pillar support shield


Unscrew screws «2» (2 pcs.). Tightening torque 2.5 Nm. Remove the support shield.


Unscrew screws "2" (2 pcs.). Tightening torque 2.5 Nm. Remove the support shield.
The article was checked by auto expert Daniil Ushakov
This article is available at russian, bulgarian, belarusian, ukrainian, serbian, croatian, romanian, polish, slovak, hungarian

Share information:
Previous articles
Audi A2: Safety system
Next articles

Removal and installation the lateral acceleration sensor
Side Airbag Cable Routing
Removal and installation the side airbag
Removal the «Passenger Airbag Off» Warning Light


Similar articles on other Audi car models:
Cylinder head — removal and installation Audi 80 B3 (1986-1991, petrol)
Cylinder head — removal, inspection and installation Audi 100 C3 (1982-1990, diesel)
Removal and installation the cylinder head (petrol) Audi A3 Type 8L (1996-2003)
Installation and removal of the cylinder head Audi A4 B5 (1994-2001, petrol)
Removal and installation the cylinder head (diesel engine… Audi A6 C5 (1997-2004)
Removal and installation the engine Audi A8 D2 (1994-2002)
Turbocharger — removal and installation Audi Q5 Type 8R (2008-2017)
Link to this page in different formats


Visitor comments

No comments yet


How much will 37 + 19 =


Audi A2(1999-2005) 
  • General information
  • Introduction to the guide
  • Maintenance
  • Engine 1.4 l (gasoline)
  • Engine repair
  • Lubrication system
  • Cooling system
  • Exhaust system
  • Engine 1.6 l (gasoline)
  • Engine repair
  • Lubrication system
  • Cooling system
  • Exhaust system
  • Engine 1.2 l (diesel)
  • Engine repair
  • Lubrication system
  • Cooling system
  • Injection and turbocharging
  • Engine 1.4 l (diesel)
  • Engine repair
  • Lubrication system
  • Cooling system
  • Turbocharging system
  • Supply system
  • Fuel injection system
  • Exhaust system
  • Transmission
  • Mechanical gearbox 02J
  • Mechanical gearbox 02T
  • Mechanical gearbox 085 DS
  • Chassis
  • Car suspension
  • Steering
  • Brake system
  • Body
  • Exterior
  • Interior
  • Seats
  • Doors, locks and windows
  • Safety system
  • Heating and air conditioning
  • Electrical equipment
  • Power devices
  • Equipment and devices
  • Wipers and washers
  • Lighting and lamps
  • Breakers and switches
  • Electrical circuits
 
AudiManual.ru © 2017-2026 · Mobile version · Feedback · Sitemap: EN BG BY UA RS HR RO PL SK HU · Site search · News and articles
80 B2 · 80 B3 petrol · 80 B3 · 80 B4 · 100 C3 diesel · 100 C3 petrol · 100 C3 · 100 C4 petrol · 100 C4 · A3 Type 8L · A4 B5 petrol · A4 B5 · A4 B6 petrol · A4 B6 · A4 B7 · A4 B8 · A6 C4 · A6 C5 · A6 C5 Allroad · A8 D2 · Q5 Type 8R · Q7 Typ 4L · Audi A2 ·
This site uses cookies 🍪. Click the button to accept this fact.