
Removal
Warnings: Drained coolant must be collected and disposed of.
When opening the expansion tank cap on a hot engine, be careful because the escaping steam can cause severe burns. To do this, cover the expansion tank cap with a thick layer of cloth and slowly unscrew the cap until a hissing sound is heard. After the hissing stops, slowly unscrew and remove the cap from the expansion tank.
Install a VAG 1306 coolant collection pan under the engine.
Open the expansion tank cap.
Take it off front bumper.
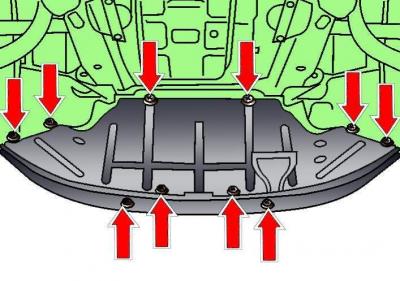
Fig. 3.1–1. Location of the engine compartment lower mudguard mounting fasteners
Release the fasteners and remove the lower engine compartment splash guard (see Fig. 3.1–1).
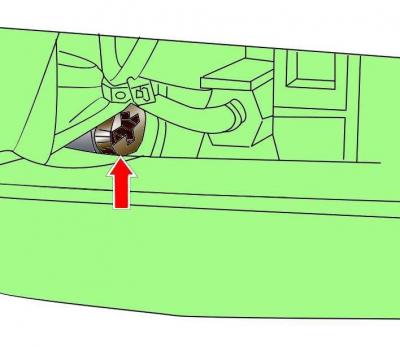
Fig. 7–5. Location of the radiator drain plug
Unscrew the radiator cap (see Fig. 7-5) and drain the coolant. To prevent coolant from spilling, insert a hose instead of the cap.
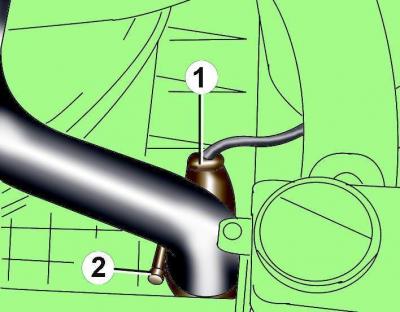
Fig. 7–31. Location of the electrical connector (1) of the fan switch temperature sensor and the clamp (2) for fastening the cooling system hose
Loosen clamp 2 (Fig. 7–31), remove the hose and drain the coolant.
At the lower left side of the radiator, disconnect the electrical connector 1 of the fan switch temperature sensor.
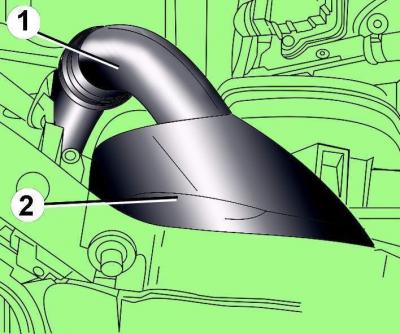
Fig. 3.1–10. Location of the air duct (1) and air intake (2) near the front engine crossmember
Separate air intake 2 (see Fig. 3.1–10) from the front crossmember and remove it together with air pipe 1.
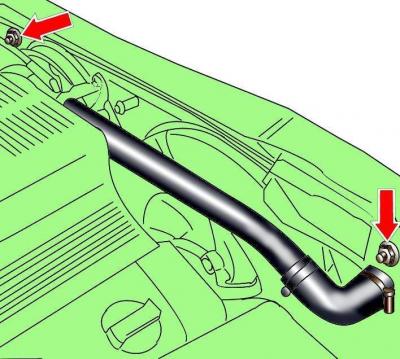
Fig. 7–32. Location of the upper mounting nuts to the front crossmember and the clamp for fastening the hose to the radiator
Loosen the clamp (Fig. 7–32) and remove the upper hose from the radiator.
Unscrew the two nuts of the upper fastening to the front crossmember (see Fig. 7–32).
Remove the decorative covers from the headlights.

Fig. 7–33. Location of mounting screws (2, 5) for headlight decorative trim brackets and nuts (1, 3, 4, 6) radiator mounts
Unscrew screws 2 and 5 (Fig. 7–33) securing the brackets for the decorative headlight trims
Unscrew the four nuts 1, 3, 4 and 6 securing the radiator.
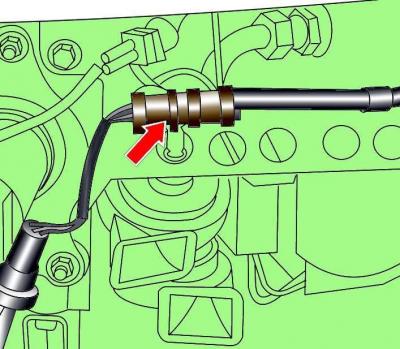
Fig. 7–34. Electrical connector location
Disconnect the electrical connector behind the left headlight (Fig. 7–34)
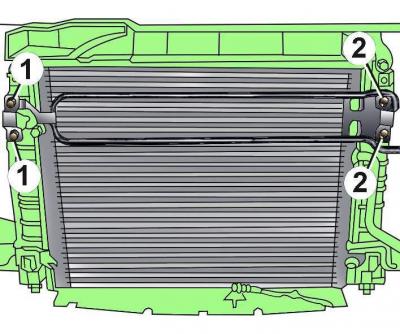
Fig. 7–35. Location of heat exchanger mounting bolts (1, 2)
Unscrew bolts 1 and 2 (Fig. 7–35) securing the heat exchanger.
Unscrew the power steering cooling system pipe and, without disconnecting it, move it to the side.
Unscrew the two nuts at the bottom of the radiator, shown by the arrows in Fig. 7–35.
Remove the heat exchanger from the bracket and move it to the side.
Tilt the radiator and lift it upwards out of the engine compartment.
Examination
If the radiator was removed due to a decrease in throughput, flush it with a stream of water in two directions and blow it out from the outside with compressed air.
If the radiator is leaking, do not attempt to weld or solder the leak, as this will damage the plastic parts of the radiator.
A minor radiator leak can be repaired with sealant.
Check the condition of the lower radiator rubber mounts and replace them if necessary.
Installation
Installation is carried out in the reverse order of removal.
Install front bumper.
Fill with coolant.
[The original text is available on the website: audimanual.ru]