
Rear wiper arm

- 1 - brush
- 2 - cap
- 3 - nut, 16 Nm
- 4 - spring washer
- 5 - wiper lever
- 6 - nozzle
- 7 - electric motor drive shaft
- 8 - brush rubber
Rear wiper motor
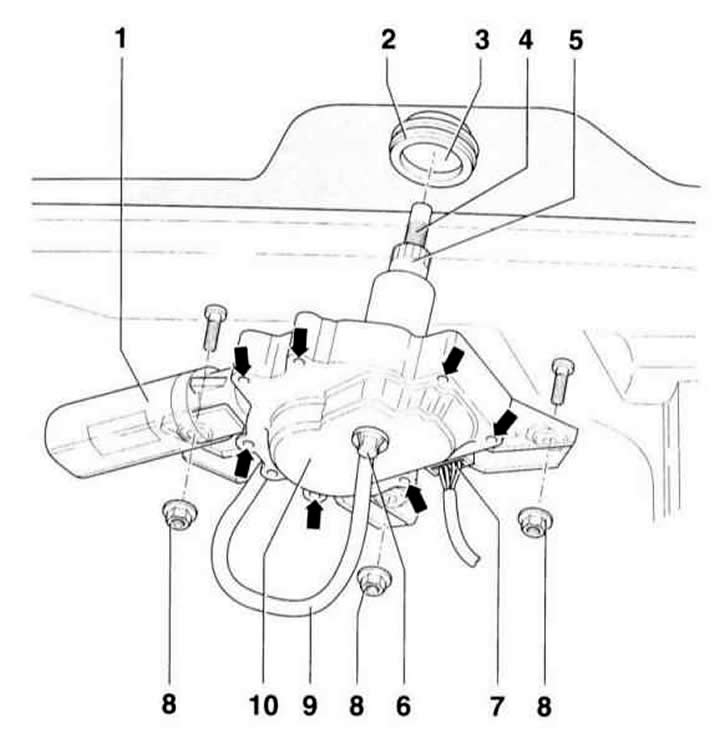
- 1 - electric motor
- 2 - sealing rubber
- 3 - hole in the rear window
- 4 - nozzle
- 5 - rear wiper drive shaft
- 6 - connecting tube
- 7 - connector
- 8 - nuts, 3 pcs., key 10 mm
- 9 - water hose
- 10 - Electric motor cover
Rear wiper arm
Removal
1. Carefully pry up and remove the cap –2– using a small screwdriver.
2. Unscrew nut –3– and remove it together with spring washer –4–.
3. Remove the lever –6– from the electric motor shaft –7–.
Installation
1. Turn off the windshield wiper motor switch.
2. Position the lever so that the rubber –8– is 5 mm away from the ceramic.
3. Tighten the lever to 8 Nm and replace the cap.
4. Turn on the rear window wiper and move it if necessary.
Rear wiper motor
Removal
1. Remove the lever.
2. Remove the inner trim of the tailgate, refer to the subsection Removal and installation the tailgate trim.
3. Disconnect connector –7–.
4. Carefully remove the water hose –9– from the connecting pipe –6–.
5. Loosen nuts –8– and remove wiper motor –1–.
Installation
1. Carefully insert the sealing rubber –2– into the rear window opening –3–.
2. Carefully insert the electric motor into the sealing rubber –2– and press it onto the pin with a torque of 8 Nm.
3. Further installation is carried out in the reverse order of removal.