Repair Chevrolet Repair Toyota Repair Honda Repair AvtoVAZ Repair Mercedes-Benz Repair BMW Repair Opel
Home  |  Contacts  |  Sitemap  |    
English Русский
Български
Беларускі
Український
Српски
Hrvatski
Română
Polski
Slovenský
Magyar
AudiManual.ru


  • AUDI 80
  • AUDI 100
  • AUDI A3
  • AUDI A4
  • AUDI A6
  • AUDI A8
  • AUDI Q
  • OTHER
  • ARTICLES
Type 8L (1996-2003)

Removal and installation the front wiper motor (Audi A3 8L)

  • Home
  • Audi A3
  • Type 8L (1996-2003)
  • Electrical equipment
  • Lighting and appliances
  • Removal and installation the front wiper motor
            0
Table of contents: Removal ↓ Installation ↓

Removal


1. Remove the wiper arms, refer to subsection Removal and installation, checking and adjustment of the final position of the windshield wiper arms.

2. Remove the heated windshield, refer to subsection Removal and installation windshield washer nozzles.

2. Remove the heated windshield, refer to subsection Removal and installation windshield washer…


3. Disconnect the wiper motor connector.

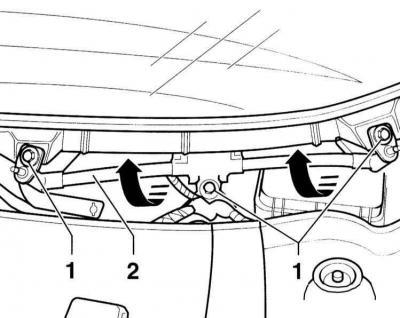
4. Remove 3 mounting screws (key 10 mm) –1–.

5. Carefully fold the wiper frame –2– (arrows) forward and then remove it as a set to the left from the water collection compartment.

5. Carefully fold the wiper frame –2– (arrows) forward and then remove it as a set to the left from…


6. Disconnect the rod –3– from the ball joint (arrow on the illustration).

Warning: Nut (key 10 mm) the crank of the electric motor should not be unscrewed.


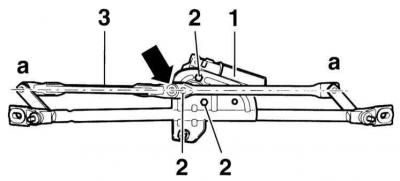
7. Unscrew 3 screws –2– (key "10") on the wiper motor holder.


8. Remove the electric motor –1– from the holder.

Installation


Installation


1. Fasten the electric motor –1– with the crank to the holder –2–.

2. Set the rod –3– to the extreme position. In this case, the points (a) should lie on the same line.

3. In this position, place the rod on the hinge head (arrow).

4. Connect the connector to the wiper motor.

5. First insert the frame with the electric motor into the water collection compartment.

6. Fold the wiper frame forward and tighten to 8 Nm.

7. Install heated windshield, refer to subsection Removal and installation windshield washer nozzles.

8. Install the levers, refer to the subsection Removal and installation, checking and adjustment of the final position of the windshield wiper arms.

9. Connect the battery ground (–) cable.

Warning: Activate the automatic electric window lifter, and also set the clock and enter the radio code, refer to the subsection Entering the radio code.
The article was checked by auto expert Nikita Rudakov
This article is available at russian, bulgarian, belarusian, ukrainian, serbian, croatian, romanian, polish, slovak, hungarian

Share information:
Previous articles
Audi A3 Type 8L: Lighting and appliances
Next articles

Additional installation of a radiotelephone on specially…
Removal and installation the roof antenna
Removal and installation the loudspeaker
Entering the radio code
Removal and installation the rear wiper arm and motor
Removal and installation the rear window wiper
Removal and installation the reservoir with the windshield…
Elements of Tempostat


Similar articles on other Audi car models:
Windscreen wiper motor and frame — removal and installation Audi 80 B3 (1986-1991, petrol)
Windscreen wiper linkage and motor — removal and installation Audi 100 C3 (1982-1990, diesel)
Removal and installation the windshield wiper motor Audi A4 B6 (2000-2006)
Windshield Wiper Motor — Removal and Installation Audi A6 C5 Allroad (1999-2005)
Removal and installation the engine Audi A8 D2 (1994-2002)
Removal the front panel of the sunroof electric motor Audi Q5 Type 8R (2008-2017)
Removal and installation the windshield wiper motor with bracket Audi A2 (1999-2005)
Link to this page in different formats


Visitor comments

No comments yet


How much will 50 + 31 =


A3(8L, 1996-2003) 
  • General information
  • User manual
  • Maintenance
  • Power unit
  • Engine repair
  • Lubrication system
  • Cooling system
  • Supply system
  • Fuel injection system
  • Exhaust system
  • Ignition system
  • Transmission
  • Manual transmission
  • Automatic transmission
  • Clutch and drive shafts
  • Chassis
  • Brake system
  • Front suspension
  • Rear suspension
  • Steering
  • Body
  • Ventilation and heating
  • Exterior (external elements)
  • Interior (internal elements)
  • Doors, covers and windows
  • Electrical equipment
  • Power devices
  • Lighting and appliances
  • Electrical circuits
 
AudiManual.ru © 2017-2026 · Mobile version · Feedback · Sitemap: EN BG BY UA RS HR RO PL SK HU · Site search · News and articles
80 B2 · 80 B3 petrol · 80 B3 · 80 B4 · 100 C3 diesel · 100 C3 petrol · 100 C3 · 100 C4 petrol · 100 C4 · A3 Type 8L · A4 B5 petrol · A4 B5 · A4 B6 petrol · A4 B6 · A4 B7 · A4 B8 · A6 C4 · A6 C5 · A6 C5 Allroad · A8 D2 · Q5 Type 8R · Q7 Typ 4L · Audi A2 ·
This site uses cookies 🍪. Click the button to accept this fact.