
Repair Chevrolet Repair Toyota Repair Honda Repair AvtoVAZ Repair Mercedes-Benz Repair BMW Repair Opel
Home  |  Contacts  |  Sitemap  |    
English Русский
Български
Беларускі
Український
Српски
Hrvatski
Română
Polski
Slovenský
Magyar
AudiManual.ru


  • AUDI 80
  • AUDI 100
  • AUDI A3
  • AUDI A4
  • AUDI A6
  • AUDI A8
  • AUDI Q
  • OTHER
  • ARTICLES
A2 (1999-2005)

Disassembly and assembly of the gearshift mechanism drive (Audi A2)

  • Home
  • Audi
  • A2 (1999-2005)
  • Transmission
  • Mechanical gearbox 085 DS
  • Disassembly and assembly of the gearshift mechanism drive
            0
Table of contents: Disassembly ↓ Assembly ↓

Disassembly


Remove the gearshift mechanism drive. Remove the fastening.

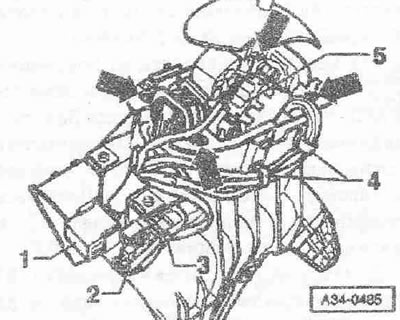
Disconnect connector "1" from the mount. Disconnect electrical connectors "2" and "5". Cut cable tie "3" and remove cable clamp "4". Unscrew the "arrow" bolts, remove the gearshift mechanism drive from the housing.
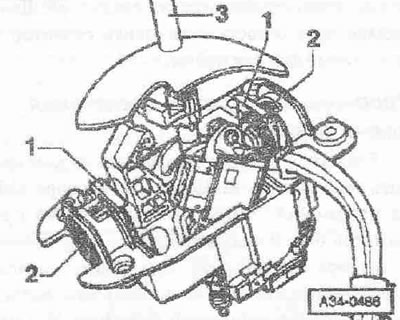
Use a screwdriver to remove the lock washers «1». Remove both support bushings «2» of the automatic…


Use a screwdriver to remove the lock washers "1". Remove both support bushings "2" of the automatic transmission selector from the support plate. Remove the automatic transmission selector "3".
Carefully and evenly remove the automatic transmission selector position recognition sensor E…


Carefully and evenly remove the automatic transmission selector position recognition sensor E "E258" pos. "1" using the lever "80.200", pressing the locking tabs "arrow" outward.
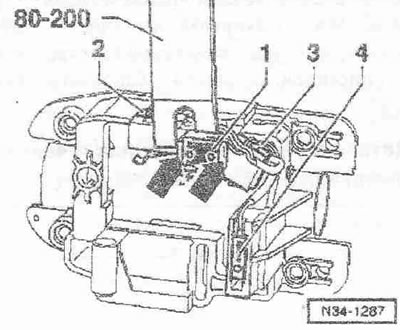


Instructions: There are 2 pins in the mount that hold the sensor in the desired position. Be…


Instructions: There are 2 pins in the mount that hold the sensor in the desired position. Be careful not to damage the pins.


Disconnect sensors "2, 3, 4" from the support plate fasteners. Remove the wiring harness together with the sensors from the support plate.

Assembly


Installation is in reverse order, taking into account the following: install the wiring harness together with the sensors:
  • 1. Automatic transmission selector N position recognition sensor "F258"
  • 2. Automatic transmission selector position recognition sensor E "F271"
  • 3. Automatic transmission selector "Stop" position recognition sensor "F259"
  • 4. Sensor for recognizing in which groove the selector lever of the automatic transmission is located "F257"
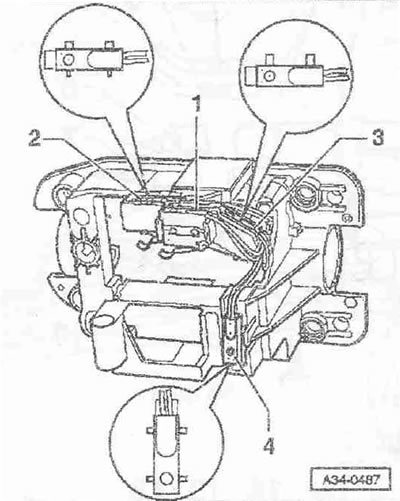
Insert the N position recognition sensor for the automatic transmission selector «F258» vertically…


Insert the N position recognition sensor for the automatic transmission selector "F258" vertically from above into the mount "arrow above". Do not damage the journals "A". Insert the wire "arrow" into the recess in the support plate and secure with cable ties "B". Check the wiring and plug-in connectors in accordance with the electrical diagram. Insert the automatic transmission selector "3" into the support plate. Insert the support sleeves "2" of the automatic transmission selector into the support plate from the front or rear. Install the lock washers "1" of the support sleeves into the support plate. The curved edges face inward. Insert the gearshift mechanism drive into the housing and tighten the bolts "arrow". Insert the plug connector "1" into the mount, connect the connector "2" and secure with a cable tie "3". Connect the plug connector "5".
The article was checked by auto expert Daniil Ushakov
This article is available at russian, bulgarian, belarusian, ukrainian, serbian, croatian, romanian, polish, slovak, hungarian

Share information:
Previous articles
Audi A2: Mechanical gearbox 085 DS
Next articles

Removal and installation the gearshift mechanism drive
Gear shift mechanism drive — design description
Removal and installation the fastener and insert with symbols
Removal and installation the switch button and casing
Removal and installation the automatic transmission selector…
Removal and installation the selector potentiometer
Removal and installation the N110 automatic transmission…
Gear shift unit — design description


Similar articles on other Audi car models:
Checking and adjusting clearances in the valve drive mechanism Audi 80 B2 (1979-1986)
Checking and adjusting clearances in the valve drive mechanism Audi 100 C3 (1982-1990, petrol)
Checking the condition of the protective covers of the drive… Audi A3 Type 8L (1996-2003)
Gear shift mechanism drive and handle with gear shift lever cover Audi A4 B8 (2007-2015)
Timing belt for gas distribution mechanism drive — design… Audi A6 C5 Allroad (1999-2005)
Checking the drive shaft protective cover Audi A8 D2 (1994-2002)
Gearshift mechanism drive Audi Q5 Type 8R (2008-2017)
Link to this page in different formats


Visitor comments

No comments yet


How much will 22 + 49 =


Audi A2(1999-2005) 
  • General information
  • Introduction to the guide
  • Maintenance
  • Engine 1.4 l (gasoline)
  • Engine repair
  • Lubrication system
  • Cooling system
  • Exhaust system
  • Engine 1.6 l (gasoline)
  • Engine repair
  • Lubrication system
  • Cooling system
  • Exhaust system
  • Engine 1.2 l (diesel)
  • Engine repair
  • Lubrication system
  • Cooling system
  • Injection and turbocharging
  • Engine 1.4 l (diesel)
  • Engine repair
  • Lubrication system
  • Cooling system
  • Turbocharging system
  • Supply system
  • Fuel injection system
  • Exhaust system
  • Transmission
  • Mechanical gearbox 02J
  • Mechanical gearbox 02T
  • Mechanical gearbox 085 DS
  • Chassis
  • Car suspension
  • Steering
  • Brake system
  • Body
  • Exterior
  • Interior
  • Seats
  • Doors, locks and windows
  • Safety system
  • Heating and air conditioning
  • Electrical equipment
  • Power devices
  • Equipment and devices
  • Wipers and washers
  • Lighting and lamps
  • Breakers and switches
  • Electrical circuits
 
AudiManual.ru © 2017-2026 · Mobile version · Feedback · Sitemap: EN BG BY UA RS HR RO PL SK HU · Site search · News and articles
80 B2 · 80 B3 petrol · 80 B3 · 80 B4 · 100 C3 diesel · 100 C3 petrol · 100 C3 · 100 C4 petrol · 100 C4 · A3 Type 8L · A4 B5 petrol · A4 B5 · A4 B6 petrol · A4 B6 · A4 B7 · A4 B8 · A6 C4 · A6 C5 · A6 C5 Allroad · A8 D2 · Q5 Type 8R · Q7 Typ 4L · Audi A2 ·
This site uses cookies 🍪. Click the button to accept this fact.