Repair Chevrolet Repair Toyota Repair Honda Repair AvtoVAZ Repair Mercedes-Benz Repair BMW Repair Opel
Home  |  Contacts  |  Sitemap  |    
English Русский
Български
Беларускі
Український
Српски
Hrvatski
Română
Polski
Slovenský
Magyar
AudiManual.ru


  • AUDI 80
  • AUDI 100
  • AUDI A3
  • AUDI A4
  • AUDI A6
  • AUDI A8
  • AUDI Q
  • OTHER
  • ARTICLES
A2 (1999-2005)

Removal and installation the fuel level indicator sensor (Audi A2)

  • Home
  • Audi
  • A2 (1999-2005)
  • Engine 1.4 l (diesel)
  • Supply system
  • Removal and installation the fuel level indicator sensor
            0
Table of contents: Removal ↓ Installation ↓

Removal


When removing the fuel level indicator sensor, the tank can be filled to a maximum of 3/4. If necessary, remove fuel from the fuel tank.

Fold back or remove the rear bench seat. Fold back the trim under the rear seat. Rotate the fuel…


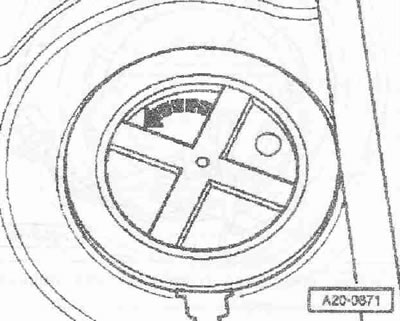
Fold back or remove the rear bench seat. Fold back the trim under the rear seat. Rotate the fuel level indicator sensor cover in the direction of the arrow and remove the cover.

Disconnect the electrical plug connection «arrow» on the blind flange.


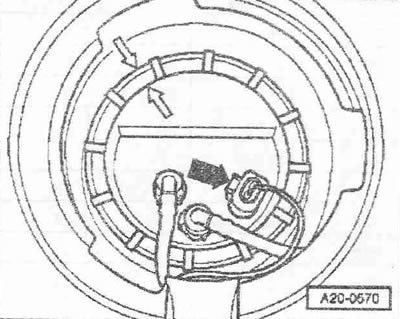
Disconnect the electrical plug connection "arrow" on the blind flange.

Mark the supply «1» and return «2» fuel lines. Remove both lines from the blind flange by pressing…


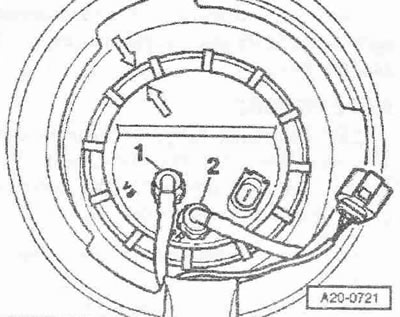
Mark the supply "1" and return "2" fuel lines. Remove both lines from the blind flange by pressing the release buttons.


A/m with additional heater


Disconnect the fuel line leading to the auxiliary heater metering pump.

All cars


All cars


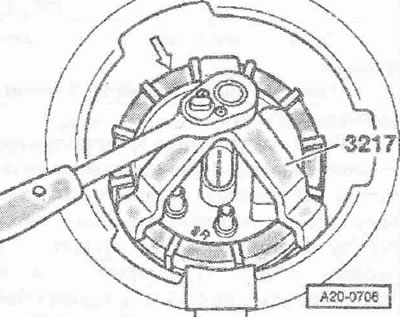
Unscrew the union nut using the union nut wrench "3217". Remove the fuel level indicator sensor with the fuel pumping unit and sealing ring from the fuel tank opening.

Instructions. When removing the fuel pumping unit, make sure that the float lever of the fuel level indicator sensor "G" is not bent. Note that there is still fuel in the fuel pumping unit. Before disconnecting the plug connections of the fuel level indicator sensor "G", you must first unlock the locking tabs of the plug contact.


Unlock the locking tabs of the plug connections «1» and «2» and remove them. Using a screwdriver,…


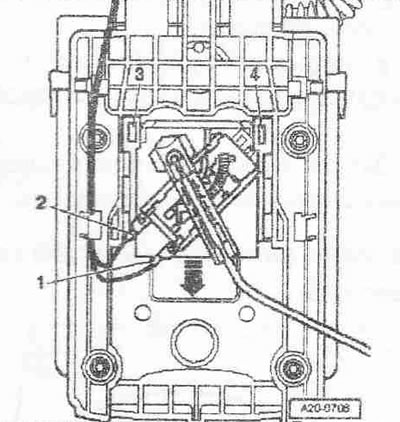
Unlock the locking tabs of the plug connections "1" and "2" and remove them. Using a screwdriver, lift the mounting plates "3" and "4" and remove the fuel level indicator sensor "G" in the downward direction "arrow".


Installation


Installation in reverse order. In this case, replace the sealing cuff. When installing the fuel pumping module, make sure not to bend the float lever of the fuel level sensor. Insert the fuel level indicator sensor "G" into the guides on the fuel pumping unit and press it up until it clicks. Connect the plug connections and check the reliability of their fastening.

Dry-fit a new sealing ring to the blind flange. Insert the fuel pump module into the fuel tank.…


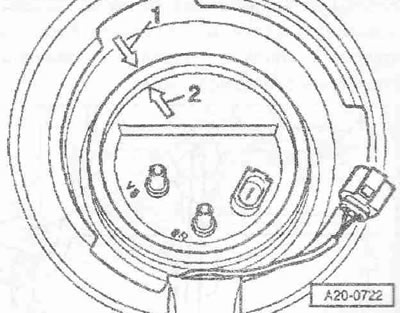
Dry-fit a new sealing ring to the blind flange. Insert the fuel pump module into the fuel tank. Overcoming the resistance of the spring, press the blind flange down and bring it to the installation position. Arrow "2" on the blind flange must match arrow "1" on the fuel tank.

Tighten the union nut using the union nut wrench «3217».


Tighten the union nut using the union nut wrench "3217".


Connect the fuel lines: Blue fuel return line «2» at the connection marked «R». Black fuel supply…


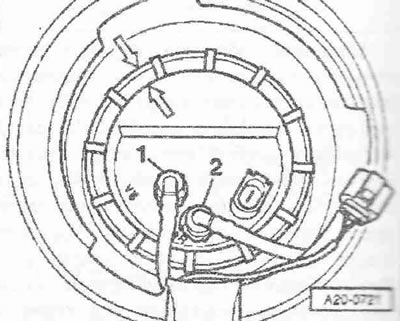
Connect the fuel lines: Blue fuel return line "2" at the connection marked "R". Black fuel supply line "1" at the connection marked "V". Tightening torque: Fuel suction module union nut: 80 Nm.

This publication is borrowed from the resource Audimanual.ru
The article was checked by auto expert Daniil Ushakov
This article is available at russian, bulgarian, belarusian, ukrainian, serbian, croatian, romanian, polish, slovak, hungarian

Share information:
Previous articles
Audi A2: Supply system
Next articles

Check the fuel level indicator sensor
Fuel pumping unit and fuel level indicator sensor
Removal and installation the fuel tank
Removal and installation the gravity feed valve
Checking a tandem pump
Removal and installation of a tandem pump
Removal and installation the fuel cooler
Fuel filter (before 04.2002) — design description


Similar articles on other Audi car models:
Fuel level sensor — removal and installation Audi 80 B3 (1986-1991, petrol)
Fuel level sensor — removal and installation Audi 100 C3 (1982-1990, diesel)
Removal and installation the fuel pump / fuel level sensor Audi A3 Type 8L (1996-2003)
Removal and installation a fuel pump with a fuel level sensor Audi A4 B6 (2000-2006)
Wiring diagram of the instrument cluster display, control lamps,… Audi A6 C5 (1997-2004)
Fuel pump / fuel level sensor Audi A8 D2 (1994-2002)
Removal the fuel level sensor «G» Audi Q5 Type 8R (2008-2017)
Link to this page in different formats


Visitor comments

No comments yet


How much will 38 + 24 =


Audi A2(1999-2005) 
  • General information
  • Introduction to the guide
  • Maintenance
  • Engine 1.4 l (gasoline)
  • Engine repair
  • Lubrication system
  • Cooling system
  • Exhaust system
  • Engine 1.6 l (gasoline)
  • Engine repair
  • Lubrication system
  • Cooling system
  • Exhaust system
  • Engine 1.2 l (diesel)
  • Engine repair
  • Lubrication system
  • Cooling system
  • Injection and turbocharging
  • Engine 1.4 l (diesel)
  • Engine repair
  • Lubrication system
  • Cooling system
  • Turbocharging system
  • Supply system
  • Fuel injection system
  • Exhaust system
  • Transmission
  • Mechanical gearbox 02J
  • Mechanical gearbox 02T
  • Mechanical gearbox 085 DS
  • Chassis
  • Car suspension
  • Steering
  • Brake system
  • Body
  • Exterior
  • Interior
  • Seats
  • Doors, locks and windows
  • Safety system
  • Heating and air conditioning
  • Electrical equipment
  • Power devices
  • Equipment and devices
  • Wipers and washers
  • Lighting and lamps
  • Breakers and switches
  • Electrical circuits
 
AudiManual.ru © 2017-2026 · Mobile version · Feedback · Sitemap: EN BG BY UA RS HR RO PL SK HU · Site search · News and articles
80 B2 · 80 B3 petrol · 80 B3 · 80 B4 · 100 C3 diesel · 100 C3 petrol · 100 C3 · 100 C4 petrol · 100 C4 · A3 Type 8L · A4 B5 petrol · A4 B5 · A4 B6 petrol · A4 B6 · A4 B7 · A4 B8 · A6 C4 · A6 C5 · A6 C5 Allroad · A8 D2 · Q5 Type 8R · Q7 Typ 4L · Audi A2 ·
This site uses cookies 🍪. Click the button to accept this fact.