



Table of contents: Removal ↓ Installation ↓
The fuel pump together with the fuel level sensor in petrol engines is located in the reserve fuel tank. In AUDI A3 cars with a diesel engine, the fuel is sucked in by the high-pressure fuel pump. Therefore, only the level sensor is located in the fuel tank. All-wheel drive cars, due to the presence of a cardan shaft that takes up space, have a fuel tank consisting of two parts. In this case, each of the two halves of the fuel tank has its own level sensor. The electric fuel pump is located in the right tank.
The fuel level sensor consists of a float and a potentiometer. When the fuel level drops, the float also drops. The potentiometer connected to the float increases the resistance of the sensor. Thus, the voltage on the instrument panel decreases and the fuel gauge moves towards "empty". In vehicles with a two-part fuel tank, the processor calculates the total fuel supply based on the signals from both sensors, controlling the fuel gauge on the instrument panel.
Warning: When removing the fuel pump, some fuel may leak out. Fuel vapors are toxic and flammable, so make sure the work area is especially well ventilated. Avoid contact with skin. Wear fuel-resistant gloves. Do not use open flames. There is a risk of fire! Keep a fire extinguisher handy.
Warning: Before removing the fuel pump and reserve sensor, it is advisable to empty the tank. For ventilation of the workplace, a radial fan can be used, the electric motor of which is located outside the air flow.
Removal
1. Disconnect the negative (–) battery cable with the ignition off.
Warning: This will erase information from electronic memory units, such as the radio code. Without the code, the radio can only be switched on by the manufacturer or an AUDI service station. Therefore, please read the materials in the subsection Entering the radio code.
2. Fold the rear seat back and unscrew the fuel reserve sensor and fuel pump cover.
Warning: The fuel system is under pressure! Before opening the hose connections, place a thick rag on it. Then carefully open the hose and relieve the pressure. Wear protective glasses when doing this.
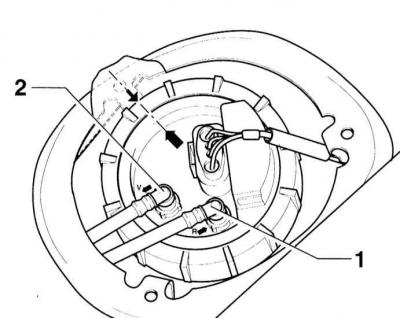
3. Disconnect the supply –2– and return –1– pipelines by squeezing the stoppers on the quick-release couplings. Close the pipelines with plugs, for example, a bolt with sealant.
4. Disconnect the fuel reserve sensor/fuel pump connector.
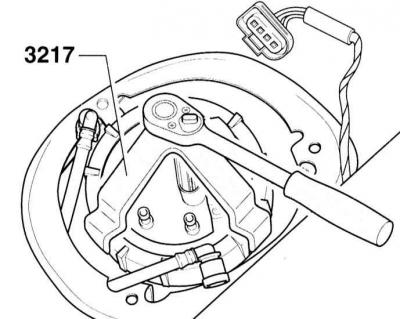
5. Unscrew the union nut using the special tool AUDI–3217.
Warning: If the specified tool is not available, loosen the nut using a wooden block and light hammer blows.
Warning: Do not allow sparks to form under any circumstances.
6. Remove the pump unit/reserve sensor and sealing ring from the fuel tank opening.
7. Drain the fuel from the pump unit into a tank or suitable container.
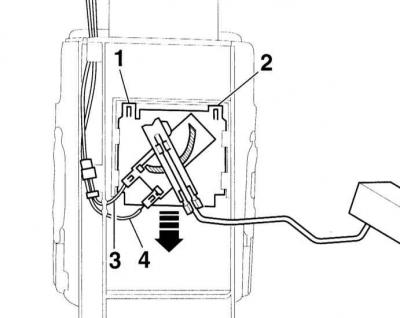
8. If necessary, remove the fuel reserve sensor. To do this, release the wire connections –3– and –4–. Use a screwdriver to lift the locking strips –1– and –2– and remove the sensor downwards.
Installation
1. Insert the sensor into the guides on the holder and press up until it locks. Connect the electrical wires on the reserve sensor.
2. Install the pump unit into the fuel tank. Make sure that the fuel reserve indicator sensor is not bent. Moisten the sealing ring with fuel before installation.
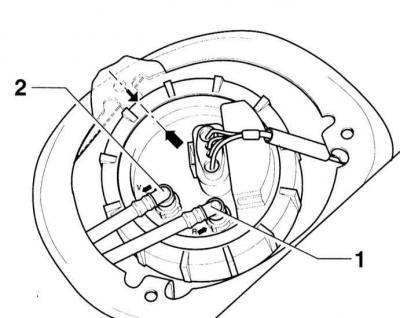
3. Check the position of the flange. The arrow on the cover should point in the direction of the arrow on the tank, refer to the illustration.
4. Tighten the union nut with the special tool AUDI–3217, tightening force 60 Nm. You can tighten the union nut with light hammer blows through a wooden block.
5. Attach the supply and return hoses, making sure the quick-release couplings are locked into place. Use new band clamps when attaching. The return hose is blue, the supply hose is black. The arrows on the flange indicate the direction of fluid flow.
6. Connect the electrical connections.
7. Secure the fuel reserve sensor cover.
8. Put the back seat back in place.
9. Connect the negative (–) cable to the battery.
Warning: Activate the automatic safety of the electric windows, enter the code of the radio receiver, set the clock, and refer to the subsection Entering the radio code.