Repair Chevrolet Repair Toyota Repair Honda Repair AvtoVAZ Repair Mercedes-Benz Repair BMW Repair Opel
Home  |  Contacts  |  Sitemap  |    
English Русский
Български
Беларускі
Український
Српски
Hrvatski
Română
Polski
Slovenský
Magyar
AudiManual.ru


  • AUDI 80
  • AUDI 100
  • AUDI A3
  • AUDI A4
  • AUDI A6
  • AUDI A8
  • AUDI Q
  • OTHER
  • ARTICLES
A2 (1999-2005)

Checking the pre-heating system (Audi A2)

  • Home
  • Audi
  • A2 (1999-2005)
  • Engine 1.4 l (diesel)
  • Supply system
  • Checking the pre-heating system
            0
Table of contents: Functional check ↓ Checking glow plugs (AMF, VNS) ↓ Checking glow plugs (aTL engine… ↓ Removal and installation glow plugs ↓
Instructions: The pre-glow system is controlled by the glow plug control unit "J179".


Used glow plugs "J179" have a self-diagnosis function. If the pre-glow system fails, an error is stored in the engine control unit. Used glow plugs "J179" are installed in the 3-slot relay board in the footwell on the front left in the 2-slot relay.

Functional check


Remove the plugs from the glow plugs. Connect the hand-held multimeter "VAG 1526C" to one of the plugs and to the engine ground. Select the actuator diagnostic mode and turn on the glow plug relay. Set value: approx. battery voltage (every 5 seconds). If the specified value is not reached: Eliminate possible open or short circuit in the wiring. Check the glow plug relay "J52". The diagnostic tester "VAS 5052" should be used.

Checking glow plugs (AMF, VNS)


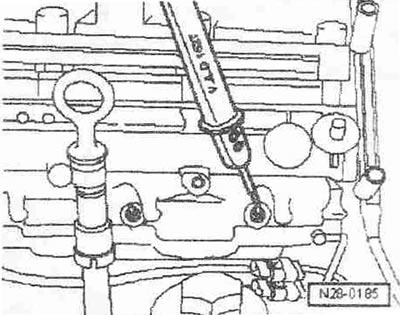
Test conditions: battery voltage at least 11.5 volts. Switch off ignition. Remove plugs from glow plugs. Connect wire of LED test lamp using terminals from auxiliary and measuring tool set "VAG 1594 C" to positive terminal of battery (+). Install test probe of LED test lamp to each glow plug in turn. LED lights: glow plug is in good condition. LED does not light: remove and install glow plugs using 10 mm swivel wrench "VAS 3220". Place glow plug to be tested on fireproof surface. Connect glow plug pin to positive terminal of charged 12-volt battery. Connect glow plug thread to negative terminal of battery.


Instructions: To connect the glow plug, use wires with a minimum cross-section of 2.5 mm².


The wires must be equipped with stable terminals. Observe the glow plug glowing process. If the…


The wires must be equipped with stable terminals. Observe the glow plug glowing process. If the glow plug does not glow or only part of the pin glows, the glow plug should be replaced.

Checking glow plugs (aTL engine letter designation)


Instructions. On vehicles with the engine letter designation "ATL", the functioning and conductivity of the glow plugs should not be checked using a DC source (e.g. 12 Volt battery). There is a risk of damage to the glow plugs.

Removal and installation glow plugs


Disconnect the corresponding plug of the glow plug to be removed. Tightening torque: Glow plugs: 15 Nm.

The original publication in its entirety is posted on the website audimanual
The article was checked by auto expert Daniil Ushakov
This article is available at russian, bulgarian, belarusian, ukrainian, serbian, croatian, romanian, polish, slovak, hungarian

Share information:
Previous articles
Audi A2: Supply system
Next articles

Adjusting the gas pedal stop
Removal and installation the gas pedal module with position…
Accelerator pedal — design description
Removal and installation the fuel changeover valve


Similar articles on other Audi car models:
Checking the oil pressure in the lubrication system Audi 80 B2 (1979-1986)
Pre-heating system Audi 100 C3 (1982-1990, diesel)
Checking the fuel system Audi A3 Type 8L (1996-2003)
Checking the fluid level in the servo control system Audi A4 B5 (1994-2001, petrol)
Checking the exhaust system Audi A6 C5 (1997-2004)
Checking the pre-heating system of diesel engines Audi A8 D2 (1994-2002)
Replacing the coolant, checking and adjusting its level,… Audi Q7 Typ 4L (2005-2015, diesel)
Link to this page in different formats


Visitor comments

No comments yet


How much will 49 + 25 =


Audi A2(1999-2005) 
  • General information
  • Introduction to the guide
  • Maintenance
  • Engine 1.4 l (gasoline)
  • Engine repair
  • Lubrication system
  • Cooling system
  • Exhaust system
  • Engine 1.6 l (gasoline)
  • Engine repair
  • Lubrication system
  • Cooling system
  • Exhaust system
  • Engine 1.2 l (diesel)
  • Engine repair
  • Lubrication system
  • Cooling system
  • Injection and turbocharging
  • Engine 1.4 l (diesel)
  • Engine repair
  • Lubrication system
  • Cooling system
  • Turbocharging system
  • Supply system
  • Fuel injection system
  • Exhaust system
  • Transmission
  • Mechanical gearbox 02J
  • Mechanical gearbox 02T
  • Mechanical gearbox 085 DS
  • Chassis
  • Car suspension
  • Steering
  • Brake system
  • Body
  • Exterior
  • Interior
  • Seats
  • Doors, locks and windows
  • Safety system
  • Heating and air conditioning
  • Electrical equipment
  • Power devices
  • Equipment and devices
  • Wipers and washers
  • Lighting and lamps
  • Breakers and switches
  • Electrical circuits
 
AudiManual.ru © 2017-2026 · Mobile version · Feedback · Sitemap: EN BG BY UA RS HR RO PL SK HU · Site search · News and articles
80 B2 · 80 B3 petrol · 80 B3 · 80 B4 · 100 C3 diesel · 100 C3 petrol · 100 C3 · 100 C4 petrol · 100 C4 · A3 Type 8L · A4 B5 petrol · A4 B5 · A4 B6 petrol · A4 B6 · A4 B7 · A4 B8 · A6 C4 · A6 C5 · A6 C5 Allroad · A8 D2 · Q5 Type 8R · Q7 Typ 4L · Audi A2 ·
This site uses cookies 🍪. Click the button to accept this fact.