Repair Chevrolet Repair Toyota Repair Honda Repair AvtoVAZ Repair Mercedes-Benz Repair BMW Repair Opel
Home  |  Contacts  |  Sitemap  |    
English Русский
Български
Беларускі
Український
Српски
Hrvatski
Română
Polski
Slovenský
Magyar
AudiManual.ru


  • AUDI 80
  • AUDI 100
  • AUDI A3
  • AUDI A4
  • AUDI A6
  • AUDI A8
  • AUDI Q
  • OTHER
  • ARTICLES
Type 8L (1996-2003)

Single Lock — General Information and Vacuum Hoses (Audi A3 8L)

  • Home
  • Audi A3
  • Type 8L (1996-2003)
  • Body
  • Interior (internal elements)
  • Single Lock — General Information and Vacuum Hoses
            0
Table of contents: Vacuum Hose Repair ↓ Disconnection of the plug connection… ↓ Laying vacuum lines in the door ↓

Wiring of a single lock


Wiring of a single lock

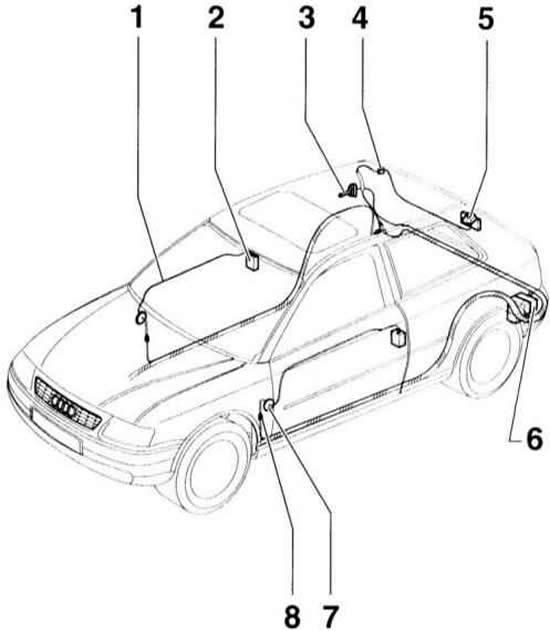
  • 1 - pressure/vacuum hose
  • 2 - front rear door adjusting element
  • 3 - tank cover adjusting element
  • 4 - bushing
  • 5 - tailgate adjusting element
  • 6 - Single lock pump
  • 7 - bushing
  • 8 - connector

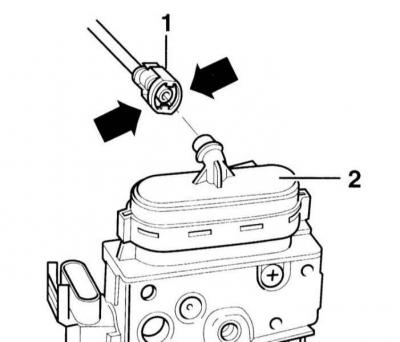
The single lock has a vacuum drive. After a long period of inactivity of the car and after replacing the pump, it is activated only as a result of repeated switching on.

If the system is in good working order, then the blocking of all locks comes into effect 2 seconds after switching on. If the pump operates for more than 5 seconds, there is a leak in the system.

If there is a leak, the pump should not operate for more than 50 seconds, after which the control unit in the single-lock pump switches off the pump.

Vacuum Hose Repair


1. Cut out the damaged area with a knife.

2. Cut a spare hose, such as Audi 533 862 225, to the required length and attach it to both ends of the vacuum line.

Disconnection of the plug connection of the A-pillar


Disconnection of the plug connection of the A-pillar


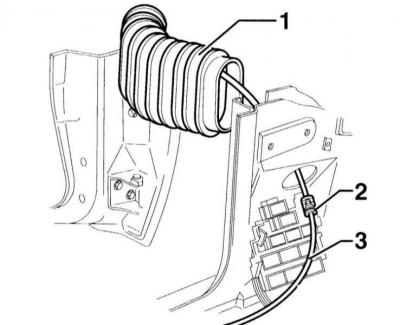
1. Connector –2– at the A-pillar is accessible after removing the A-pillar trim. 1 – casing, 3 – vacuum hose to the single-lock pump.


Warning: To disconnect the plug-in connections of the vacuum hoses of the single lock and the adjustment elements, they must first be unlocked.


Warning: To disconnect the plug-in connections of the vacuum hoses of the single lock and the…


2. Press the connector –1– and disconnect. 2 – door lock adjusting element.

3. Disconnect the connector.

Laying vacuum lines in the door


Laying vacuum lines in the door


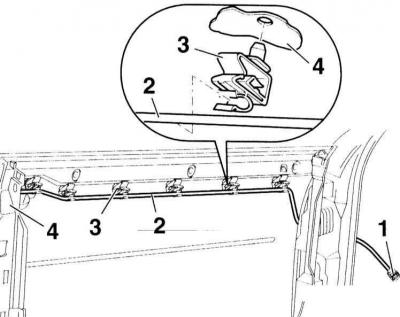
1. Insert connector –1– into rack A and connect.

2. Secure the vacuum hose –2– in the clamp –3–. 4 – beam.

2. Secure the vacuum hose –2– in the clamp –3–. 4 – beam.


3. Secure the vacuum hose –1– in the clamp –2–.


4. Fix the connector into the door adjusting element.

[The original publication in its entirety is posted on the website: audimanual.ru]
The article was checked by auto expert Nikita Rudakov
This article is available at russian, bulgarian, belarusian, ukrainian, serbian, croatian, romanian, polish, slovak, hungarian

Share information:
Previous articles
Audi A3 Type 8L: Interior (internal elements)
Next articles

Installing the side airbag into the adjustment beam
Installing a side airbag
Removal and installation the rear seat and backrest
Connecting the Airbag Wiring Jumper
Removal and installation single lock activators
Emergency release of the fuel filler flap
Removal and installation a single lock pump


Similar articles on other Audi car models:
Design and technical characteristics. General information Audi 80 B2 (1979-1986)
General information Audi 100 C3 (1982-1990, diesel)
Single Lock — General Information Audi A4 B6 (2000-2006)
General information Audi A6 C5 (1997-2004)
General information about the 2.8L petrol engine Audi A8 D2 (1994-2002)
Brake system — general information Audi Q5 Type 8R (2008-2017)
General information about the fuel injection system Audi A2 (1999-2005)
Link to this page in different formats


Visitor comments

No comments yet


How much will 29 + 18 =


A3(8L, 1996-2003) 
  • General information
  • User manual
  • Maintenance
  • Power unit
  • Engine repair
  • Lubrication system
  • Cooling system
  • Supply system
  • Fuel injection system
  • Exhaust system
  • Ignition system
  • Transmission
  • Manual transmission
  • Automatic transmission
  • Clutch and drive shafts
  • Chassis
  • Brake system
  • Front suspension
  • Rear suspension
  • Steering
  • Body
  • Ventilation and heating
  • Exterior (external elements)
  • Interior (internal elements)
  • Doors, covers and windows
  • Electrical equipment
  • Power devices
  • Lighting and appliances
  • Electrical circuits
 
AudiManual.ru © 2017-2026 · Mobile version · Feedback · Sitemap: EN BG BY UA RS HR RO PL SK HU · Site search · News and articles
80 B2 · 80 B3 petrol · 80 B3 · 80 B4 · 100 C3 diesel · 100 C3 petrol · 100 C3 · 100 C4 petrol · 100 C4 · A3 Type 8L · A4 B5 petrol · A4 B5 · A4 B6 petrol · A4 B6 · A4 B7 · A4 B8 · A6 C4 · A6 C5 · A6 C5 Allroad · A8 D2 · Q5 Type 8R · Q7 Typ 4L · Audi A2 ·
This site uses cookies 🍪. Click the button to accept this fact.