



Table of contents: Mounting position of spiral belts on… ↓ Removal and installation the floor… ↓ Removal and installation the… ↓ Removal and installation the upper… ↓ Removal and installation the rear… ↓ Removal and installation the seat… ↓ Removal and installation of Horstfix ↓
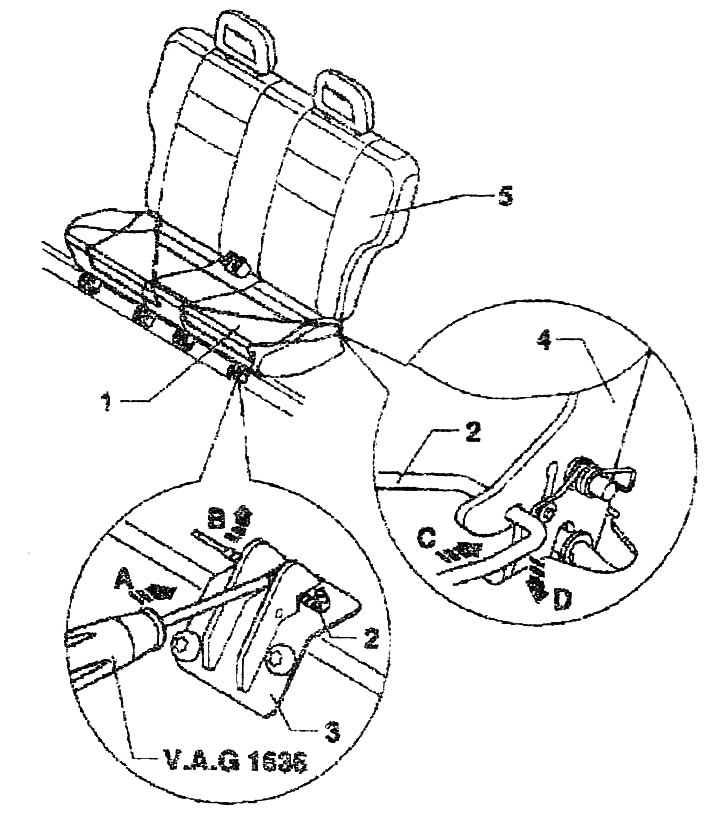
1. One-piece rear seat..Push out with an awl "V.A.G 1636/" or a slotted screwdriver in the direction of arrow "A" frame "2" from the front floor mounts "3" (4x). At the same time, bend the front edge of the undivided rear seat "B" upwards. Press the undivided rear seat "C" and then in the direction of arrow "D", while removing the wire frame 2- from the retaining plate "4". Remove the undivided rear seat from the car. Installation: Install the undivided rear seat in the car. Hang the wire frame "2" on the retaining plate "4". Check the position of the spiral straps on the front wire frame. To prevent noise, the spiral straps must be in the area of the front floor mounts "3". Press from above on the front edge of the undivided rear seat so that the wire frame "2" clicks into the front floor mounts "3" (4x)
2. Wire frame of the supporting seat
3. Front floor anchorage for single rear seat (4x)
4. Fixing shield
5. Fixed rear seat back
Mounting position of spiral belts on the wire frame of the seat support
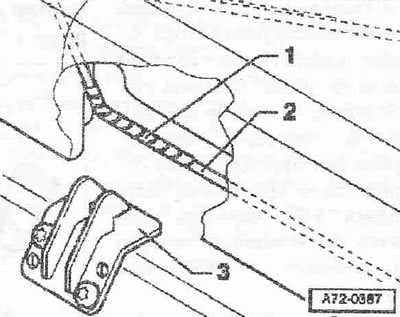
The spiral straps "1" on the wire frame of the seat carrier "2" before installing the undivided rear seat are located in the area of the front floor anchorages "3".
Removal and installation the floor anchorage of the single-seat rear bench seat
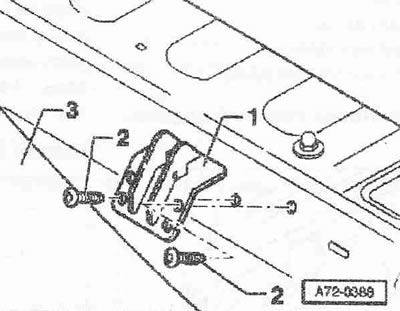
Remove the rear seat. Fold back the rear carpet "3". Unscrew the screws "2" (2 pcs.), tightening torque 23 Nm. 1. Front floor anchorage of the undivided rear seat
Removal and installation the lightweight rigid rear seat backrest
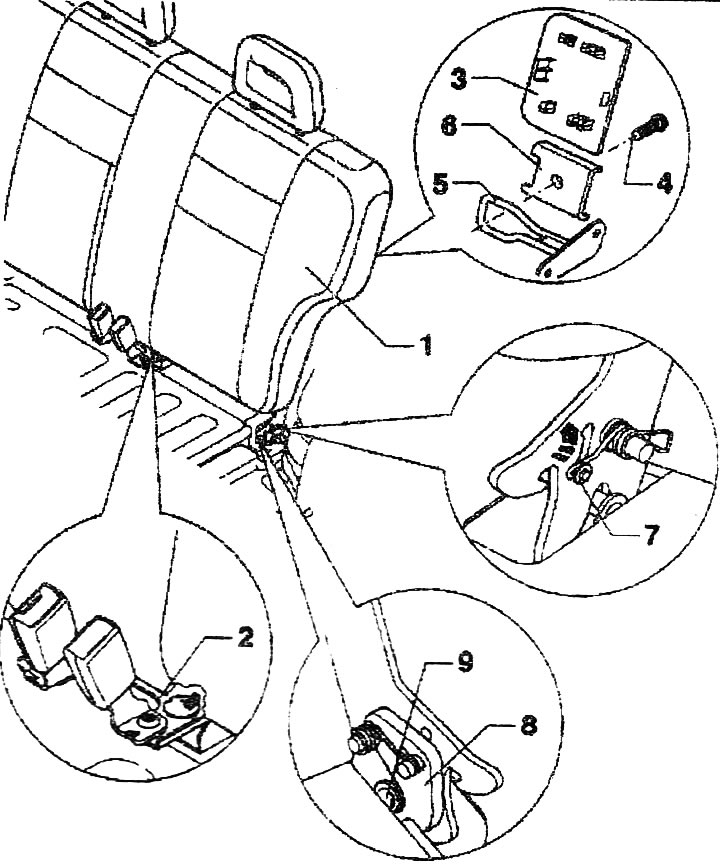
1. Fixed rear seat back. Remove the rear seat. Remove the seat belt buckle cylinder "2". Unfasten the upper tie down shield "3". Loosen the bolt "4" and remove the bracket "6". Press the locking bolt "7" in the direction of the arrow until it locks. In doing so, the locking hook "8" opens the latch of the rear locking bracket "9". Tilt the rear seat back to a vertical position forwards (approx. 20°). Pull the rear seat back vertically upwards away from the rear locking brackets "9". Remove the rear seat back from the vehicle. Installation: Install the rear seat back in the vehicle. Position the locking hook "8" against the rear locking bracket "9". Tilt the rear seat back to the upper tie down stop "5" rearward. Press the locking bolt "7" forward until it locks. In this case, the locking hook "8" locks the rear locking bracket "9". Install the holder "6" using the screw "4", tightening torque 23 Nm. Fasten the screen of the upper tie "3". Install the seat belt lock cylinder "2". Install the back of the rear seat.
2. Seat belt buckle cylinder
3. Top Binding Screen
4. Bolts (2 pcs.), tightening torque 23 Nm
5. Top binding
6. Bracket
7. Locking pin
8. Fixing hook
9. Rear locking bracket
Removal and installation the upper tie
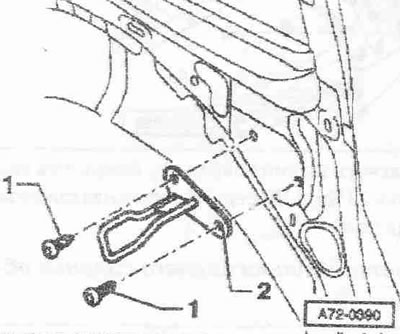
Remove the rear seat. Remove the backrest of the rear seat. Remove the rear inner wheel arch trim. Remove the side trim of the trunk. Unscrew screws "1" (2 pcs.). Tightening torque 23 Nm. 2. Upper tie.
Removal and installation the rear retaining bracket
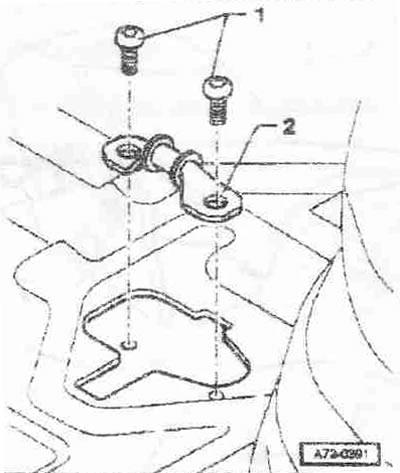
2. Rear locking bracket.
Remove the rear seat. Remove the backrest of the rear seat. Bend back the boot floor trim. Unscrew screws "1" (2 pcs.). Tightening torque 23 Nm.
Removal and installation the seat belt buckle cylinder
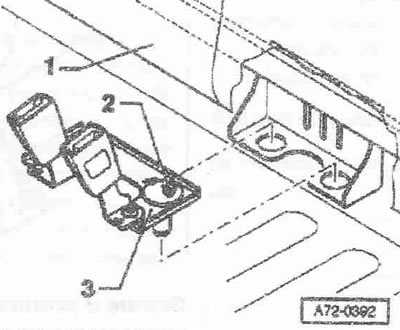
Remove the rear seat. Unscrew the Hoistfix screw "2". Replace the Hoistfix screw after each removal. Tightening torque 1C Nm. Pull the seat belt buckle cylinder "3" upwards. 1. Rear seat back.
Removal and installation of Horstfix
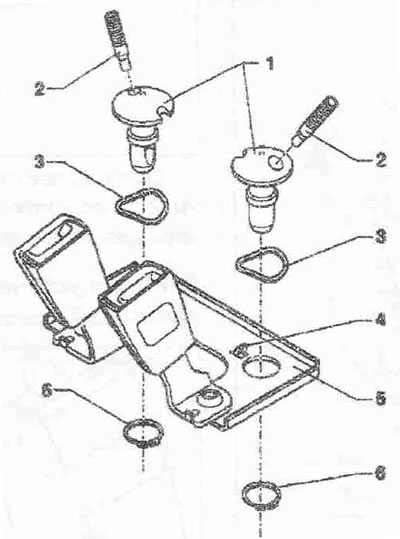
1. Horstfix. Remove the rear seat. Remove the seat belt buckle cylinder "5". Remove the retaining ring "6". Pull the Horstfix "1" up from the seat belt buckle cylinder "5". Install in reverse order. When installing, the cover on the seat belt buckle cylinder "4" should click into the Hcrstfix opening
2. Horstfix screw
3. Shaft spring washer
4. Seat belt buckle cylinder cover
5. Seat belt buckle cylinder
6. Retaining ring
[Content source: the specified website «audimanual.ru»]