Repair Chevrolet Repair Toyota Repair Honda Repair AvtoVAZ Repair Mercedes-Benz Repair BMW Repair Opel
Home  |  Contacts  |  Sitemap  |    
English Русский
Български
Беларускі
Український
Српски
Hrvatski
Română
Polski
Slovenský
Magyar
AudiManual.ru


  • AUDI 80
  • AUDI 100
  • AUDI A3
  • AUDI A4
  • AUDI A6
  • AUDI A8
  • AUDI Q
  • OTHER
  • ARTICLES
Type 8L (1996-2003)

Removal and installation an additional resistor (Audi A3 8L)

  • Home
  • Audi A3
  • Type 8L (1996-2003)
  • Body
  • Ventilation and heating
  • Removal and installation an additional resistor
            0
Table of contents: Removal ↓ Installation ↓

Removal


1. Remove the glove box, refer to the subsection Removal and installation the glove box.

1. Remove the glove box, refer to the subsection Removal and installation the glove box.


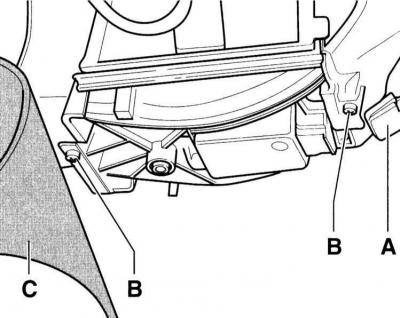
2. Loosen the screw clamp of the foam cover (C) and fold the cover aside.

3. Disconnect the connector (A) of the additional resistor. Loosen the screws (B) and remove the resistor holder.

3. Disconnect the connector (A) of the additional resistor. Loosen the screws (B) and remove the…


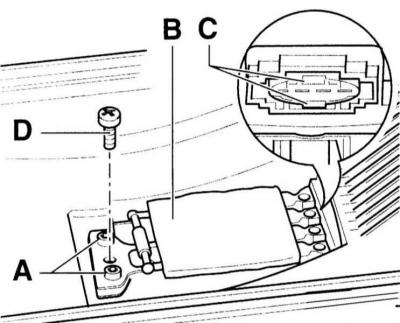
4. Replace the resistor (B) on the holder. To do this, drill the fasteners (A) or break them. Press the stoppers (C).

Warning: When assembling, secure the resistor with self-tapping screws (D) 3.2 x 10 mm.


Installation


5. Insert the resistor into the holder and secure with screws (D) 3.2 x 10 mm.

6. Fix the resistor, connect the resistor connector.

7. Secure the foam cover with a screw clamp.


8. Install the glove box, refer to the subsection Removal and installation the glove box.

The original text of the material can be found on the website: Audimanual.ru
The article was checked by auto expert Nikita Rudakov
This article is available at russian, bulgarian, belarusian, ukrainian, serbian, croatian, romanian, polish, slovak, hungarian

Share information:
Previous articles
Audi A3 Type 8L: Ventilation and heating
Next articles

Removal and installation the fresh air fan
Removal and installation heater control cables
Removal and installation the heater drive / replacing the lamp
Removal and installation the footwell nozzle
Air conditioner device
Removal and installation the compressor
Air conditioner diagnostics based on codes on the display of its…


Similar articles on other Audi car models:
Engine — removal and installation Audi 80 B3 (1986-1991, petrol)
Toothed drive belt — removal, inspection and installation Audi 100 C3 (1982-1990, diesel)
Removal and installation of the exhaust system. Replacement of… Audi A4 B6 (2000-2006)
Additional radiator — removal and installation Audi A6 C5 Allroad (1999-2005)
Removal and installation the engine Audi A8 D2 (1994-2002)
Removal and installation additional coolant pumps Audi Q7 Typ 4L (2005-2015, diesel)
Removal and installation the additional units bracket Audi A2 (1999-2005)
Link to this page in different formats


Visitor comments

No comments yet


How much will 46 + 18 =


A3(8L, 1996-2003) 
  • General information
  • User manual
  • Maintenance
  • Power unit
  • Engine repair
  • Lubrication system
  • Cooling system
  • Supply system
  • Fuel injection system
  • Exhaust system
  • Ignition system
  • Transmission
  • Manual transmission
  • Automatic transmission
  • Clutch and drive shafts
  • Chassis
  • Brake system
  • Front suspension
  • Rear suspension
  • Steering
  • Body
  • Ventilation and heating
  • Exterior (external elements)
  • Interior (internal elements)
  • Doors, covers and windows
  • Electrical equipment
  • Power devices
  • Lighting and appliances
  • Electrical circuits
 
AudiManual.ru © 2017-2026 · Mobile version · Feedback · Sitemap: EN BG BY UA RS HR RO PL SK HU · Site search · News and articles
80 B2 · 80 B3 petrol · 80 B3 · 80 B4 · 100 C3 diesel · 100 C3 petrol · 100 C3 · 100 C4 petrol · 100 C4 · A3 Type 8L · A4 B5 petrol · A4 B5 · A4 B6 petrol · A4 B6 · A4 B7 · A4 B8 · A6 C4 · A6 C5 · A6 C5 Allroad · A8 D2 · Q5 Type 8R · Q7 Typ 4L · Audi A2 ·
This site uses cookies 🍪. Click the button to accept this fact.