
Repair Chevrolet Repair Toyota Repair Honda Repair AvtoVAZ Repair Mercedes-Benz Repair BMW Repair Opel
Home  |  Contacts  |  Sitemap  |    
English Русский
Български
Беларускі
Український
Српски
Hrvatski
Română
Polski
Slovenský
Magyar
AudiManual.ru


  • AUDI 80
  • AUDI 100
  • AUDI A3
  • AUDI A4
  • AUDI A6
  • AUDI A8
  • AUDI Q
  • OTHER
  • ARTICLES
A2 (1999-2005)

Removal and installation headlights (Audi A2)

  • Home
  • Audi
  • A2 (1999-2005)
  • Electrical equipment
  • Lighting and lamps
  • Removal and installation headlights
            0
Table of contents: Removal ↓ Installation ↓ Installing headlights along the body… ↓

Removal


Turn off the ignition and remove the ignition key. Set the light switch to position "0". Wash the hood outside and wipe with chamois leather. Unlock the service cover from the inside. Unlock the hood and pull it forward a little. Remove the hood. Cover the bumper near the headlight with adhesive tape to avoid damaging the paintwork. Unscrew bolts "2". Separate the headlight in the places marked with "arrows" by moving the headlight toward the center of the car. Disconnect the plug connection and remove the headlight. Ignore pos. "3".

Installation
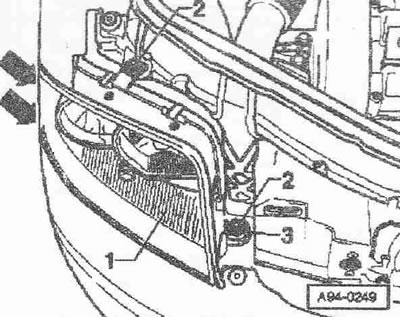


Installation in reverse order, in this case it is necessary to insert the headlight into the…


Installation in reverse order, in this case it is necessary to insert the headlight into the mounting slots "1" on the shelf of the lock. Pos. "2" should not be taken into account.
Check the installation of the headlight relative to the contours of the body (gaps). If necessary,…


Check the installation of the headlight relative to the contours of the body (gaps). If necessary, align again. After installation, adjust the headlights. Tightening torque: Headlight to radiator frame: 6 Nm.


Installing headlights along the body contour (gaps)


Installing the outer edge


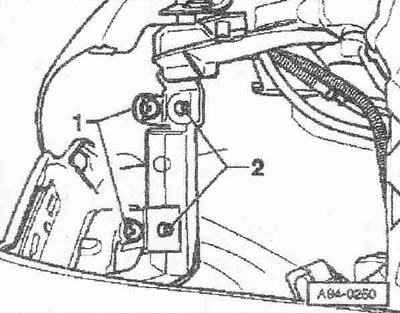
Loosen screws "2". With the headlight removed, gradually change the position of the mounting elements. To check the installation, mount the headlight again each time.

Aligning the inner edge
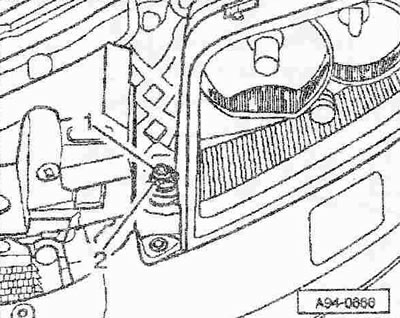


Loosen screw «1». Using adjusting nut «2», gradually change the mounting position of the headlight.…


Loosen screw "1". Using adjusting nut "2", gradually change the mounting position of the headlight. To check the installation, mount the headlight again each time. Set the position of the headlight Tightening torque: Headlight to radiator frame: 6 Nm.

[Text provided by the online resource «audimanual.ru»]
The article was checked by auto expert Daniil Ushakov
This article is available at russian, bulgarian, belarusian, ukrainian, serbian, croatian, romanian, polish, slovak, hungarian

Share information:
Previous articles
Audi A2: Lighting and lamps
Next articles

Headlight — design description
Replacing the low beam bulb
Replacing the high beam bulb
Replacing the parking light bulb
Replacing the turn signal bulb


Similar articles on other Audi car models:
Headlights and headlight bulbs — removal and installation Audi 80 B3 (1986-1991, petrol)
Headlights and headlight bulbs — removal and installation Audi 100 C3 (1982-1990, diesel)
Removal and installation headlights Audi A3 Type 8L (1996-2003)
Checking the functionality of headlights and horn Audi A4 B6 (2000-2006)
Gas discharge lamps for low beam headlights Audi A6 C5 (1997-2004)
Removal and installation headlights Audi A8 D2 (1994-2002)
Removal and installation of headlights and their components Audi Q7 Typ 4L (2005-2015, diesel)
Link to this page in different formats


Visitor comments

No comments yet


How much will 32 + 15 =


Audi A2(1999-2005) 
  • General information
  • Introduction to the guide
  • Maintenance
  • Engine 1.4 l (gasoline)
  • Engine repair
  • Lubrication system
  • Cooling system
  • Exhaust system
  • Engine 1.6 l (gasoline)
  • Engine repair
  • Lubrication system
  • Cooling system
  • Exhaust system
  • Engine 1.2 l (diesel)
  • Engine repair
  • Lubrication system
  • Cooling system
  • Injection and turbocharging
  • Engine 1.4 l (diesel)
  • Engine repair
  • Lubrication system
  • Cooling system
  • Turbocharging system
  • Supply system
  • Fuel injection system
  • Exhaust system
  • Transmission
  • Mechanical gearbox 02J
  • Mechanical gearbox 02T
  • Mechanical gearbox 085 DS
  • Chassis
  • Car suspension
  • Steering
  • Brake system
  • Body
  • Exterior
  • Interior
  • Seats
  • Doors, locks and windows
  • Safety system
  • Heating and air conditioning
  • Electrical equipment
  • Power devices
  • Equipment and devices
  • Wipers and washers
  • Lighting and lamps
  • Breakers and switches
  • Electrical circuits
 
AudiManual.ru © 2017-2026 · Mobile version · Feedback · Sitemap: EN BG BY UA RS HR RO PL SK HU · Site search · News and articles
80 B2 · 80 B3 petrol · 80 B3 · 80 B4 · 100 C3 diesel · 100 C3 petrol · 100 C3 · 100 C4 petrol · 100 C4 · A3 Type 8L · A4 B5 petrol · A4 B5 · A4 B6 petrol · A4 B6 · A4 B7 · A4 B8 · A6 C4 · A6 C5 · A6 C5 Allroad · A8 D2 · Q5 Type 8R · Q7 Typ 4L · Audi A2 ·
This site uses cookies 🍪. Click the button to accept this fact.