
Table of contents: Rearrangement of the backrest from… ↓ Remove the seat side screen ↓ Removal the upholstery trim ↓ Removal the seat back adjusting screw ↓ Remove the seat side screen holder ↓ Remove the seat base ↓ Removal the height adjustment lever… ↓ Removal the handle of the… ↓ Removal the seat longitudinal… ↓ Removal the seat height adjustment… ↓
Attention! For vehicles with a side airbag, observe the safety regulations when working with the side airbag.
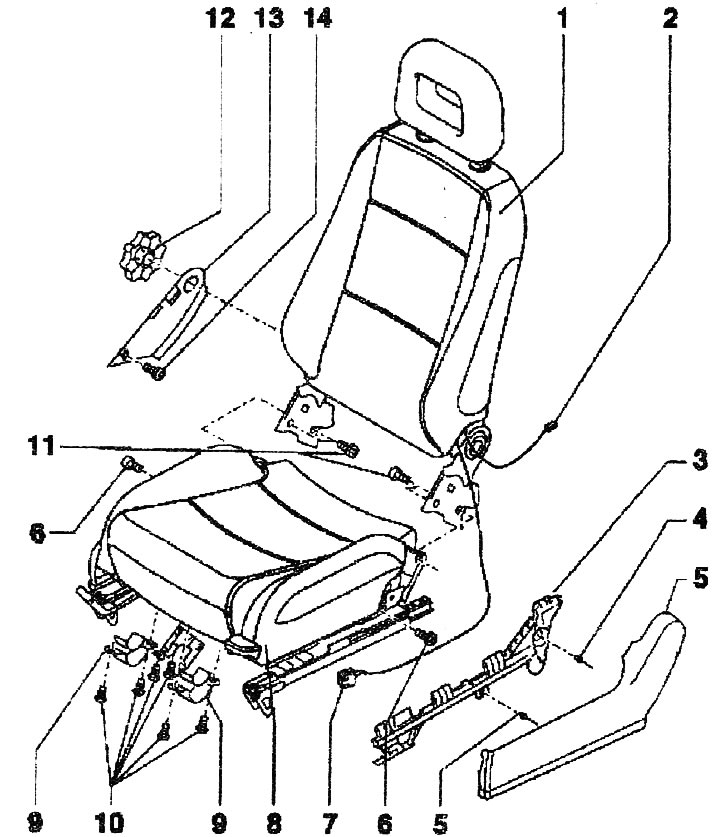
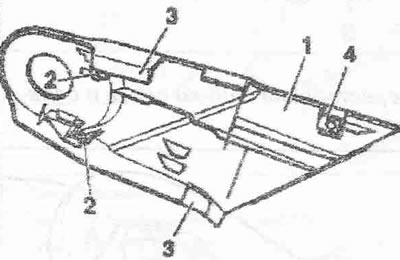
1. Backrest frame. Remove the seat. Remove the seat side screen "5". Remove the backrest adjustment wheel "12". Disconnect the Airbag cable "7" from the seat base. Disconnect the seatback heater cable "2" from the seat base. On vehicles without a height adjustment lever, unscrew the screws "10" (6x) of the seat base. Remove the holder "9" with the bearing shell halves. Fold the seat base "8" forward and up. On vehicles with a height adjustment lever, move the height adjustment lever to the lowest position. All vehicles: remove the trim panel "13". Disconnect the Airbag cable "7" from the holder "3". Unscrew the screws "11" (4 pcs.). Remove the seatback "1"
2. Seat heating cable
3. Seat side screen holder 4. Rivets
5. Seat side panel
6. Screws (2 pcs.), tightening torque 24 Nm. Before unscrewing, heat the screw head with a heat gun "V.A.G 1416" at a temperature of 150°C. Cover the cover with a metal sheet. Unscrew the screw with a max. 35 Nm using a torque wrench. If screw "6" does not unscrew, then screw "6" should be drilled with a 5 mm drill and removed with a left-hand drill
7. Side Airbag cable
8. Seat recess
9. Bracket.
10. Bolts (6 pcs.)
11. Screws (4 pcs.), tightening torque 50 Nm. Unscrew screws "11" first from the front (round holes), and then at the back (slits)
12. Flywheel. If the flywheel is too loose after installation, replace it
13. Upholstery trim
14. Bolt. Tightening torque 2 Nm
Rearrangement of the backrest from left to right
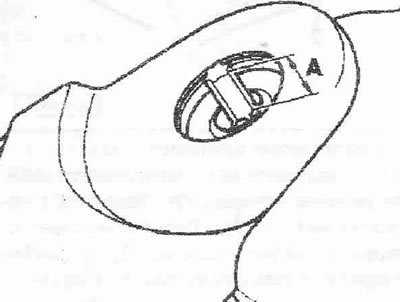
Shaft projection "1" Size "A" 20 mm from the side of the backrest adjustment wheel.
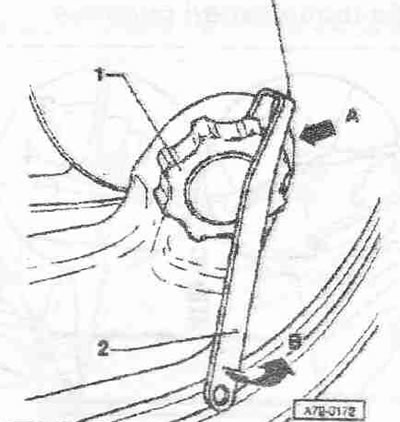
Remove the seat side screen
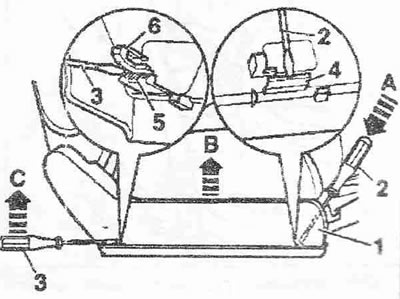
Removal is possible with the seat installed. Move the front cushion to the side and press the slotted screwdriver "2" on the locking latch "4" (direction of arrow "A"), while simultaneously moving the side seat panel "1" away from the seat from below. Slide the slotted screwdriver from below between the locking latch "5" and the guide "6". Press the slotted screwdriver "3" on the locking latch "5" downwards (direction of arrow "C"), while simultaneously moving the side seat panel "1" away from the seat from below. Remove the side seat panel "1" upwards (direction of arrow "B").
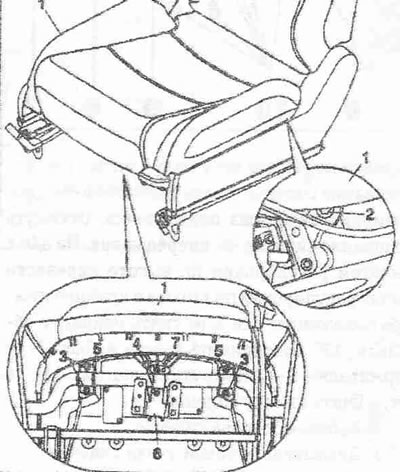
Removal the upholstery trim
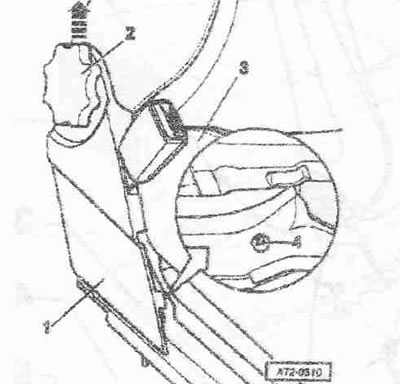
Remove the seat. Remove the backrest adjustment wheel. On vehicles with a seat cushion height adjustment mechanism: move the seat pan "3" upwards. Unscrew the screw "4" from below. Move the upholstery cover "1" upwards (in the direction of the arrow). Remove the trim panel.
When installing, apply the upholstery pad "1" and push it down, simultaneously putting on the lower pad "3". Push it against the guides "2" (2x). Raise the upper pads "3" above the back frame. When installing, use the tin nut "4".
Removal the seat back adjusting screw
Turn the backrest adjustment wheel "1" until the backrest adjustment wheel lock is visible from behind, in the direction of arrow "A" (you may need a flashlight). Hook the hook of assembly tool 3399 "2" and press in the direction of arrow "B". Turn the adjusting screw another 180°. Hook the hook of assembly tool 3399 "2" and press in the direction of arrow "B". Remove the seat back adjusting screw.
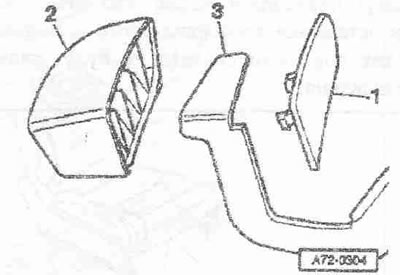
Remove the seat side screen holder
Remove the seat. Remove the side panel of the seat. Disconnect the Airbag cable "3" from the seat side screen holder -1—. Drill out the rivets "2" (2 pcs.). Remove the holder "1" by moving it upwards (direction of the arrow). Pull the holder "1" out of the front clamp backwards.
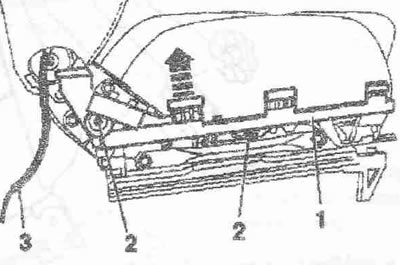
Remove the seat base
1. Seat base. Remove the seat, remove the seat side panel, remove the Airbag cable. Remove the seat side screen holder. Remove the trim panel. Unscrew the screws "2" (2 pcs.). Unscrew the screws "3" (4 pcs.). Unscrew the screws "4" (2 pcs.). Remove the seat base. When installing the detachable panel holder "6", always use the hole "7" on the side of the Airbag
2. Screws (2 pcs.) Tightening torque 24 Nm. Before unscrewing, heat the screw head with a heat gun "V.A.G 1416/" at a temperature of 150°C. Cover the cover with a metal sheet. Unscrew the screw with max. 35 Nm using a torque wrench. If screw "2" does not unscrew, then screw "2" should be drilled with a 5 mm drill and removed with a left-hand drill.
3. Screws (4 pcs.) Tightening torque 3 Nm.
4. Screws (2 pcs.) Tightening torque 3 Nm.
5. Bracket
6. Pluggable panel holder
7. Cylinder diameter
Removal the height adjustment lever handle
Using the lever, remove the trim. Remove handle "2" by moving it forward from the lever.
Removal the handle of the longitudinal seat adjustment lever
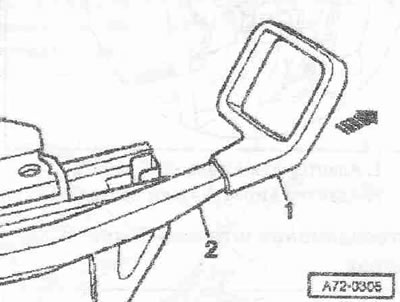
Handle "1" cannot be removed without damaging it. Remove handle "1" in the direction of the arrow from the horizontal adjustment lever "2".
Removal the seat longitudinal adjustment lever cover

Remove the seat. Remove the cover "1" in the direction of the arrow "B" from the lever "3". Remove the cover "1" in the direction of the arrow "A" from the lever "2".
Removal the seat height adjustment lever

Remove the seat. Remove the side panel of the seat. Remove the seat side screen holder. Pry off the spring arms "2". Remove the shaft "4" from the axle "3". Remove the spring "5". Unscrew the bolt "6". Remove the seat height adjustment lever "1".