Repair Chevrolet Repair Toyota Repair Honda Repair AvtoVAZ Repair Mercedes-Benz Repair BMW Repair Opel
Home  |  Contacts  |  Sitemap  |    
English Русский
Български
Беларускі
Український
Српски
Hrvatski
Română
Polski
Slovenský
Magyar
AudiManual.ru


  • AUDI 80
  • AUDI 100
  • AUDI A3
  • AUDI A4
  • AUDI A6
  • AUDI A8
  • AUDI Q
  • OTHER
  • ARTICLES
A2 (1999-2005)

Rear Door and Rear Door Mounting Bracket Seal (Audi A2)

  • Home
  • Audi
  • A2 (1999-2005)
  • Body
  • Doors, locks and windows
  • Rear Door and Rear Door Mounting Bracket Seal
            0
Instructions. It is necessary to use the set "Fasteners and gaskets for the mounting plate", All new spare doors after varnishing must be equipped with all the necessary seals. When removing the mounting bracket (mounting shield) the door trim, mounting bracket and clamps must be removed with extreme care to avoid bending the mounting bracket. After each removal of the mounting bracket, (mounting shield) it is necessary to replace the sealing strips and reconnect the sealant bead to the sealing strips using butyl cord "AKL 450 005 05". All bolts, wire harness clamps and door trim have a seating surface, these parts must be replaced. After installing the mounting bracket and door trim, check for leaks with water. The temperature of the surfaces to be glued must not be lower than the room temperature, if necessary, heat the surfaces with a heat gun.
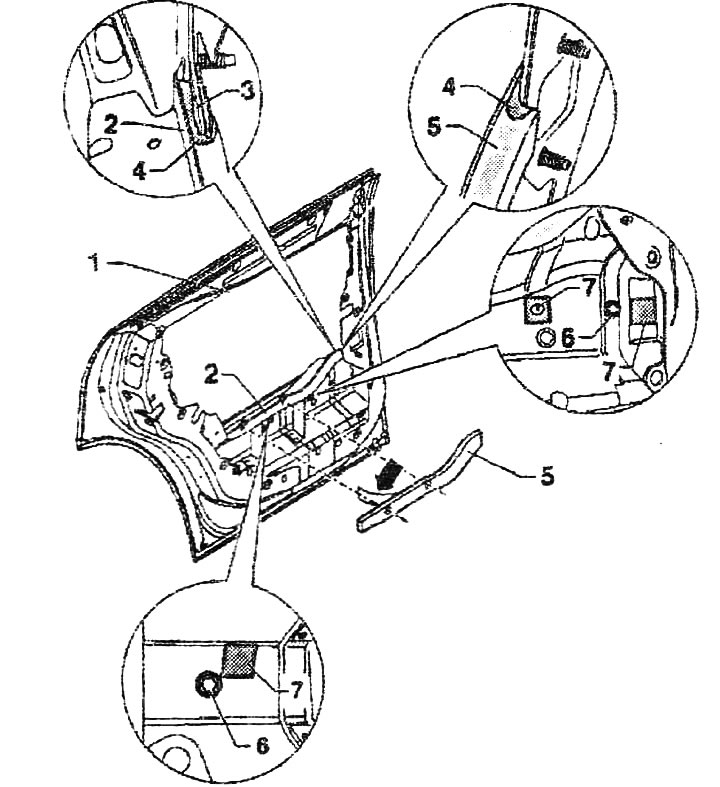

1. Back door.


1. Back door.

2. Safety bar.

3. Hinge reinforcement.

4. Sealant roller. As a sealant, butyl cord "AKL 450 005 05". Butyl cord "AKL 450 005 05" supplied with the "Fasteners and Gaskets for the Mounting Plate" set. Seal the space between the safety bar, hinge reinforcement and connecting element of the sealing strip. Before applying the sealing bead, stick the sealing strip to the safety bar. Remove the damaged sealing bead with extreme care to avoid damaging the paintwork of the door. Use, for example, a scraper to remove the sealing bead. Apply a new sealing bead according to the drawing and polish it. Make sure that the space between the safety bar and the hinge reinforcement is completely filled and that the already glued sealing strip is in tight contact with the adjacent sealing bead.


5. Sealing strips (made of polyurethane foam). Comes with a set of "Fasteners and gaskets for the mounting shield". Covered on both sides with protective film. Remove the protective film immediately before gluing. There should be no glue, dust or oil residue on the surface of the safety bar to be glued. Treat the surface to be glued with a cleaner "D 009 401 04" and wipe the surface dry. Remove the protective film "arrow" from the surface that will be glued first. Place the sealing strips on the safety bar. Do not press the strips. Align the holes in the sealing strip with the holes in the safety bar. The holes in the sealing strip and in the safety bar must match. If this does not happen, the sealing strip will be damaged during subsequent installation of the door. Press the sealing strips firmly over the entire surface to be glued. If there is a bead of sealant, monitor the joint of the sealing strips / sealant bead. If necessary, reconnect the sealant bead with the sealing strips. Remove the outer protective film immediately before installing the mounting bracket (mounting shield).

6. Plug. Supplied with the "Fasteners and Gaskets for the Mounting Shield" kit. Make sure that the plug is correctly fixed in the safety bar.

7. Seal. Comes with the "Fasteners and Gaskets for Mounting Shield" kit. Self-adhesive. The surface to be glued must be free of glue, dust and oil. Treat the surface to be glued with a cleaner "D 009 401 04" and wipe the surface dry. Install the seal on the closed hole in the safety bar. Press the seal firmly.
The article was checked by auto expert Daniil Ushakov
This article is available at russian, bulgarian, belarusian, ukrainian, serbian, croatian, romanian, polish, slovak, hungarian

Share information:
Previous articles
Audi A2: Doors, locks and windows
Next articles

Removal and installation the rear door inner seal
Removal and installation the outer rear door seal
Removal and installation the clamping strip and the rear door…
Removal and installation the rear door lock
Removal and installation a lift-and-slide sunroof
Removal the lift-and-slide sunroof
Sealing of a lift and slide hatch
Removal the rear cover of the sliding and tilting sunroof


Similar articles on other Audi car models:
Rear door lock — removal and installation Audi 80 B3 (1986-1991, petrol)
Windshield, Rear Window and Door Glass — Removal and Installation Audi 100 C3 (1982-1990, diesel)
Removal and installation the wedge element of the rear door lock Audi A3 Type 8L (1996-2003)
Electrically heated door rear view mirrors Audi A4 B6 (2000-2006)
Replacing the rear overhead door light bulb Audi A6 C4 (1994-1997)
Rear door speakers Audi A8 D2 (1994-2002)
Rear door lock and lock bracket Audi Q5 Type 8R (2008-2017)
Link to this page in different formats


Visitor comments

No comments yet


How much will 48 + 32 =


Audi A2(1999-2005) 
  • General information
  • Introduction to the guide
  • Maintenance
  • Engine 1.4 l (gasoline)
  • Engine repair
  • Lubrication system
  • Cooling system
  • Exhaust system
  • Engine 1.6 l (gasoline)
  • Engine repair
  • Lubrication system
  • Cooling system
  • Exhaust system
  • Engine 1.2 l (diesel)
  • Engine repair
  • Lubrication system
  • Cooling system
  • Injection and turbocharging
  • Engine 1.4 l (diesel)
  • Engine repair
  • Lubrication system
  • Cooling system
  • Turbocharging system
  • Supply system
  • Fuel injection system
  • Exhaust system
  • Transmission
  • Mechanical gearbox 02J
  • Mechanical gearbox 02T
  • Mechanical gearbox 085 DS
  • Chassis
  • Car suspension
  • Steering
  • Brake system
  • Body
  • Exterior
  • Interior
  • Seats
  • Doors, locks and windows
  • Safety system
  • Heating and air conditioning
  • Electrical equipment
  • Power devices
  • Equipment and devices
  • Wipers and washers
  • Lighting and lamps
  • Breakers and switches
  • Electrical circuits
 
AudiManual.ru © 2017-2026 · Mobile version · Feedback · Sitemap: EN BG BY UA RS HR RO PL SK HU · Site search · News and articles
80 B2 · 80 B3 petrol · 80 B3 · 80 B4 · 100 C3 diesel · 100 C3 petrol · 100 C3 · 100 C4 petrol · 100 C4 · A3 Type 8L · A4 B5 petrol · A4 B5 · A4 B6 petrol · A4 B6 · A4 B7 · A4 B8 · A6 C4 · A6 C5 · A6 C5 Allroad · A8 D2 · Q5 Type 8R · Q7 Typ 4L · Audi A2 ·
This site uses cookies 🍪. Click the button to accept this fact.