
Table of contents: Removal ↓ Installation ↓
Removal
Warning: To remove the front seat with side airbag, adapter VAS 5094 is required.
1. Move the seat forward manually or electrically.
2. Remove the rear cover of the seat guides from the channel side, refer to subsection Removal and installation the seat guide cover from the channel side.
3. Remove the rear cover of the seat guides from the tunnel side, refer to subsection Removal and installation the seat guide cover on the tunnel side.
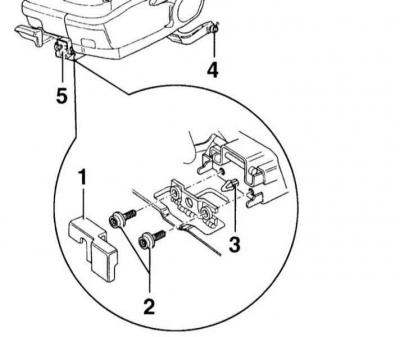
4. Remove cover –1–.
5. Remove the mounting screws –2–.
6. Remove the clamps –3– from the guide.
7. For vehicles with power seat adjustment: Move the seat fully forward or rearward.
8. Disconnect the negative (–) battery cable with the ignition off.
Caution: Warning: Caution: This will erase information from the electronic memory units, such as the radio code. Without the code, the radio can only be switched on by the manufacturer or an AUDI service station. Therefore, please read the subsection Entering the radio code.
9. Vehicles with heated seats: Disconnect the heated seat and power seat connectors.
10. Vehicles with side airbags: Disconnect the side airbag and seat position detection connector and connect the VAS 5094 adapter.
Caution: Before disconnecting the side airbag connector, remove any static electricity by touching the door latch or body. The airbag adapter must remain connected until the seat is reinstalled, refer to subsection Connecting the Airbag Wiring Jumper.
11. Remove the floor mat in the area of the guide rail.
12. Slide the seat back out of the guide.
Installation
1. Insert the seat from the rear into the guide rail so that the front slider –5– and the rear rollers –4– are completely in the guide.
2. If the seat adjustment mechanism is difficult to operate, lubricate the slider with grease.
3. If necessary, connect the seat heating and adjustment connector.
4. If necessary, disconnect adapter VAS 5094. Connect the connector for the side airbag and seat position detection. When doing this, make sure that the lug on the connector is at the top.
5. Compress the clamp –3– and tighten the screws –2– to a torque of 23 Nm.
6. Install cover –1–. Please note the instructions in subsection Headlight adjustment.
7. Install the guide covers on the seat side and the channel, refer to subsections Removal and installation the seat guide cover from the channel side and Removal and installation the seat guide cover on the tunnel side.
8. Turn on the ignition.
9. Close the doors.
10. Connect the negative (–) cable to the battery.
Warning: Enter radio code, adjust electric window, set clock, subsection Entering the radio code.