
Repair Chevrolet Repair Toyota Repair Honda Repair AvtoVAZ Repair Mercedes-Benz Repair BMW Repair Opel
Home  |  Contacts  |  Sitemap  |    
English Русский
Български
Беларускі
Український
Српски
Hrvatski
Română
Polski
Slovenský
Magyar
AudiManual.ru


  • AUDI 80
  • AUDI 100
  • AUDI A3
  • AUDI A4
  • AUDI A6
  • AUDI A8
  • AUDI Q
  • OTHER
  • ARTICLES
A2 (1999-2005)

Removal and installation the oil pan (Audi A2)

  • Home
  • Audi
  • A2 (1999-2005)
  • Engine 1.4 l (gasoline)
  • Lubrication system
  • Removal and installation the oil pan
            0
Table of contents: Removal ↓ Installation ↓

Removal


Remove the engine hood. Remove the oil dipstick from the guide tube.
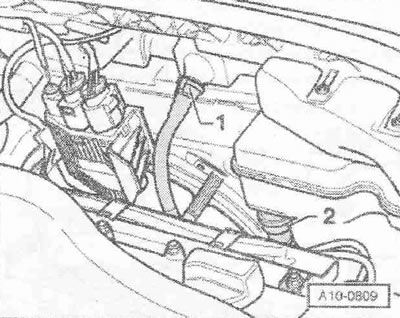
Remove the guide tube «1» of the oil level dipstick; to do this, press the locking buttons. Remove…


Remove the guide tube "1" of the oil level dipstick; to do this, press the locking buttons. Remove the oil filler pipe "2" from the oil filler tank. Remove the inlet pipe with the catalytic converter. Unscrew the bolt "arrow", remove the support with the guide tube for the dipstick to determine the oil level and the oil filler pipe from the oil pan.
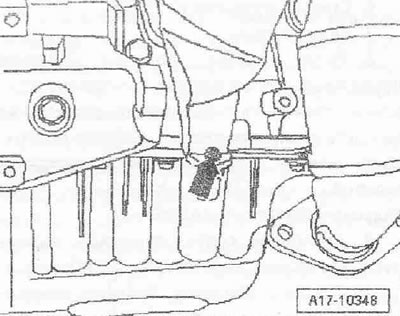
Unscrew the «arrow» bolts and remove the heat shield of the right drive shaft.
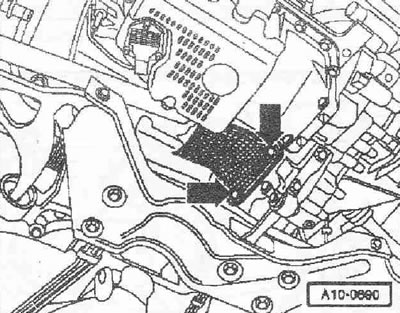

Unscrew the "arrow" bolts and remove the heat shield of the right drive shaft.

Disconnect plug connector «1» of the oil level and temperature sensor «G266».


Disconnect plug connector "1" of the oil level and temperature sensor "G266".
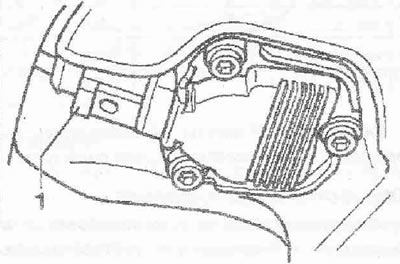


Install an oil extraction device «V.A.G 1782» under the engine and drain the oil. Unscrew the bolts…


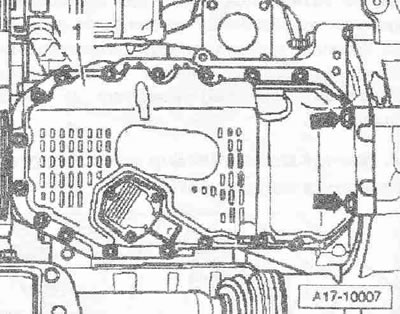
Install an oil extraction device "V.A.G 1782" under the engine and drain the oil. Unscrew the bolts "arrows" connecting the oil pan and gearbox. Crosswise, loosen and unscrew the screws of the oil pan "1". Carefully separate the oil pan from the gluing area.
Installation


Installation


Install in reverse order, replacing the O-ring on the dipstick guide tube. Remove any remaining sealant from the oil pan and cylinder block, for example with a rotating brush with plastic bristles. Clean the mounting surfaces: they must be free of oil and grease. Cut off part of the tube at the front mark (hole approx. 2mm).

Caution! Risk of blocking the lubrication system channel if there is too much sealant. The sealant bead must not be thicker than the minimum size.
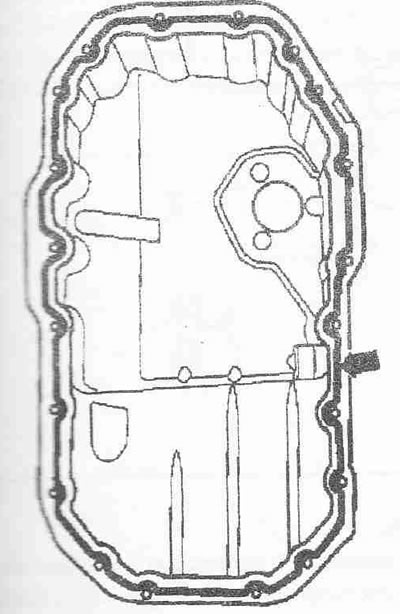


Apply a bead of sealant «arrow» to the clean seating surface of the oil pan, as shown in the…


Apply a bead of sealant "arrow" to the clean seating surface of the oil pan, as shown in the figure. Thickness of the sealant bead: 2.3 mm.

Instructions. Apply sealant especially carefully in the flange area. Install the oil pan within 5 minutes after applying the sealant.
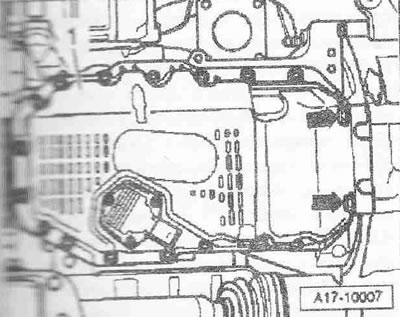

Install the oil pan and tighten the bolts.


Install the oil pan and tighten the bolts.

Installation is in the reverse order, in this case it is necessary to install the heat shield of the drive shaft. Install the support with the guide tube for the dipstick to determine the oil level and the oil filler tube. Install the inlet pipe with the catalytic converter. Fill with oil and check its level.
The article was checked by auto expert Daniil Ushakov
This article is available at russian, bulgarian, belarusian, ukrainian, serbian, croatian, romanian, polish, slovak, hungarian

Share information:
Previous articles
Audi A2: Lubrication system
Next articles

Oil level and temperature sensor
Oil pressure sensor
Support with guide tube for oil level dipstick and oil filler…
Pressure reducing valve of the engine crankcase ventilation…
Removal and installation the oil pump
Removal and installation the oil pressure sensor


Link to this page in different formats


Visitor comments

No comments yet


How much will 21 + 38 =


Audi A2(1999-2005) 
  • General information
  • Introduction to the guide
  • Maintenance
  • Engine 1.4 l (gasoline)
  • Engine repair
  • Lubrication system
  • Cooling system
  • Exhaust system
  • Engine 1.6 l (gasoline)
  • Engine repair
  • Lubrication system
  • Cooling system
  • Exhaust system
  • Engine 1.2 l (diesel)
  • Engine repair
  • Lubrication system
  • Cooling system
  • Injection and turbocharging
  • Engine 1.4 l (diesel)
  • Engine repair
  • Lubrication system
  • Cooling system
  • Turbocharging system
  • Supply system
  • Fuel injection system
  • Exhaust system
  • Transmission
  • Mechanical gearbox 02J
  • Mechanical gearbox 02T
  • Mechanical gearbox 085 DS
  • Chassis
  • Car suspension
  • Steering
  • Brake system
  • Body
  • Exterior
  • Interior
  • Seats
  • Doors, locks and windows
  • Safety system
  • Heating and air conditioning
  • Electrical equipment
  • Power devices
  • Equipment and devices
  • Wipers and washers
  • Lighting and lamps
  • Breakers and switches
  • Electrical circuits
 
AudiManual.ru © 2017-2026 · Mobile version · Feedback · Sitemap: EN BG BY UA RS HR RO PL SK HU · Site search · News and articles
80 B2 · 80 B3 petrol · 80 B3 · 80 B4 · 100 C3 diesel · 100 C3 petrol · 100 C3 · 100 C4 petrol · 100 C4 · A3 Type 8L · A4 B5 petrol · A4 B5 · A4 B6 petrol · A4 B6 · A4 B7 · A4 B8 · A6 C4 · A6 C5 · A6 C5 Allroad · A8 D2 · Q5 Type 8R · Q7 Typ 4L · Audi A2 ·
This site uses cookies 🍪. Click the button to accept this fact.