
Repair Chevrolet Repair Toyota Repair Honda Repair AvtoVAZ Repair Mercedes-Benz Repair BMW Repair Opel
Home  |  Contacts  |  Sitemap  |    
English Русский
Български
Беларускі
Український
Српски
Hrvatski
Română
Polski
Slovenský
Magyar
AudiManual.ru


  • AUDI 80
  • AUDI 100
  • AUDI A3
  • AUDI A4
  • AUDI A6
  • AUDI A8
  • AUDI Q
  • OTHER
  • ARTICLES
D2 (1994-2002)

Removal and installation the outer joint of the drive shaft (Audi A8 D2)

  • Home
  • Audi A8
  • D2 (1994-2002)
  • Transmission
  • Drive shafts
  • Removal and installation the outer joint of the drive shaft
            0
Secure the drive shaft in a vice with soft jaws.

Remove the clamps securing the protective cover and slide the cover from the hinge onto the drive shaft.

Thoroughly clean the inside of the joint and remove the snap ring from the inside of the joint.

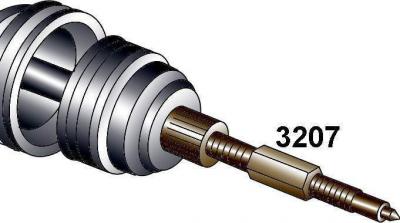
Screw special tool 3207 into the joint shaft and remove the outer joint from the drive shaft (Fig. 10-5).

Remove the snap ring, gasket and Belleville washer from the end of the drive shaft.

Fill the inner joint with grease.
Fill the inner joint with grease.


Fig. 10–5 Using Special Tool 3207 to Remove Outer Joint from Drive Shaft
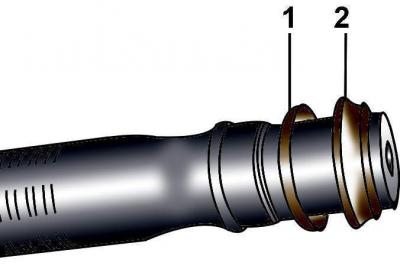

Fig. 10–5 Using Special Tool 3207 to Remove Outer Joint from Drive Shaft


Fig. 10–6. Installing the disc washer (1) and intermediate ring (2) on the drive shaft


Install a disc washer with the convex side towards the joint and an intermediate ring on the drive shaft (Fig. 10–6).


Install a new snap ring onto the drive shaft, secure the shaft in a vice with soft jaws and use a soft hammer to press the joint onto the shaft until the snap ring fits neatly into the groove on the inside of the joint.

Install the protective cover on the hinge and secure it with clamps, using a screwdriver to first lift the inner edge of the cover to equalize the air pressure under the cover.
Install the protective cover on the hinge and secure it with clamps, using a screwdriver to first…


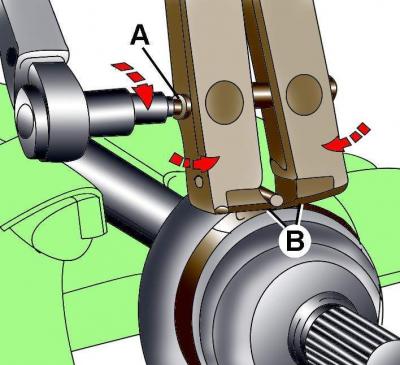
Fig. 10–7. Using a special tool to fasten the clamp: A – screw for tightening the tool jaws; B – installation of tool jaws on the clamp


To fasten the clamps, use tool 1683 (Fig. 10–7). Place the jaws of the tool on the corners of the clamp clamp and tighten the jaws with a screw in this position.
The article was checked by auto expert Nikita Rudakov
This article is available at russian, bulgarian, belarusian, ukrainian, serbian, croatian, romanian, polish, slovak, hungarian

Share information:
Previous articles
Audi A8 D2: Drive shafts
Next articles

Removal and installation the drive shaft
General information about drive shafts
Drive shaft joint sleeve


Similar articles on other Audi car models:
Removal and installation the outer joint of the wheel drive shaft Audi 80 B2 (1979-1986)
Removal and installation the outer joint of the front wheel… Audi 100 C3 (1982-1990, petrol)
Clutch and Drive Shaft Specifications Audi A3 Type 8L (1996-2003)
Drive shaft — removal and installation Audi A4 B8 (2007-2015)
Checking the drive shaft protective boot Audi A6 C5 (1997-2004)
Replacing the drive shaft ball bearing Audi Q5 Type 8R (2008-2017)
Tripod Drive Shaft (ANY) Audi A2 (1999-2005)
Link to this page in different formats


Visitor comments

No comments yet


How much will 49 + 47 =


A8(D2, 1994-2002) 
  • General information
  • User manual
  • Maintenance
  • Power unit
  • Petrol engine 2.8L
  • Petrol engine 3.7L and 4.2L
  • Diesel engine 2.5L
  • Diesel engine 3.3L
  • Ignition and injection (gasoline)
  • Fuel system (diesel)
  • Lubrication system
  • Cooling system
  • Transmission
  • Clutch
  • Car gearbox
  • Drive shafts
  • Cardan gear
  • Car suspension
  • Chassis
  • Wheels and tires
  • Steering
  • Brake system
  • Body
  • Exterior (external elements)
  • Interior (internal elements)
  • Heating and air conditioning
  • Electrical equipment
  • Fuses and relays
  • Lighting and lamps
  • Instruments and switches
 
AudiManual.ru © 2017-2026 · Mobile version · Feedback · Sitemap: EN BG BY UA RS HR RO PL SK HU · Site search · News and articles
80 B2 · 80 B3 petrol · 80 B3 · 80 B4 · 100 C3 diesel · 100 C3 petrol · 100 C3 · 100 C4 petrol · 100 C4 · A3 Type 8L · A4 B5 petrol · A4 B5 · A4 B6 petrol · A4 B6 · A4 B7 · A4 B8 · A6 C4 · A6 C5 · A6 C5 Allroad · A8 D2 · Q5 Type 8R · Q7 Typ 4L · Audi A2 ·
This site uses cookies 🍪. Click the button to accept this fact.