
Repair Chevrolet Repair Toyota Repair Honda Repair AvtoVAZ Repair Mercedes-Benz Repair BMW Repair Opel
Home  |  Contacts  |  Sitemap  |    
English Русский
Български
Беларускі
Український
Српски
Hrvatski
Română
Polski
Slovenský
Magyar
AudiManual.ru


  • AUDI 80
  • AUDI 100
  • AUDI A3
  • AUDI A4
  • AUDI A6
  • AUDI A8
  • AUDI Q
  • OTHER
  • ARTICLES
Type 8L (1996-2003)

Removal, installation and checking the horn (Audi A3 8L)

  • Home
  • Audi A3
  • Type 8L (1996-2003)
  • Electrical equipment
  • Lighting and appliances
  • Removal, installation and checking the horn
            0
Table of contents: Removal ↓ Examination ↓ Installation ↓
Behind the front bumper on the left side there is one high-pitched and one low-pitched sound signal. To protect the contacts between the power button and the signal, a relay is installed. When the signal is turned on, the relay control circuit is closed.

Removal


1. Remove the bumper, refer to the subsection Removal and installation bumpers.
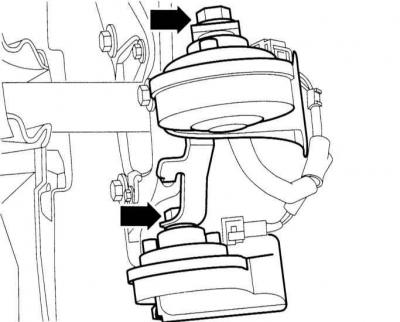
1. Remove the bumper, refer to the subsection Removal and installation bumpers.


2. Unscrew the nuts (13mm wrench) and remove the signal attachments.

3. Disconnect the connector by pressing the lock.

Examination


Connect the horn with an auxiliary wire directly to the on-board battery. In this case, connect the contact of the black/yellow cable to the positive terminal (+) of the battery, and the contact of the brown cable to the negative cable (-) of the battery. The horn should work.

Installation


1. Insert the signal attachments and secure.

2. Connect the multi-pin connector.

3. Install the bumper, refer to the subsection Removal and installation bumpers.

The original version of the article is posted on the website AUDIMANUAL.RU
The article was checked by auto expert Nikita Rudakov
This article is available at russian, bulgarian, belarusian, ukrainian, serbian, croatian, romanian, polish, slovak, hungarian

Share information:
Previous articles
Audi A3 Type 8L: Lighting and appliances
Next articles

Checking the brake light
Checking the heated rear window
Checking the windshield wiper motor
Diagnostics of faults of on-board electrical equipment — general…
Safety fuses
Fusible Links — General Information
Circuit breakers (thermal relays)
Relay — general information


Similar articles on other Audi car models:
Cooling Fan Thermal Switch — Checking, Removing and Installing Audi 80 B3 (1986-1991, petrol)
Checking the functionality of the BSC Audi 100 C3 (1982-1990, diesel)
Checking the horn Audi A4 B5 (1994-2001, petrol)
Checking the oil level and filling Audi A6 C5 (1997-2004)
Checking the exhaust system Audi A8 D2 (1994-2002)
Checking the fuel level sensor «G» Audi Q5 Type 8R (2008-2017)
Engine — Checking Oil Level Audi A2 (1999-2005)
Link to this page in different formats


Visitor comments

No comments yet


How much will 38 + 43 =


A3(8L, 1996-2003) 
  • General information
  • User manual
  • Maintenance
  • Power unit
  • Engine repair
  • Lubrication system
  • Cooling system
  • Supply system
  • Fuel injection system
  • Exhaust system
  • Ignition system
  • Transmission
  • Manual transmission
  • Automatic transmission
  • Clutch and drive shafts
  • Chassis
  • Brake system
  • Front suspension
  • Rear suspension
  • Steering
  • Body
  • Ventilation and heating
  • Exterior (external elements)
  • Interior (internal elements)
  • Doors, covers and windows
  • Electrical equipment
  • Power devices
  • Lighting and appliances
  • Electrical circuits
 
AudiManual.ru © 2017-2026 · Mobile version · Feedback · Sitemap: EN BG BY UA RS HR RO PL SK HU · Site search · News and articles
80 B2 · 80 B3 petrol · 80 B3 · 80 B4 · 100 C3 diesel · 100 C3 petrol · 100 C3 · 100 C4 petrol · 100 C4 · A3 Type 8L · A4 B5 petrol · A4 B5 · A4 B6 petrol · A4 B6 · A4 B7 · A4 B8 · A6 C4 · A6 C5 · A6 C5 Allroad · A8 D2 · Q5 Type 8R · Q7 Typ 4L · Audi A2 ·
This site uses cookies 🍪. Click the button to accept this fact.