
Table of contents: Removal the windshield wiper arms ↓ Removal the windshield wiper motor ↓ Installing a Windshield Wiper Motor ↓ Installing windshield wiper arms ↓ Checking the angle of the windshield… ↓
Removal the windshield wiper arms
Wet the windshield with water, then turn the wiper on and off until the wiper lever returns to its original position.
Remove the ground cable from the battery.
Remove the wiper blades.
Using a thin screwdriver blade, remove the cover at the base of the wiper arm.
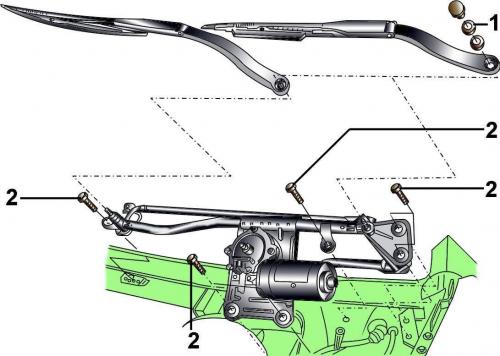
Fig. 16–76. Windscreen wiper: 1 – nut; 2 – bolt
Loosen nut 1 securing the windscreen wiper arm a few turns (Fig. 16–76).
By moving the wiper arm from side to side, loosen its fit on the axle, then unscrew the nut and remove the wiper arm.
Removal the windshield wiper motor
Remove the rubber seal from the hood trim panel.
Remove the left plastic panel from the windshield wiper motor.
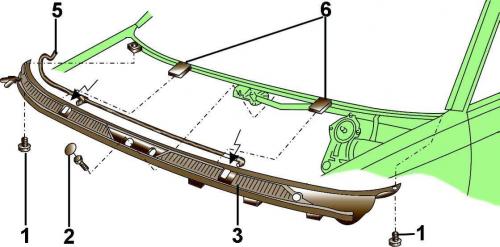
Fig. 16–77. Hood trim panel and washer nozzles: 1 – screw; 2 – bolt; 3 - hood trim panel; 4 – washer nozzles; 5 – hose; 6 – holders
Unscrew two screws 1 (Fig. 16–77) and bolt 2; pull forward and remove the hood trim panel from the two holders 6.
Disconnect hose 5 from washer nozzles 4 and remove the hood trim panel from the vehicle.
Unscrew bolts 2 (see Fig. 16–76) securing the windshield wiper mechanism.
Disconnect the electrical connector from the wiper motor.
Remove the windshield wiper mechanism from the vehicle.
Installing a Windshield Wiper Motor
When installing a new wiper motor, reset it to its original position. To do this, connect the electrical connector to the wiper motor and the ground wire to the battery. Briefly turn the wipers on and off. This will reset the wiper motor. Remove the ground wire from the battery and disconnect the electrical connector from the wiper motor.
Install the windshield wiper mechanism into place and connect the electrical connector to the wiper motor.
Secure the windshield wiper mechanism with the bolts, tightening them to a torque of 6 N·m.
Connect the hose to the washer nozzles.
Place the hood trim panel on the holders and secure it with screws and a bolt.
Install the rubber seal.
Installing windshield wiper arms
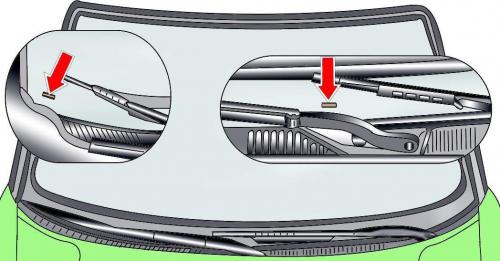
Fig. 16–78. Initial position of windshield wiper blades
Nominal values of angles, degrees:
- driver side 6
- passenger side 6
Set the windshield wiper arm so that the windshield wiper blade is positioned on the windshield mark (Fig. 16–78).
Secure the wiper arms with nuts, tightening them to a torque of 16 Nm.
Install decorative caps on the wiper arm mounting nuts.
Check the installation angle of the windshield wiper arm and adjust it if necessary.
Checking the angle of the windshield wiper arm
Warning: Check the wiper arm angle if the glass is not being cleaned properly or if the wipers are noisy.
Turn the windshield wipers on and off, the windshield wiper arms will return to their original position. Remove the windshield wiper blades.
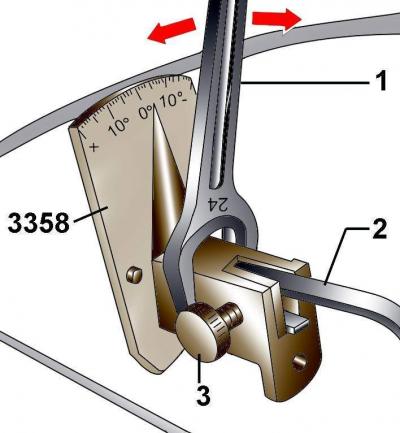
Fig. 16–79. Checking and adjusting the angle of the windshield wiper arm: 1 – spanner; 2 – windshield wiper lever; 3 – tool VW 3358
Insert windscreen wiper arm 2 (Fig. 16–79) into the HAZET 4851–1 or VW 3358 tool and secure with a bolt.
If adjustment is necessary, carefully turn the VW 3358 tool with spanner 1 until the pointer on the scale is at the required value.
Remove tool VW 3358, install and secure wiper blades.
(Material republished from the website: audimanual.ru)